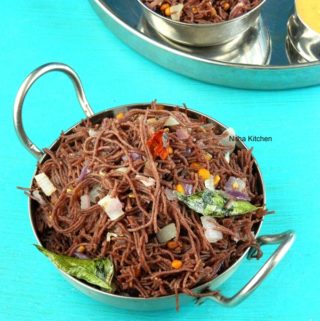
Ragi Idiyappam Sevai Recipe
Prep Time
15 mins
Cook Time
15 mins
Course:
Appetizer, Main Course, Snack
Cuisine:
Indian
Servings: 4 People
Ingredients
For Dough
- 1.5 Cup Ragi Flour
- 1-2 Cups Water Varies by method
- Salt - As Needed
- 1/2 tsp Oil
- 2 Numbers Garlic/Shallot/Red Chilli Each Optional
- 1/2 tsp Cumin seeds
For Tempering
- Prepared/Steamed Ragi Sev
- 1 Tbsp Oil - 1 Tbsp
- 1/2 Cup Chopped Onion/Shallot
- 1-2 Numbers Red Chilli or Green chilli
- 1 Sprig Curry Leaves
- 1 Tbsp Chana/Urad dhal Each
- 1 tsp Mustard Seeds
Instructions
Method I
-
Add flour in a wide mixing bowl.
-
Boil 1 Cup of water with onion/red chilli and garlic, cumin seeds and salt (Pic 1) when starts boiling, filter (Pic 2) and add it immediately to the flour.
-
The water should boil well if the filtered water is not hot enough again bring to boil.
-
Now make a well in the flour and pour the very hot/boiling water in batches (Pic 3).
-
Mix well with wooden spatula and when all flour gets the moisture, stop adding more water (Pic 4), check the below picture for the right consistency.
-
You may not need all water but depends on the boiling temp I have given extra quantity, for 1 1/2 cup of flour 3/4 Cup + 2 Tbsp of water is what I exactly used).
-
The right consistency is the flour changes color/wet enough and need be rolled together like a chapati dough (Pic 5).
-
Now when you knead with your palms it should gather well without any crack/breaks(pic 5)...
-
By this time the flour will be half cooked (Pic 1, step wise picture below) and dough should not be gooey..
-
Add .5 tsp oil, You can rest the dough or press it when they are warm (easy to press) , either way works...
-
Please check the NOTE section for more details.
Method II
-
Mix flour and 2 cups of water without lumps.
-
Now bring to boil with little salt and cumin powder (and not seeds) if desired.
-
Keep stirring and when all moisture goes off , then remove from heat.
-
You can add few drops of oil (1/2tsp) right now...
-
This method is like preparing kozhukattai/modak outer layer.
-
The prepared dough should be stiff and not gooey.
Idiyappam Preparation
-
When dough cooled down, use sev press and press in circular motion over the idli plate Pic 7 above.
-
Use cloth or grease the idli plates with little oil or use idiyappam maker shown in Pic 7, 8 , 9 & 10.
-
Add necessary water to the idli pan and steam this pressed ragi idiyappam for 3-5 mins (Pic 9 & 10), this cooks soon mine took only 3 mins, but depends on the utensil make the time varies.
-
Once its done it changes to nice brown color and no pale uncooked ragi flour should be there.
-
Let them cool and apply oil to hands and gently split it randomly.
-
Make tadka with mustard seeds, curry leaves, chana and urad dal, onion, chilis (refer video).
-
Switch off the flame, add prepared steamed idiyappam, salt and gently mix it (refer notes for tips) with the pan heat.
-
Serve hot with chutneys like shown in video or plain.
Recipe Notes
- If the dough is not stiff do cook over stove till the moisture evaporates and become stiff.
- If it breaks then it could because of either not used boiling water to mix or lack of water in the dough.
- You can grease the idiyappam press with oil for easy handling.
- I used pure home ground Millet flour alone but beginners can add of small portion of rice flour to get stiff idiyappam.
- If using whole grain then to powder do follow procedure as I did in kambu sevai recipe.
- Split the idiyappam when it's completely cooled when you rush while it's hot then there is chance to stick together.
- Also while tempering/ seasoning except prepared idiyappam do add rest of the ingredients and after removing from flame can gently mix the prepared sevai.
- This prevents too much breaking the homemade healthy idiyappam.
If you are not sure about gently mixing it. Instead of stirring do flip the ingredients in the pan like we do for fried rice 😊.