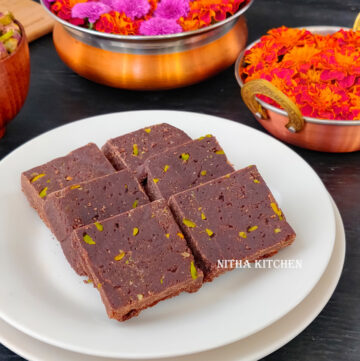
Millet Chocolate Burfi Recipe
Prep Time
5 mins
Cook Time
20 mins
Course:
Dessert, sweets
Cuisine:
Indian
Servings: 6 Pieces
Ingredients
- 3/4 Cup Ragi Flour (replace 1/4 cup with milk powder, optional)
- 1/2-3/4 Cup Raw Cane Sugar
- 1/3 Cup Water
- 1 Tbsp Cocoa Powder OR Bournvita - 2 Tbsp
- 3 Tbsp Ghee
- Slivered Pistachios - To Decorate
Instructions
-
Prepare the tray by adding just oil/ghee or parchment paper.
-
Sprinkle slivered pistachios over it as shown in Pic 1.
-
Add sugar and water in a sauce pan (Pic 2).
-
Boil in medium flame until the sugar dissolves (Pic 3).
-
When the syrup changes to clear texture (Pic 3) do start checking for the consistency.
-
Check what happens with imperfect sugar consistency in "Variations & Tips" section.
-
To check the consistency, hold a drop of syrup and stretch in between your fingers.
-
If it stretches well like shown in video at or Picture 4 above do stop boiling the syrup.
-
If it breaks while stretching then continue boiling the syrup for couple of seconds and do keep checking the consistency often.
-
Once the syrup is done keep aside.
-
Dry roast the ragi flour in a pan for 5-7 minutes in low flame or until raw smell disappears (Pic 5).
-
Add 2 tbsp ghee to the dry roasted ragi flour (Pic 6) and keep roasting in low flame for 5 more minutes (Pic 7).
-
The smell of ghee roasted ragi is divine.
-
By this time prepared syrup will be not so hot, so boil less than a minute to rolling boil and pour over the roasted ragi flour (Pic 8).
-
Add milk powder if using right now.
-
As I mentioned earlier and in video I added the syrup in three batches , either you can pour in a single stretch or in batches to limit sugar as desired.
-
Mix the syrup well with the flour quickly and switch off the flame.
-
Add the cocoa powder (check "variations & tips" section), remaining ghee (Pic 9) and now the mixture looks glossy (Pic 10).
-
Check perfect burfi texture in Picture 11 above.
-
It dries out soon so immediately drop them in the prepared pan and press the top evenly (Pic 12).
-
Let it cool in room temperature and once cooled remove from the tray / parchment paper (Pic 13).
-
Then cut it in to 6 squares (Pic 14 & 15), by this time outer layer is crisp and it turns soft the next day.
-
Store it in air tight container for later use.
-
I used a 6 inch length and 4 inch wide tray so each piece is 2X2 in squares (Pic 16).