• Skip to primary navigation
  • Skip to main content
  • Skip to primary sidebar
  • Skip to footer
Nitha Kitchen
  • Home
  • Recipe Index
  • Video Recipes
  • DIY & How-To’s
    • Homemade
    • Gardening
    • Kitchen Basics
  • About the Author
  • Navigation Menu: Social Icons

You are here: Home / Gardening / How to make Raised Garden Bed in Slope Area | Step By Step Idea for Beginners in Gardening

How to make Raised Garden Bed in Slope Area | Step By Step Idea for Beginners in Gardening

March 28, 2018 By Sangeetha Priya 1 Comment

Some unused area in our backyard (shown below) has been taken care to yield organic veggies from last year. Still few more works are pending and planning to make it this year, so I will update this post with more pictures and information in near future and If you like this post do hit like, share with friends and bookmark for future use. We were thinking to make that slope useful and effective from the day we got the house. After installing fence and a year after the closing we made the raised garden beds with the help of  H’s office colleagues, a special thanks to them otherwise it couldn’t be happened in right time.

After this two 4X4 feet garden beds (shown in first picture above) we both of us made a garden bed of 4X4 again by our self, you can see it in last few pictures. So below is the unused area of almost 20 feet length and 10 feet width. Today I am sharing the pictures and ideas collected from our garden bed installation. Feel free to comment or mail for your doubts.

Before going to detailed post lets see how the square box for the garden has been done. We left some space in the deep slope down (not to touch neighbor fence) and started right after our grass bed. Also left some space (2 feet) in the side to go and take care of plants so plan and leave some space all over the bed.

Materials Needed For Making the Raised Garden Bed

The 8X2 feet untreated woods – You can cut them at Home depot/Lowe’s to 4X4 and bring it home, but if you have tools you can cut them at home (for the first two beds they did cutting in front of the house)
Supporting Sticks – It comes in a pack of 6, will add more pictures soon.
Construction Screws – Long Screws to drill
Drainage Rocks
Garden Soil
Top Soil
Compost
Drilling Machine
Fabric Sheet to control weeds
Eye protecting glasses while drilling
Garden gloves to work on

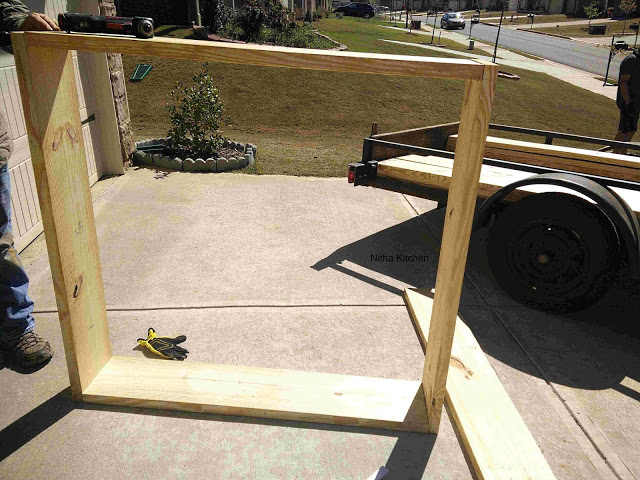
They cut them in to two planks each and drilled to make 4X4 perfect square box.

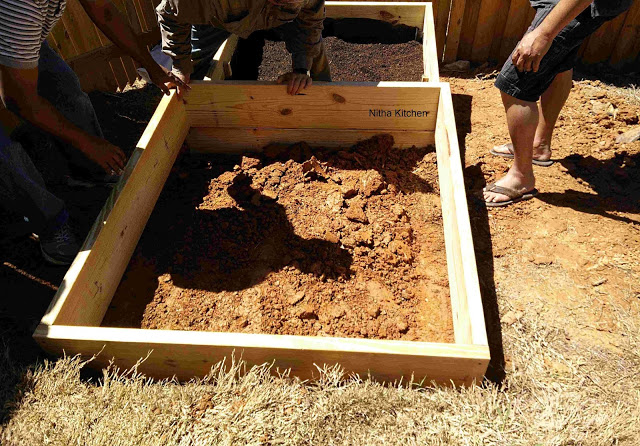
You have to dig a bit to place them perfectly. This is the main thing in the slope gardening. So use dummy planks as a leveler and start digging three sides. The deep slope needs a slight dig mark and not much.

and it continues in the below picture as well.

Before placing the square box in the slope they added a one side support/base to the extreme slope so that it levels up. This is the second main thing to note. Do check it out in the below picture.

Once done with support board, place the square bed and connect them both with support sticks( need to drill here with construction screws). So for the bottom garden bed we added two layers/rows of  4X4 box, like shown below. Also can you see the supporting sticks at the corner of two row beds it was implemented all over the inner sides of bed to make sure it aligns with the other bed properly.

Raised Garden Bed Filling / Soil Composition

After placing the beds and drilling, add the fabric sheet so to prevent weeds from the ground. And then add the drainage rocks (they are heavy in weight) and we added rocks to fill 2 inch height (almost covered the first box).

Later add the garden soil for 4X4X2 size box we added 6-7 bags I believe.

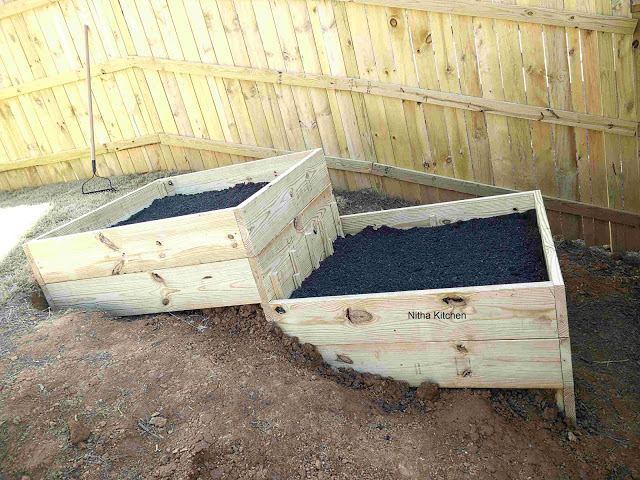
Add compost to it, mix it up. Later add top soil on top. So the first bed is ready, now they started working on the second most thing. Same 2 rows of 4X4X2 box and here no extra wooden plank support is needed like they did in the deep slope.

In the above picture placing the First box for the second 4X4X2 bed…

Fixed the Second box in the below picture, added support sticks then filled with soil…make sure to add support sticks after placing the second one and drill at more places so they won’t move out of alignment.

Top soil

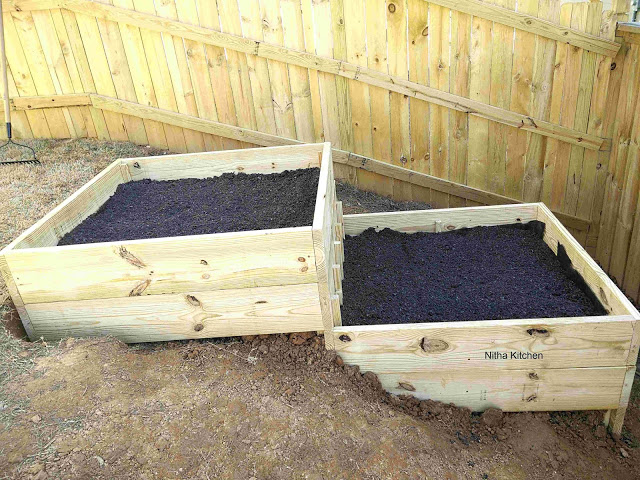
The final outcome 🙂 notice those supporting sticks placed between first and second bed.

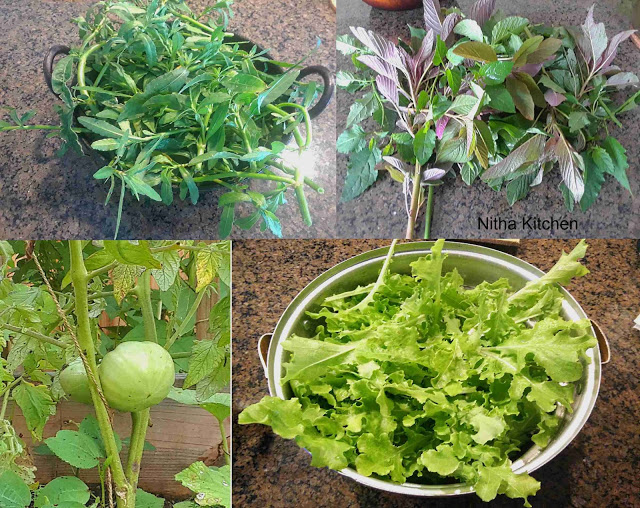
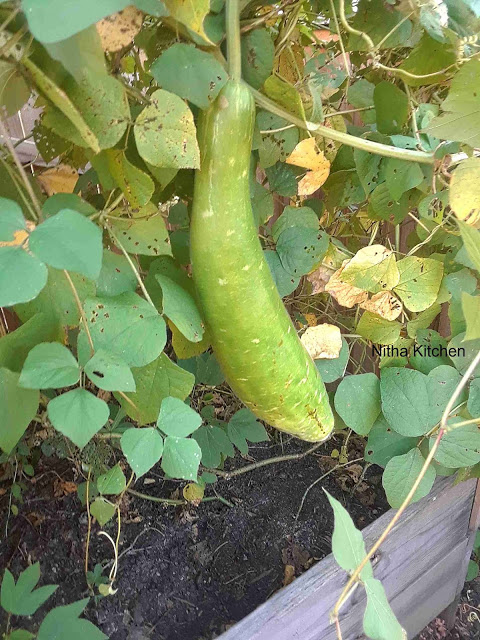
Now what :-), have got reasonable yields in my first garden experience. This year just started something indoor. And few pictures below are the yields I got last year. Yup I started everything from seed and even lettuce :-).

Later we made the third bed, here is the picture of it.

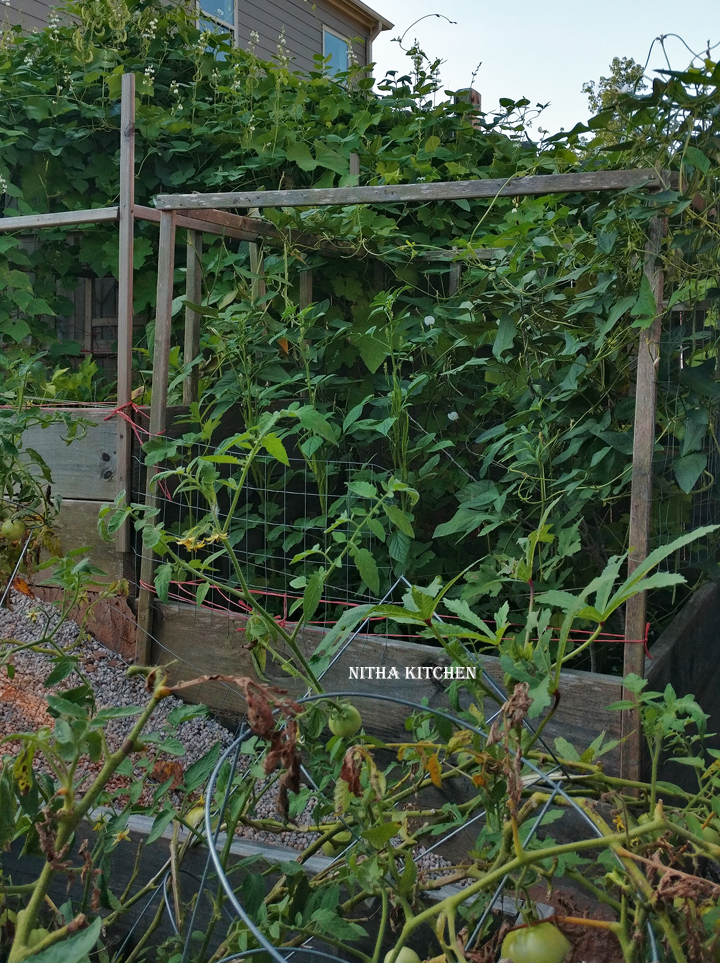
We added some trellis and this model we got it from google images (the trellis sticks are just for $10 for each bed excluding screws).

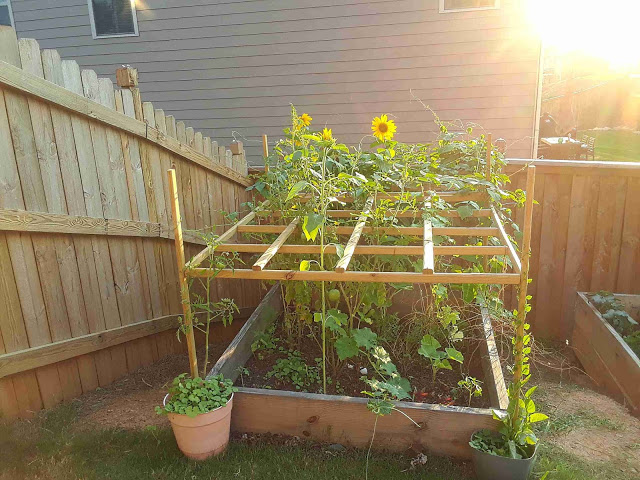
First covered one bed later for the second one too…can you see the slight visible third garden bed on your right?

Last year I got more yields of south Indian greens, bottle gourd and avarakkai (chikkudu) and okra too. This year planning to add more tomato, capsicum and as usual keerai varieties.
Grandma and grand children separating the avara kottai/ beans from the matured one. Feel free to comment or mail your doubts. This post is our reference for future beds as well. So bookmark this post, do share it with your friends, keep watching it for more updates coming soon 🙂 Thank you.

The first garden bed after 4 years in the above picture which was fully covered by creeper plants

Post You May Like:

Aval Verkadalai Jaggery Laddu Poha Peanut Ladoo
Vanilla Custard Ice Cream with Fresh Cherries and Hint of Chocolate
How to make Animal Fondants for Jungle Theme Cake | Marshmallow Fondant Figures

Filed Under: Gardening Tagged With: detailed pictorial post for slope garden bed, Garden Basics, Gardening, How to make Raised Garden Bed in Slope Area, how to make wooden bed to plant veggies, learn to make garden bed for vegetable and flower, Nitha Kitchen, step by step garden making process, Step By Step Post for Beginners in Gardening, wooden box garden bed

Archives

Previous Post: « Kale Stir Fry | Keerai Paruppu Poriyal
Next Post: Mango Peda Recipe Aam Pedha Recipe »

Reader Interactions

Comments

  1. lija outlaw

    April 2, 2018 at 8:41 am

    Posts shared useful information and meaningful life, I'm glad to be reading this article and hope to soon learn the next article.
    Avriq India
    http://www.avriq.com

    Reply

Leave a Reply Cancel reply

Your email address will not be published. Required fields are marked *

Recipe Rating


Primary Sidebar

Categories

Follow us :-)

Nitha's Kitchen

Random Posts

traditional karupatti pongal video recipe, கருப்பட்டி பொங்கல் காஸ் அடுப்பில் செய்வது எப்படி,

Karupatti Pongal Traditional Sweet Pongal Video Recipe

Chocolate Fudge Cake Recipe

Kongunadu Uppu Paruppu Recipe

Thenum Thinai Maavum Thinai Urundai Millet Honey Balls

Rasgulla Recipe From Scratch

Eggless Moist Chocolate Brownies | Classic Chocolate Chip Brownies Recipe

Spicy Garlic Chicken Fried Rice | One Pot Meal Recipe

nithakitchen

Sangeetha Priya
Recently we celebrated Diwali cum our family's fir Recently we celebrated Diwali cum our family's first teen birthday with her favorite 13 snacks as listed below. All are homemade and tried few new snacks this year
...
..
.
🪔 Almond Burfi

🪔 Bournvita Burfi 

🪔 Gulab Jamun

🪔 Jhangri

🪔 Kaju Katli

🪔 Karupatti Mysore Pak

🪔 Khaja

🪔 Moth Namkeen (mixture with sev)

🪔 Nattu Sakkarai Adhirasam

🪔 Pasiparuppu Murukku 

🪔 Peanut Burfi 

🪔 Thenkuzhal

🪔 Thattu Vadai (Thattai)

 
https://www.nithaskitchen.com/category/indian-recipes/diwali or use search for particular recipe https://www.nithaskitchen.com

#nithakitchen #firstteeninthehouse #teenbirthday #diwalisweets #diwalisnacks #deepavali #sharingwithlove  #diwalitreat #palaharam #festivaloflights #diwali #birthdayspread #homemade #thenkuzhal #adhirasam #athirasam #diwali2022 #deepavalipalaharam #deepavali2022 #murukku #nithakitchenrecipes #minibakeryathome #walkwithindia  #chocolateburfi  @walkwithindia @walkwithchennai #deepavalisnacks #thattai #thattuvadai #burfi #namkeen
Gulab Jamun Cheesecake aka Rose/Gulkand and Carda Gulab Jamun Cheesecake  aka Rose/Gulkand and Cardamom flavored Cheesecake From scratch with two versions. 
https://www.nithaskitchen.com/2020/11/gulab-jamun-cheesecake.html
Follow @nithakitchen for more recipes
...
..
.
#nithakitchen #jamuncheesecake #gulabjamuncheesecake #fusioncheesecake #cheesecake #egglessgulabjamuncheesecake #egglessbaking #egglesscheesecake #eggfreebaking #nithakitchenrecipes #diwali #gulkandcheesecake #homemade #rosecheesecale #cardamomcheesecake #jamunstuffedcheesecake #egglessbakes #nofondantcake #nobuttercream #nithakitchencakes #homebaker #bakedwithlove #walkwithindia #bakersofinstagram  #cheesecakerecipe #gulabjamun #gulabjamuncake #rosecheesecake #cardamomcheesecake
@walkwithindia @walkwithchennai
#worldidliday can't be better than these ☺️. M #worldidliday can't be better than these ☺️. My contribution for annual #idli day.

Recipe @nithakitchen
...
..
.
#nithakitchen #walkwithindia #walkwithchennai #foodbossindia #foodblogger #nammaidli #universeidli #chennaidiaries #chennaimemories #bbcgoodfood #ndtvfood #onthetable #idli #instafood #foodieofchennai #atlantafoodblogger #nammabengaluru #karnatakadiaries #breakfast #tiffin #morningfood  #indianfood #southindianfood #huffposttaste #vegan #indianinusa #idlichutney #idlisambar #idlichutney #bengalurudiaries
Happy Deepavali 🎇 🪔🎉😊 . Here is a glim Happy Deepavali 🎇 🪔🎉😊 . Here is a glimpse of Diwali preparation from my side. Another big day is coming soon for us will update more in the next post
...
..
.
🪔 Adhirasam

🪔 Bournvita Burfi 

🪔 Thenkuzhal

🪔 Thattu Vadai (Thattai)

🪔 Coconut Bun/ Thengaai Bun

https://www.nithaskitchen.com/category/indian-recipes/diwali or use search for particular recipe https://www.nithaskitchen.com

#nithakitchen #diwalisweets #diwalisnacks #deepavali #sharingwithlove  #diwalitreat #palaharam #festivaloflights #diwali #birthdayspread #homemade #thenkuzhal #adhirasam #athirasam #diwali2022 #deepavalipalaharam #deepavali2022 #murukku #nithakitchenrecipes #minibakeryathome #walkwithindia  #chocolateburfi  @walkwithindia @walkwithchennai #deepavalisnacks #tamilyshares #deepavali2022🎉 #thattai #thattuvadai #thengaibun #coconutbun #burfi
Follow on Instagram

Trending Now

  • Chana Dal Burfi Recipe
  • Bananas in Coconut Milk | Gluoy Bwod Chee Recipe | Popular Thai Dessert
  • Fish Dum Biryani | Meen Biriyani | Machli Ki Biryani in Oven
  • Arisi Thengai Paal Payasam | Coconut Milk Kheer | Traditional South Indian Recipe
  • Spinach Fatayer | Baked Savory Veg Pie Recipe | Middle East Bakes

Archives

Vegetarian Curry/ Lentil Recipes

Chettinad Pakoda Kuzhambu Recipe | Vegetarian Lentil and Coconut Based Curry

Kollu Kulambu Horse Gram Sprouts Gravy | முளை கட்டிய கொள்ளு குழம்பு

See More;

Latest Pins!

Millet Recipes

Ragi Pakoda Finger Millet Pakora

Ragi Pakoda Pakora Video recipre

Ragi Pakoda Pakora , The color may be dark brown but very crispy and perfect tea time snack which can be prepared in jiffy. I assure it ...

Read More

For More Posts -->

Appetizer and Snacks

instant aval vadai poha vada video recipe

Instant Aval Vadai Red Poha Vada Video Recipe

Thengaai Paal Murukku Recipe

Thengai Paal Murukku Instant Coconut Milk Chakli

See More;

Footer

my foodgawker gallery

Copyright© 2023 Nitha Kitchen All Rights Reserved