
Today I am here with this month Swathi’s baking group partner challenge. Though I am not feeling well, I already planned to bake one veg n non veg pie recipes, noted the recipes clearly so I am able to bake 2 pies at a time 2day. Thanks Swathi l 3sidesofcrazy, Gayathri of Gayathri’s cookspot, Samanta of Samanthamenzies for suggesting this wonderful recipe. The orange juice added in the crust gives good color n flavor to the pie. When it’s too good my daughter certified it as ‘YUMMY’ and I got her appreciation today. I don’t have much bright light in indoor so I am not satisfied with the clicks ;:-( but this is the wonderful crisp n delicious recipe I would say. Now move on to the recipe.
Ingredients
APF/Maida – 2 and 3/4 Cups
Vegetable Shortening – 8 Tbsp (Or Replace with butter see NOTE 1)
Butter – 2 Tbsp
Orange Juice – 4 Tbsp (or Replace with Cold Water)
Cold Water – 5 Tbsp
Salt – 1/2tsp
Method
- If using homemade orange juice prepare and chill it, make sure to chill the water in freezer or use ice cubes.
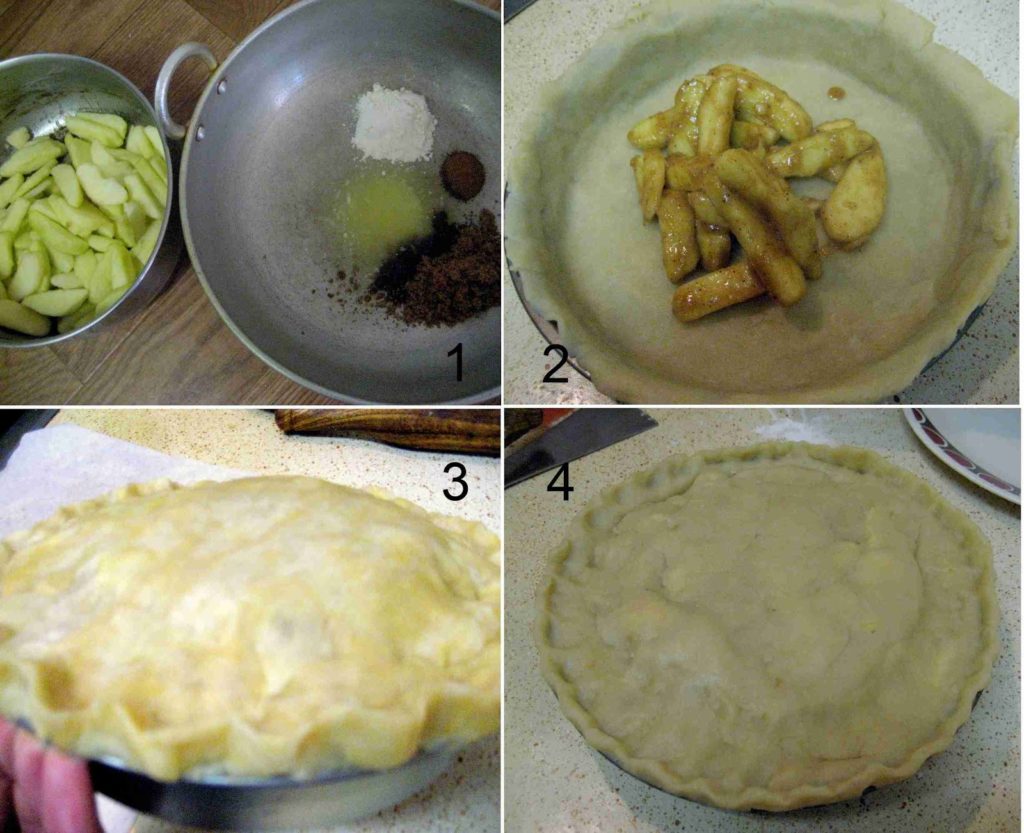
- Mix salt with flour , cut the very cold butter and shortening, mix with flour(Pic 1).
- Use fork and rub it crumbly.
- Now add tbsp of juice at a time and keep on mixing with fork.
- Once done with juice, start adding 1 tbsp of cold water at a time (Pic 2).
- When you try to make balls from the crumbled mixture it should happen with cracks otherwise continue adding cold water (Pic 3).
- I have used 5 Tbsp of water and other ingredients are also exact measurements.
- Now divide the gathered dough in to 2 with one bit larger than another (Pic 4).

- Flat the balls separately in plastic wrap, if breaks adjust it and seal the wrap (In below Pic 1).
- Refrigerate both the dough for at least 1 hour.
- Meanwhile prepare the filling for pie.
For filling
Granny Smith Apples – 5 Numbers (I used halve red delicious and half Granny smith)
Cinnamon and Cloves Powder – 1 Tbsp
Brown Sugar – 1/4 – 1/2 Cup
APF/Maida – 2 Tbsp
Lemon Juice – 1 /2 Tbsp
Butter – 1 Tbsp (Optional)
- Peel the apples, slice medium thickness and mix with lemon juice to prevent oxidizing.
- In a pan melt butter, add cinnamon and cloves powder, brown sugar and flour.
- When cooled down add the sliced apples.
- Mix everything well and keep it in room temp till the dough sets.
How to Roll the Pie Crust and Fill with Apple mixture
- After 1 hour, in between two parchment/wax papers roll the prepared pie dough.
- The edges may leave cracks, fix it with your hands and continue rolling (Pic 2).
- Just invert the pan (I used cake pan) over the dough and make sure you have rolled evenly all over.
- You may notice butter/shortening (fat) in white tiny spots all over the, if you see than the crust is perfect.
- Use the rolling pin, wrap the rolled dough and drop gently over pan (Pic 3).
- Adjust the inner corners (Pic 4) and prick with fork.

- Again chill the dough along with pan for couple of minutes before adding the filling.
- Meanwhile start rolling another left over dough to cover the top.
- Roll it and chill it for few mins.
- Now take the pan out from refrigerator and add the filling.
- You can see lot of water/juice from the apple mixture/filling.
- So filter and add only the apples and even the top layer with your hand/Spatula (Pic 2).
- Heat the juice left from pie filling mixture for 2 mins or till it becomes thick like jam consistency.
- Now pour this over the apple filling (should not be hot while adding).
- Take another rolled pie from refrigerator and cover it (Pic 3).
- Make designs as you like over the corner and center, make some big slits for the air bubbles to release (Pic 4).
- Now freeze the dough for at least 5mins before baking.
- The dough should be hard before going in to the oven otherwise the sides melt soon.
- Bake at 400° F for first 10 mins, after that the sides turn light dark brown, to prevent over darkening cover the sides with aluminum foil.
- If you have any left over dough make shapes freeze for while and decorate it at this point.
- Now again start baking at 350° F for another 40 mins or till you see bubbles at the center.
- Cool it for 1-2 hrs before you serve.
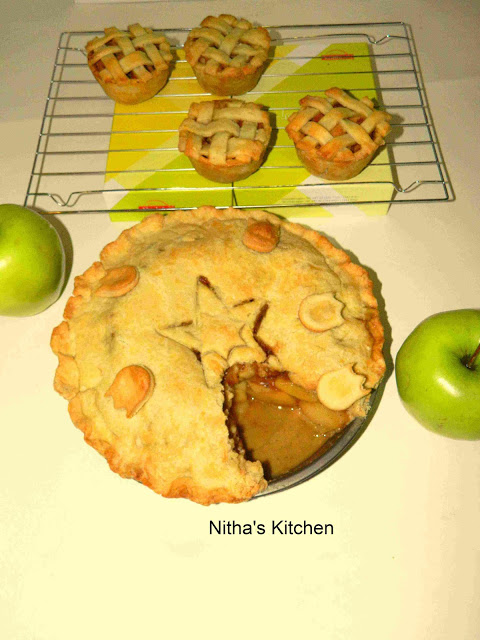
THE MINI PIES I SHOWED HERE AT THE BACK IS CHICKEN MINI PIES USING LIGHT PIE CRUST CLICK HERE FOR THE RECIPE.
Note:
- I don’t have Crisco shortening sticks so I measured the shortening in TBSP and kept in freezer for 15mins before adding in to the flour/salt mixture.
lovely pie, love your mini versions too.
very very nice – the pics are all so colorful and ur pies have turned out well !
Lovely pies! Love the mini ones 🙂 perfectly done!
scrumptious and yummy looking pie, love your step wise clicks too..,
Delicious apple pie, you did very Sangeetha, if your daughter approves then it is super tasty sure.
Perfectly done apple pie! It looks super yummy!
Pie looks perfect and awesome…
looks so gorgeous.
Apple pie looks delicious, well baked. Glad to meet you through baking partners 🙂 following you, pls visit my space and follow as well to be connected.
Looking so good dear,perfect and yummy pie
apple pie is our family fav but haven't tried it so far…yours looks so delicious n tempting sangee…u have made it so perfectly…great job! love ur perfection 🙂
beautiful pie looks absolutely yummy..
Pie looks perfect, Sangee.. You have made it very well..
Looks absolutely yumm.love ur pic.
wow..amazing and perfectly made apple pie !!
OMG, I'm drooling looking at apple pie in so many friends' blog….
wow this looks so good dear 🙂 amazing pie
Wow! Looks Yum..Is this apple pie season..?
Delicious pie!! Looks yummy!!
Spill the Spices
Looks so perfect… Would love a slice
Do you remember i told that you will be making a beautiful apple pie much more better than me, see you proved it sis, Such a beautiful pie..
Thks sis for ur wonderful compliment 🙂 n thks all for ur appreciations!!!