• Skip to primary navigation
  • Skip to main content
  • Skip to primary sidebar
  • Skip to footer
Nitha Kitchen
  • Home
  • Recipe Index
  • Video Recipes
  • DIY & How-To’s
    • Homemade
    • Gardening
    • Kitchen Basics
  • About the Author
  • Navigation Menu: Social Icons

You are here: Home / School Lunch Box Ideas / Bread Varieties / Handmade Basic White Bread | Hokkaido Milk Bread with Tangzhong Method

Handmade Basic White Bread | Hokkaido Milk Bread with Tangzhong Method

February 25, 2014 By Sangeetha Priya 17 Comments

I am a member of We Knead to Bake(WNTB), a wonderful bread baking group which I joined recently. For this month challenge Aparna has suggested to choose any of her bread recipe or our own. Since Basic White Bread was in my dream for a quite long time, I choose this soft pillow like milk bread recipe. Though I kneaded the bread dough with my hands I got the perfection, so you too can follow the same procedure or use food processor. Also as usual I have given alternate for few ingredients , do read the recipe in detail to make it perfect…

Yields :- One Loaf (9” by 5” tin), 2 Small Loaves (6” by 4” tins) or 1 Small Loaf (6” by 4”) and 6 Small Rolls (Muffin Tins). Depending on what you are making, divide your dough. If you are making 1 loaf, divide your dough in 3 equal pieces. If you are making two smaller loaves, divide your dough into 6 equal pieces.

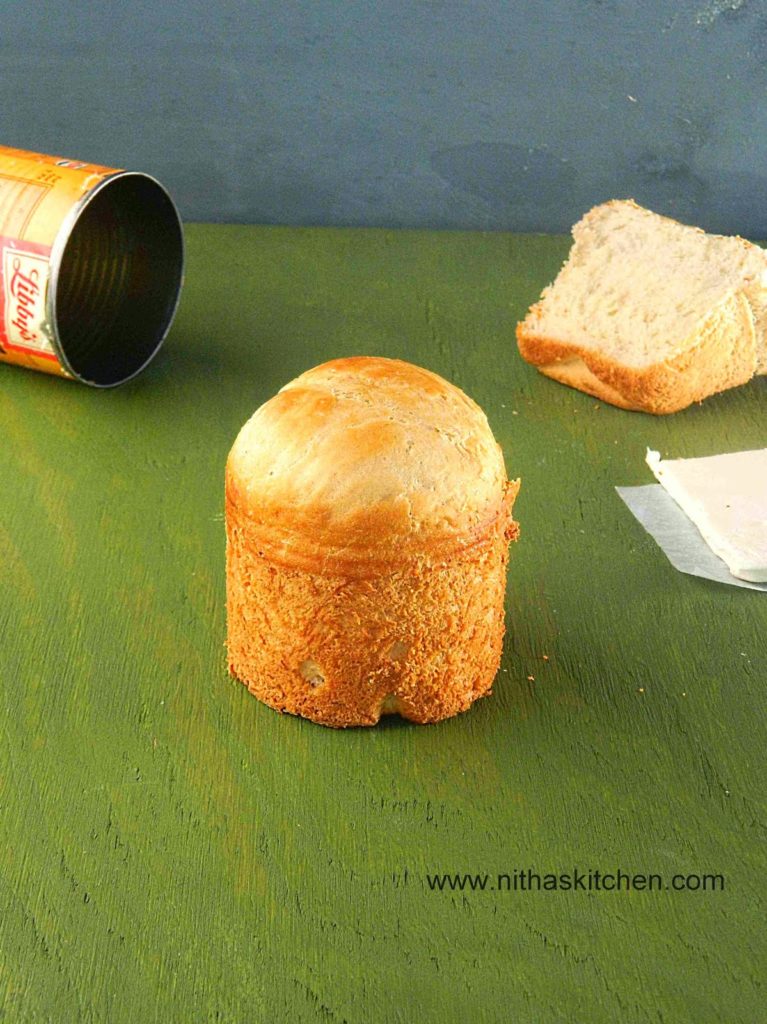
* MilkPowder and Cream/Condensed Milk mentioned here in the ingredient list are optional, I made the big loaf using regular milk, another day I used cream and milk powder to make small loaf and round bun in can/tin (the idea i got from WNTB members, shown in pic below), I couldn’t find any big difference in texture, so use the ingredients as per availability.

Recipe Source :- Kirbie

Ingredients

For The Tangzhong (Flour-Water Roux)
All-Purpose Flour – 2 n 3/4 Tbsp
Water –  1/4 Cup
Milk – 1/4 Cup

For The Dough
All Purpose Flour –  2n1/2 Cups
Tangzhong –  1/3 Cup (use all the above prepared tangzhong)
Milk (and a little more if needed) – 1/2 Cup
Instant Dried Yeast – 2tsp
Sugar – 3 Tbsp
Unsalted butter – 25gm/2 Tbsp (cut into small pieces, softened at room temperature)
Powdered Milk – 2 Tbsp (Optional can alternate with Regular Milk)
Cream (25% fat) – 1/8 Cup (Alternate with Condensed Milk or Regular Milk)
Salt – 1/2tsp

Method

The Tangzhong  (Flour-Water Roux)

  • Whisk together lightly the flour, water and milk in a saucepan until smooth and there are no lumps.
  • Place the saucepan on the stove, and over medium heat, let the roux cook till it starts thickening.
  • Keep stirring/ whisking constantly so no lumps form and the roux is smooth.
  • If you have a thermometer, cook the roux/ tangzhong till it reaches 65C (150F) and take it off the heat.
  • If you don’t have a thermometer, then watch the roux/ tangzhong until you start seeing “lines” forming in the roux/ tangzhong as you whisk/ stir it.
  • Check the picture here for the tangzhong consistency.
  • Take the pan off the heat at this point, Let the roux/ tangzhong cool completely and rest for about 2 to 3 hours at least.
  • It will have the consistency of a soft and creamy.
  • If not using immediately, transfer the roux to a bowl and cover using plastic wrap.
  • It can be stored in the fridge for about a day. Discard the tangzhong after that.

The Bread Dough

  • I made this dough using my hands, just pulsed the dry ingredients in mixie/blender for few secs. If you have food processor then go ahead.
  • This dough is a bit sticky, can take some time and effort to knead by hand.
  • Do not add more flour to make it less sticky either.
  • Put the flour, salt, sugar, powdered milk and instant yeast in the processor bowl and pulse a couple of times to mix.
  • In another small bowl mix the milk, cream and Tangzhong till smooth(Pic 1) and add the flour mixture(Pic 1) until the dough comes together.
  • Now add the butter(Pic 2) and knead till you have a smooth and elastic dough(approx 7-10 minutes) which is just short of sticky.
  • The dough will start out sticky but kneading will make it smooth (Pic 3).
  • If the dough feels firm and not soft to touch, add a couple of teaspoons of milk till it becomes soft and elastic.
  • When the dough is done, you should be able to stretch the dough without it breaking right away (check the picture here). When it does break, the break should be form a circle.
  • Form the dough into a ball and place it in a well-oiled bowl turning it so it is well coated.
  • Cover with a towel, and let the dough rise for about 45 minutes or till almost double in volume(Pic 4).
  • Place the dough on your working surface, You don’t need flour to work or shape this dough.

How to Roll the Bread Dough

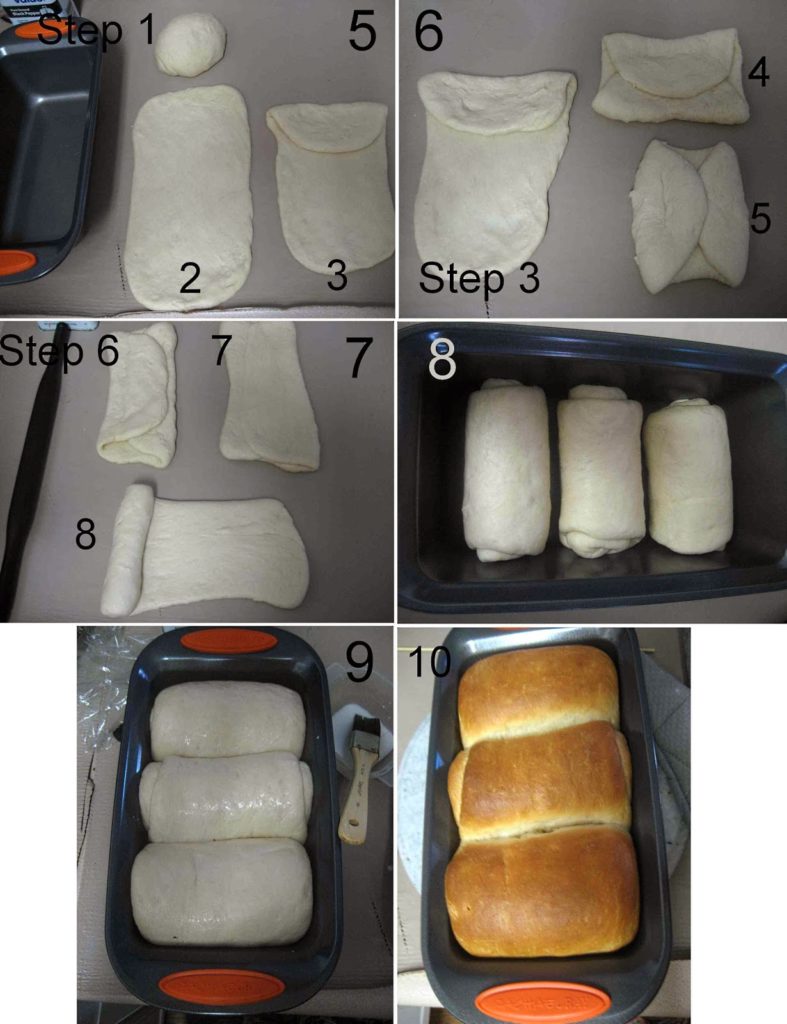
  • Divide in to 3 or 6 parts (Pic 5, Step 1)) n roll out each portion of the dough with a rolling pin into an oval shape (Pic 5, Step 2) , about 1/8” thick.
  • Take one end of the dough from the shorter side of the oval and fold it to the middle of the oval(Pic 5, Step 3).
  • Take the other end and fold so it slightly overlaps the other fold (Pic 6, Step 4).
  • Rotate 90 (Pic 6, Step 5) n roll this folded dough with the rolling pin(Pic 7, Step 6) so the unfolded edges are stretched out to form a rectangle (Pic 7, Step 7).
  • Roll the rectangle from one short edge to the other(Pic 7, Step 8), pinching the edges to seal well.
  • Do this with each of the three larger pieces and place them(Pic 8), sealed edges down, in a well-oiled loaf tin.
  • Cover with a towel and leave the dough to rise for about 45 minutes (Pic 9).
  • Carefully brush the tops of the loaf with milk (or cream), I usually brush 2-3 times, starting after 30 minutes of second proof.
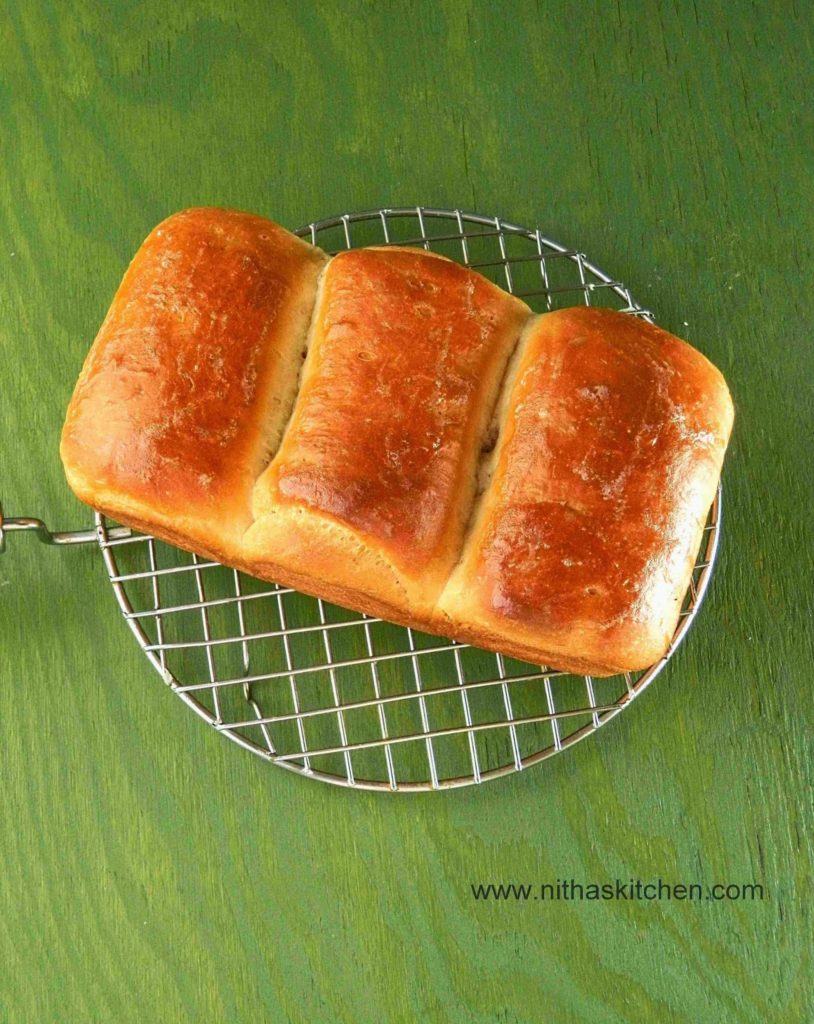
  • Bake them at 170C (325F) for about 20 to 30 minutes till they are done (if you tap them they’ll sound hollow) and beautifully browned on top (Pic 10).
  • Apply butter immediately when it is out form oven, Let them cool in the tins for about 5 minutes and then unmould and transfer to a rack till slightly warm or cool.
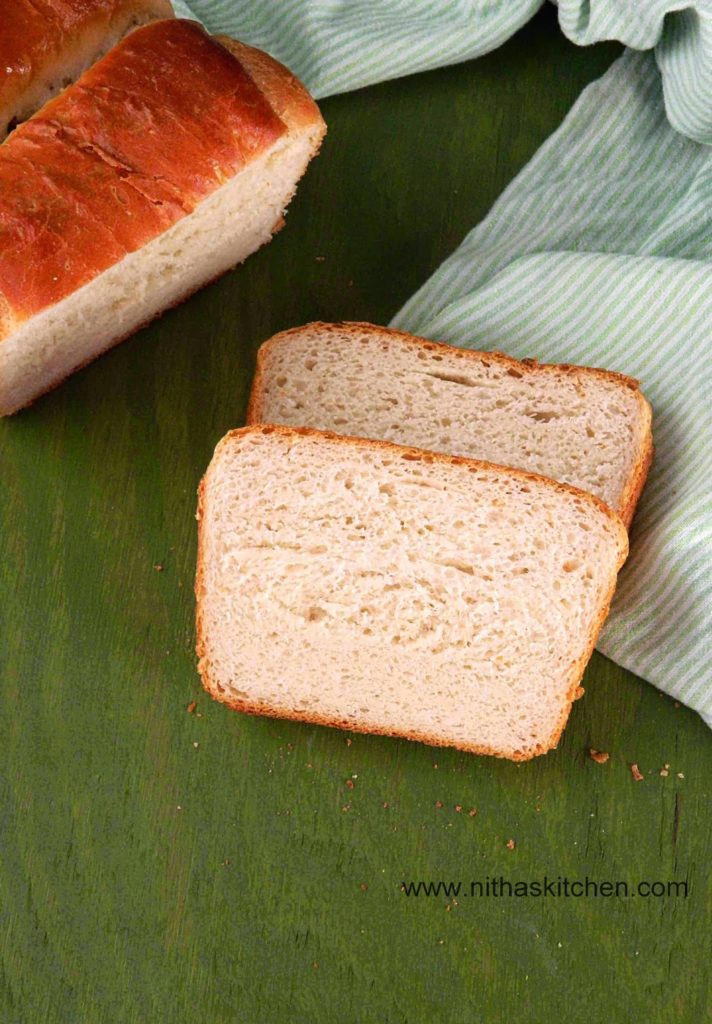
  • Serve or else store in a bread bin. This bread stays soft and delicious even the next day.
  • Bread goes plain as it is with cream cheese spread or toast as you like.

Post You May Like:

Checker Board Cake with Chocolate and Yellow Cakes
Kollu Paruppu Masiyal Horse Gram Chutney Recipe
French Macaron | Macaron Recipe for Beginners with Troubleshooting Tips

Filed Under: Bread Varieties, Breads, Buns and Donuts, Christmas recipe, Kids and Infant Corner, Thanksgiving Holiday Bakes Tagged With: bakery style bread using roux or tangzhong method, Baking n Biting, beginners recipe, Egg free Hokkaido milk buns, Eggless Baking, eggless egg free hand made Hokkaido bread recipe, how to get brown top on breads without egg wash, how to make bread at home, how to make soft and pillow like milk bread, Lunch Box Specials, Nitha Kitchen, step by step basic white bread recipe

Archives

Previous Post: « Chicken Fried Rice Using Homemade Peri Peri Sauce
Next Post: Vazhaithandu Poriyal | Banana Stem Stir Fry | வாழைத்தண்டு பொரியல் »

Reader Interactions

Comments

  1. Priya Suresh

    February 27, 2014 at 9:09 pm

    Hokkaido bread is always my fav, they came out simply awesome Sis.

    Reply
  2. Manju @ Manjus Eating Delights

    February 27, 2014 at 6:08 pm

    I'm yet to try this Hokaido bread technique but I've seen its perfect. The bread looks awesome!

    Reply
  3. Swathi Iyer

    February 27, 2014 at 12:53 am

    Delicious bread, looks perfect.

    Reply
  4. Sireesha Puppala

    February 27, 2014 at 12:04 am

    Bread looks perfect ..

    Reply
  5. chikkus Kitchen

    February 26, 2014 at 3:55 pm

    Looks so soft and perfectly baked dear 🙂

    Reply
  6. Veena Theagarajan

    February 26, 2014 at 3:51 pm

    super soft and tempting bread

    Reply
  7. Sony P

    February 26, 2014 at 2:07 pm

    Bread looks perfect …… B'ful baked!!

    Reply
  8. Navaneetham Krishnan

    February 26, 2014 at 10:51 am

    Really I'm lost on what to say. The bread is simply breathtaking.

    Reply
  9. prethika skm

    February 26, 2014 at 8:42 am

    Well explained and perfectly baked bread…Love that tin shaped bread looks different 🙂

    Reply
  10. Babitha costa

    February 26, 2014 at 3:33 am

    beautifully baked dear

    Reply
  11. Sona S

    February 26, 2014 at 2:11 am

    Perfectly baked bread, looks very soft..

    Reply
  12. Meena Kumar

    February 25, 2014 at 9:32 pm

    The bread looks awesome.Should try it sometime.

    Reply
  13. divya

    February 25, 2014 at 8:56 pm

    Beautifully presented,Loved it ,superb!!

    Reply
  14. nandoos Kitchen

    February 25, 2014 at 5:23 pm

    soft and perfectly baked bread.

    Reply
  15. Manjula Bharath

    February 25, 2014 at 5:15 pm

    omg fantastic hakkaido bread dear 🙂 so pillowy texture you got , fabulous !!

    Reply

Trackbacks

  1. Eggless Wheat Ladi Pav Dinner Rolls Video Recipe - Nitha Kitchen says:
    April 17, 2020 at 11:27 am

    […] Handmade Basic White Bread | Hokkaido Milk Bread with Tangzhong Method Eggless Ladi Pav Bun Bread Video Recipe From Scratch Looking for 100% Bread Flour or All Purpose Flour Buns HERE is the recipe link. Eggless Wheat Pav Buns Recipe from Scratch Half and Half Bread cum Wheat Flour Recipe Perfect Burger Buns | Ladi Pav Buns | Soft Dinner Rolls from scratch Egg based Burger Buns Italian Dinner Rolls | Garlic Flavored Soft Cheese Buns Garlic Flavored Italian Dinner Rolls Misal Pav with Homemade Pav Buns Recipe Misal Pav with homemade Pav buns […]

    Reply
  2. Eggless Thengai Bun | Bakery style Coconut Bun | Tutti Frutti Nuts Stuffed Sweet Bread | Dilkush – Nitha Kitchen says:
    April 20, 2018 at 1:18 pm

    […] can use tangzhong method to get even soft […]

    Reply

Leave a Reply Cancel reply

Your email address will not be published. Required fields are marked *

Recipe Rating


Primary Sidebar

Categories

Follow us :-)

Nitha's Kitchen

Random Posts

Baked Wheat Gujiya Mawa Gujiya Recipe Gujiya Recipe Gujiya Video Recipe Mawa Gujiya filling how to make instant mawa for gujiya wheat gujiya nitha kitchen recipes

Baked Wheat Gujiya Mawa Gujiya Recipe

Milk Peda Palkova Milk Fudge

Authentic Palkova Milk Peda Video Recipe

Milk Powder Burfi video recipe

Milk Powder Burfi Video Recipe

Eggless Crescent Sugar Cookies Kourabiethes Recipe

Gibassier Traditional French Bread Recipe

How to Make Sundakkai Vathal | Sun Dried Turkey Berry at Home

Chicken Tikka Dum Biryani | How to make Biriyani in Oven

nithakitchen

Sangeetha Priya
இனிய பொங்கல் திருந இனிய பொங்கல் திருநாள் நல்வாழ்த்துக்கள்
Advance Pongal Wishes ☺️
#nithakitchen @nithakitchen
#pongalwishes #ulavarthirunaal #happypongal #enjoythisweek #pongal #makarsankranti #engaveetupongal #pongalprep #harvestfestival #farmerfestival
Happy Deepavali 🎇 🪔🎉😊 . Here is a glim Happy Deepavali 🎇 🪔🎉😊 . Here is a glimpse of Diwali preparation from my side. Another big day is coming soon for us will update more in the next post
...
..
.
🪔 Adhirasam

🪔 Bournvita Burfi 

🪔 Thenkuzhal

🪔 Thattu Vadai (Thattai)

🪔 Coconut Bun/ Thengaai Bun

https://www.nithaskitchen.com/category/indian-recipes/diwali or use search for particular recipe https://www.nithaskitchen.com

#nithakitchen #diwalisweets #diwalisnacks #deepavali #sharingwithlove  #diwalitreat #palaharam #festivaloflights #diwali #birthdayspread #homemade #thenkuzhal #adhirasam #athirasam #diwali2022 #deepavalipalaharam #deepavali2022 #murukku #nithakitchenrecipes #minibakeryathome #walkwithindia  #chocolateburfi  @walkwithindia @walkwithchennai #deepavalisnacks #tamilyshares #deepavali2022🎉 #thattai #thattuvadai #thengaibun #coconutbun #burfi
My daughter made this yummy shortbread brownies an My daughter made this yummy shortbread brownies and with as usual biryani and #redboxmovies sunday well spent. This year there was no heart shaped pink desserts in our #valentinesspl menu 😊
Some making video clips in my stories
...
..
.
Follow @nithakitchen for baking recipes

#nithakitchen #brownies #shortbreadcookies #mixedbrownies #vanillashortbread #chocolatebrownie #indianinusa  #thefeedfeed #walkwithchennai #walkwithindia  #foodblogger #walkwithindiafoodblogger #valentinescookies  #valentinesdaytreats
Air Fryer Mint Bhujia Pudina Sev in an air fryer w Air Fryer Mint Bhujia Pudina Sev in an air fryer with video recipe @nithakitchen 

Written Recipe Link
https://www.nithaskitchen.com/2022/10/pudina-sev-in-air-fryer-recipe.html

Direct YouTube Link !
https://youtu.be/FAeLjSG6Lz8

#airfryerrecipes #indianairfryerrecipes #instantvortexplus #instantvortex #glutenfreesnack #mintbhujia #mintsev #pudinasev #pudinabhujia #sevinairfryer #airfryerbhujia #airfryersev #airfryersnacks #airfryerrecipe #nithakitchen #nithakitchenrecipes #airfriedgoodness #vegansnack #savorysnack #savourysnack #deepavali2022 #deepavalipalaharam #diwalisnack #bhujia #sev #namkeen #recipepost #diwaliprep #deepavaliprep
Follow on Instagram

Trending Now

  • How to make Raised Garden Bed in Slope Area | Step By Step Idea for Beginners in Gardening
  • Kaju Anjeer Burfi Video Recipe
    Kaju Barfi Anjeer Stuffed Burfi Video Recipe
  • No Churn Eggless Orange Ice Cream Recipe
  • Hot Milk Sponge Cake Recipe with Eggless Option | Step by step tutorial to make plain Vanilla sponge cake
    Hot Milk Cake Recipe with Eggless Option
  • Cassata Ice Cream Cake Video Recipe

Archives

Vegetarian Curry/ Lentil Recipes

kathirikkai kaara kuzhambu

Kathirikai Kara Kuzhambu Recipe

Manathakkali Keerai Mor Kuzhambu | Restaurant Style Pumpkin Kootu Recipe

See More;

Latest Pins!

Millet Recipes

Ellu Urundai Til Ke Ladoo Sesame Laddu Recipe

It gives immense pleasure to prepare food with Home/Farm grown ingredients and it’s also very close to heart. Today’s Ellu Urundai Til Ke Ladoo recipe ...

Read More

For More Posts -->

Appetizer and Snacks

spinach cheese bites using crescent dough

Spinach Cheese Bites Recipe Using Homemade Crescent Dough

Vazhaipoo Masala Vadai Banana Blossom Vada Recipe

See More;

Footer

my foodgawker gallery

Copyright© 2023 Nitha Kitchen All Rights Reserved