• Skip to primary navigation
  • Skip to main content
  • Skip to primary sidebar
  • Skip to footer
Nitha Kitchen
  • Home
  • Recipe Index
  • Video Recipes
  • DIY & How-To’s
    • Homemade
    • Gardening
    • Kitchen Basics
  • About the Author
  • Navigation Menu: Social Icons

You are here: Home / Cakes and Bakes / Pizza Varieties / Vegetarian New York Style Pizza Crust and Sauce

Vegetarian New York Style Pizza Crust and Sauce

September 30, 2013 By Sangeetha Priya 22 Comments

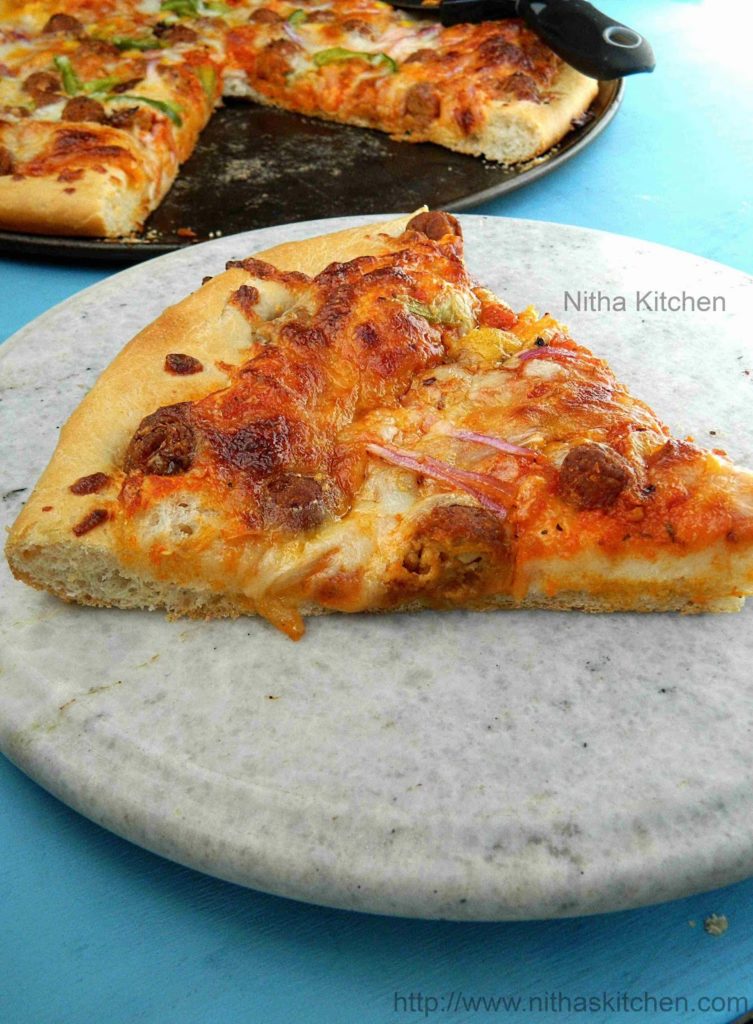
New York style pizza crust and sauce contains Indian style topping :-), I mean vegetable Rajma/red beans kofta mini balls, you might be aware if you read my previous post. I have several pizza versions and this version is unique from it…Usually we make pizza sauce a day before but here the dough is made 24 hours before at least and ferment in refrigerator. Quite interesting and its simplifies the baking process the next day. 

Day I
Preparing the dough and sauce, also you can make the mini veg kofta balls if using to top the pizza, everything refrigerate till you use.
Day 2
Make ready with other toppings like slicing onion,capsicum,tomato,cheese and bake the pizza.

New York Style Pizza Crust and Sauce

Ingredients for Pizza Dough

Bread Flour or APF/Maida – 3 Cups
Yeast – 2tsp (I use Active Dry Yeast)
Olive Oil – 2-3 Tbsp
Regular Salt – 1 and 1/4tsp (Replace with Kosher Salt – 2tsp)
Sugar – 1 Tbsp
Lukewarm Water – 10oz ( don’t use all at a time, reserve few tbsps of water and add if needed)

Ingredients for pizza sauce 

Whole peeled tomatoes or Fresh Tomatoes – 1 (28-ounce) Can or 4 Numbers (Large Size)
Onion – 1 medium Size (Finely chopped)
Garlic – 2 medium cloves (grated or finely chopped)
Extra Virgin Olive oil – 1 Tbsp
Unsalted butter – 1 Tbsp
Dried Oregano – 1tsp
Basil with leaves – 2 six-inch fresh sprigs (Replace with 1tsp dried basil herb)
Red Pepper Flakes/Red Chili Powder – 1tsp
Regular/Kosher Salt – As Needed
Sugar – 1tsp

Toppings

  • Any sliced or chopped veggies of your choice such as capsicum, sliced onions,mushroom, paneer,sliced jalapenos, even fruits such as pineapple.
  • For Vegetarian Mini Spinach Rajma Koftas/Fritters (meat less meat balls) check the Baked or Deep fried recipes, Just follow the same procedure and make mini size as shown in below picture…
  • For Non veg topping check the recipe here.
  • 1 Cup or more – Parmesan or Mozzarella Cheese grated (depends on the size of the pizza).

Sauce making method

  • If using fresh tomatoes add the tomatoes in hot boiled water for 5 minutes and then peel the skin.
  • Pulse the tomatoes and their juice in food processor/mixie until pureed or puree with hand blender.
  • Set tomatoes aside.
  • Combine butter and oil in medium saucepan and heat over medium-low heat until butter is melted.
  • Add garlic, onion, oregano, dry basil (if using), pepper flakes and large pinch salt and cook, stirring frequently, until fragrant but not browned, about 3 minutes.
  • Add tomatoes, basil sprigs and sugar, bring to a simmer, reduce heat to lowest setting (bubbles should barely be breaking the surface) and cook stirring occasionally, until reduced by 1/2, about 40 minutes-1 hour. Adjust salt to taste.
  • Allow to cool and store in covered container in the refrigerator for up to 2 weeks.

For Making the thin crust pizza

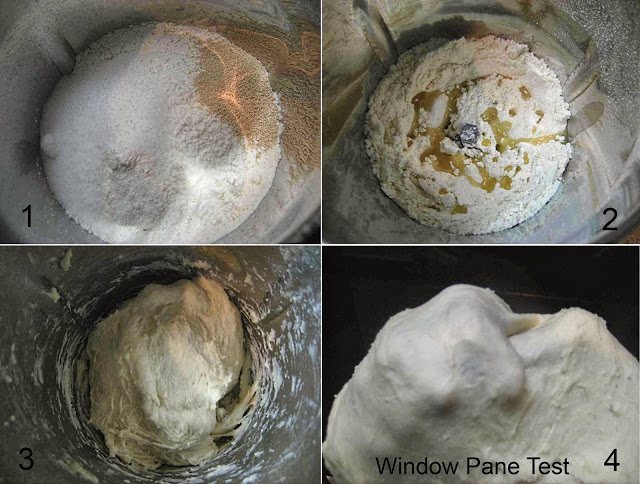
  • Combine flour, sugar, salt, and yeast in bowl of food processor or in a bowl (Pic 1).
  • Pulse 3 to 4 times until incorporated if you have food processor. otherwise mix well together with the help of the whisk.
  • Add olive oil and water (Pic 2).
  • Run food processor until mixture forms ball that rides around the bowl above the blade, about 15 seconds.
  • Continue processing 15 seconds longer. Those who don’t have food processor. try it with hand mixer or stand mixer or knead it with your hands like chapathi/roti dough.
  • The dough will stick a bit (Pic 3).
  • Transfer dough ball to lightly floured surface and knead once or twice by hand until smooth ball is formed. It should pass the windowpane test (Pic 4).
  • Window pane test is nothing but an indication that the amount of gluten formed, If you can stretch the dough without breaking (Pic 4).
  • Divide dough into three even parts and place each in a covered quart-sized deli container or in a zipper-lock freezer bag (Step wise Picture 1 below).
  • Place in refrigerator and allow to rise at least one day, and up to 5 days (I allowed 24 hours, Pic 1).

New York Style Pizza Crust and Sauce Assembly

  • At least two hours before baking, remove dough from refrigerator and shape into balls by gathering dough towards bottom and pinching shut.
  • Flour well and place each one in a separate medium mixing bowl (Pic 2).
  • Cover tightly with plastic wrap and allow to rise at warm room temperature until roughly doubled in volume (Pic 3).
  • 1 hour before baking, Turn single dough ball out onto lightly flour surface.
  • Gently press out dough into rough 8-inch circle, leaving outer 1-inch higher than the rest.
  • Gently stretch dough by draping over knuckles into a 12 to 14-inch circle about 1/4-inch thick (Pic 4).
  • Transfer to pizza pan also sprinkle corn meal to the pan before placing the pizza.
  • Bake the pizza for 7 minutes in preheated oven at 400°F and allow to cool completely before adding the sauce and toppings.
  • But the original recipe calls for direct baking with sauce and toppings and no pre baking of pizza base.
  • Apply Olive oil for the edges of pizza base.
  • Spread approximately 2/3 cup of sauce evenly over surface of crust, leaving 1/2 to 1-inch border along edge (Pic 5).
  • Add toppings (I usually freeze sliced onion,capsicum,tomato and shredded cheese for a while for even cooking) of your choice evenly and spread 1/3 of cheese over sauce evenly (Pic 5).
  • Bake until cheese is melted with some browned spots and crust is golden brown and puffed, 7-10 minutes or varies depends on your oven.
  • Transfer to cutting board, slice, and serve immediately.
  • Repeat with remaining dough balls, remaining sauce, and remaining cheese.

Notes

  1. I usually use one 16″ pizza pan and 2/8″ inch cake pans while making this quantity pizza.
  2. The above said inch measurements gives perfect thin crust pizza, if like to make thick pizza (shown below) then reduce the size of stretching and follow the same procedure.
  3. Good dusting of cornmeal on the peel/pan which keeps the dough from sticking and greatly helps the pizza in sliding off. Before you attempt to transfer the pizza into the oven
  4. Try to loosen the pizza as much you can to get thin crust, before start baking.

    Old Pictures Updated!!!

Post You May Like:

Milagu Adai for Karthigai Deepam
Indian Style Chicken Curry Pasta Recipe
Pirandai Podi Adamant Creeper Powder Recipe

Filed Under: Eggless Baking, Kids and Infant Corner, Pizza Varieties, Savory Bakes, Thanksgiving Holiday Bakes Tagged With: a very detailed post, Eggless Baking, fermented in refrigerator, Homemade, how to get perfect shaped pizza, how to make pizza topping, how to top the pizzas, New York Style Pizza Crust and Sauce, nitha, olice oil necessary for coating the edges of pizza, perfect new york style pizza sauce, Perfect New York style thin crust pizza topped with mini vegetable fritters/kofta balls, perfect trick to melt the sliced topping and cheese, Pizza, pizza dough made a day before, Purely Vegetarian Pizza with Mini Kofta Topping, step by step pictures, thick pan pizza, thin crust, veg kofta balls in pizza topping, window pane test

Archives

Previous Post: « Healthy Baked Spinach Beans Fritters Kofta
Next Post: Vegan Jaggery Apple Cake Recipe | My 250th Post »

Reader Interactions

Comments

  1. Asiya Omar

    October 7, 2013 at 3:09 am

    Wow ! Looks Yum.
    On going event WTML. Kindly participate and win the give away.

    Reply
  2. Treat and Trick

    October 2, 2013 at 6:07 pm

    Great recipe and looks fabulous!

    Reply
  3. Suja Md

    October 2, 2013 at 2:08 pm

    Wow…pizzas looks great …love it to the core!

    Reply
  4. Uma Ramanujam

    October 2, 2013 at 10:19 am

    No to any kind of pizza. Looks very perfect and wanna have a bite…

    Reply
  5. Vidya Chandrahas

    October 2, 2013 at 8:27 am

    Awesome pizza ..looks yummy and inviting.

    Reply
  6. Sangeetha M

    October 1, 2013 at 8:10 pm

    wow..pizza looks so tempting and delicious, nice n healthy topping sangee…lovely pics n beautifully presented!

    Reply
  7. Maha Gadde

    October 1, 2013 at 6:42 pm

    interesting n any time i can have pizza…:)

    Reply
  8. Gayathri Ramanan

    October 1, 2013 at 4:03 pm

    awesome pizza..love the topping..

    Reply
  9. Rumana Ambrin

    October 1, 2013 at 2:20 pm

    Pizza looks stunning..

    Reply
  10. Priya Anandakumar

    October 1, 2013 at 1:01 pm

    Very tempting and delicious pizza, looks perfect and lovely clicks,,,.

    Reply
  11. Priya Suresh

    October 1, 2013 at 11:09 am

    Love that topping, wat a gorgeous pizza, i dont mind inviting myself to ur place.

    Reply
  12. Subha Bose

    October 1, 2013 at 7:28 am

    Nice detailed recipe, Thanks for sharing looks yum too.
    Keep in touch,
    http://www.candycrow.com

    Reply
  13. Lubna Karim

    October 1, 2013 at 6:03 am

    That's a awesome pizza recipe….love it….that topping sounds yum…

    Reply
  14. Manjula Bharath

    October 1, 2013 at 5:32 am

    wow wow such an tempting pizza there 🙂 looks so yummy and tempting dear !! very nicely explained and lovely clicks !!

    Reply
  15. Happys Cook

    October 1, 2013 at 5:25 am

    yummy pizza…. looks awesome.. Nice clicks…

    Reply
  16. Follow Foodie

    October 1, 2013 at 4:31 am

    Wow , Lovely Presentation

    Reply
  17. Preeti Tamilarasan

    September 30, 2013 at 3:50 pm

    is that pizza stone sangee?? like the photos in which u are holding a slice 🙂

    Reply
    • sangeethapriya

      October 5, 2013 at 9:08 pm

      Thanks Preethi, no dear its marble stone but one day with courage i am planning to bake in it 🙂

      Reply

Trackbacks

  1. Baked Spinach Kidney Beans Fritters Veg Kofta Recipe says:
    July 12, 2020 at 6:31 pm

    […] Here is the picture of Mini baked koftas topped in New York Style Pizza… […]

    Reply
  2. How to dry and store Oregano Leaves | DIY Dried Ajwain Leaves says:
    July 9, 2020 at 7:08 pm

    […] NY Style Pizza Crust […]

    Reply
  3. Handmade Basic White Bread | Hokkaido Milk Bread with Tangzhong Method - Nitha Kitchen says:
    November 17, 2018 at 11:03 pm

    […] is done, you should be able to stretch the dough without it breaking right away (check the picture here). When it does break, the break should be form a […]

    Reply
  4. Vegetarian California BBQ Style Pizza From Scratch | California Pizza Kitchen BBQ Pizza Copycat Recipe – Nitha Kitchen says:
    April 20, 2018 at 10:59 am

    […] find time to click the thick pizza crust alone, for thin crust you can refer my Newyork Style Pizza Crust, which resembles like it. Also if you are a beginner in making pizza do check the dough making step […]

    Reply

Leave a Reply Cancel reply

Your email address will not be published. Required fields are marked *

Recipe Rating


Primary Sidebar

Categories

Follow us :-)

Nitha's Kitchen

Random Posts

Vegan Mango Overnight Oats

Carrot Beans Stir Fry | Carrot Beans Poriyal Recipe

Mushroom Tikka Masala | Spicy Kalan Kuzhambu Recipe

Fish Dum Biryani | Meen Biriyani | Machli Ki Biryani in Oven

homemade ghee video recipe

Homemade Ghee | Clarified Butter | Tips to get the right consistency Ghee

Cupcakes Muffins Baking Essentials

Homemade Khoya Mawa Recipe Using Regular mu

Homemade Khoya Mawa Video Recipe

nithakitchen

Sangeetha Priya
Hope you guys are doing good! Here is our Vinayaga Hope you guys are doing good! Here is our Vinayagar Chaturthi Celebration picture. For the festival we made 11 items (yes kids helped a lot). Those were half sweet and half savory kozhukattai varieties and used palm jaggery (Karupatti) as sweetener and also most of them were millet based...For the menu and other details do check the link provided in Insta bio...
..
.
#backafterthebreak @nithakitchen #nithakitchen #nithakitchenrecipes #kozhukattai #milletkozhukattai #kozhukattairecipe #southindianfood #modaks #modhagam #puranakozhukattai #pooranakozhukattai #vinayagarchathurthi #ganeshchaturthi #videorecipe #festivalseason #navaratri #navarathri #dussera
A part of yesterday's preparation before my covid A part of yesterday's preparation before my covid vaccine...
Stocked up for two-three days and today I had my first dose...also made regular sambar
, Rasam and poriyal which are not in the frame.
From breakfast to lunch to dinner including snacks all homemade ☺️ and you can find all the recipes except wrap filling in the blog.

Follow @nithakitchen

🍛 Adhirasam
🍛 Homemade Fig Bars
🍛 Ponnanganni Paruppu Podi
🍛 Ellu Podi
🍛 Soft Idlis
🍛 Avocado Chapati Dough
🍛 Chana Masala
🍛 Mixed Veg and black beans wrap filling
🍛 Little modified filling with peanuts for Vaandu
...
..
.
#nithakitchen #walkwithindia #walkwithchennai #foodbossindia #foodblogger #homemakerlife #adhirasam  #bbcgoodfood #ndtvfood #onthetable #vegmeals #instafood #foodieofchennai #atlantafoodblogger #nammabengaluru #karnatakadiaries #fullmeals  #indianfood #southindianfood #huffposttaste  #indianinusa  #bengalurudiaries
#mealprep #mealprepideas #eathealthy #homemade #homemadefood #idli #idlipodi #chanamasala
Bournvita Burfi with video recipe @nithakitchen #n Bournvita Burfi with video recipe @nithakitchen #nithakitchen

Written Recipe Link
https://www.nithaskitchen.com/2021/10/bournvita-burfi.html 

Direct YouTube Link !
https://youtu.be/iXO40lV33kM

Bournvita Burfi with video recipe @nithakitchen #nithakitchen

Written Recipe Link
https://www.nithaskitchen.com/2021/10/bournvita-burfi.html 

Direct YouTube Link !
https://youtu.be/iXO40lV33kM

#burfi #barfi #chocolateburfi #bournvitaburfi #chocolatebarfi #bournvitabarfi #barfee #glutenfree #sweet #chocolatemithai #mithai #nithakitchen #nithakitchenrecipes #deepavali2022 #deepavalipalaharam #diwalisnack #recipepost #diwaliprep #deepavaliprep #chocolatesweet #gheesweet #chocolatebarfee #bournvita #healthmixburfi #besanburfi #besanchocolateburfi #burfirecipes #halwaimithai #videorecipe #recipeblog
இனிய பொங்கல் நல்வா இனிய பொங்கல் நல்வாழ்த்துக்கள்!💐🌞🌺

Happy Pongal Sankranti🎑 

Thinai Ven Pongal Millet Kara Pongal , had a filling breakfast with Kathirikkai Goshtu, Tiffin Sambar and Coconut Chutney. Recipe from archives got a makeover with video tutorial recently ☺️
As always #linkinbio 👇

@nithakitchen

https://www.nithaskitchen.com/2015/02/millet-ven-pongal.html
...
..
.

#nithakitchen #nithakitchenrecipes #norice #healthylifestyle #healthyliving #healthyeating #pongalopongal #khichdi #milletkhichdi #nithakitchenblog #instantpotpongal #instantpotrecipes #instantpotcooking #pip # #venpongal #milletpongal #kharapongal #kharapongalrecipe #videorecipe #pongal #pongali #millets #millet #foxtailmillet #makarsankranti #makarsankranthi #sankranthi #harvestfestival #ulavarthirunaal
Follow on Instagram

Trending Now

  • Zero Oil Diet Chapati Video Recipe
  • Eggless Almond Sponge Cake Recipe From Scratch
  • Spinach Fatayer | Baked Savory Veg Pie Recipe | Middle East Bakes
  • How to make Raised Garden Bed in Slope Area | Step By Step Idea for Beginners in Gardening
  • Authentic Goan Chicken Curry Recipe

Archives

Vegetarian Curry/ Lentil Recipes

Ennai Kathirikkaai Kuzhambu Recipe | Brinjal Varuthu Araicha Puli Kulambu

kathirikkai kaara kuzhambu

Kathirikai Kara Kuzhambu Recipe

See More;

Latest Pins!

Millet Recipes

Thinai Badam Karupatti Urundai Foxtail Millet Laddu

thinai badam karupatti urundai video recipe

Whatever I make for snack it vanishes in minute so today i made a healthy snack Thinai Badam Karupatti Urundai (In Tamil) aka Foxtail Millet Laddu ...

Read More

For More Posts -->

Appetizer and Snacks

Perfect Punjabi Party Samosa Video Recipe

Perfect Crispy Party Punjabi Samosa Video Recipe

Moong Bean Vada Recipe, பாசிப்பயிறு வடை செய்முறை

Moong Bean Vada Video Recipe | பாசிப்பயிறு வடை

See More;

Footer

my foodgawker gallery

Copyright© 2023 Nitha Kitchen All Rights Reserved