• Skip to primary navigation
  • Skip to main content
  • Skip to primary sidebar
  • Skip to footer
Nitha Kitchen
  • Home
  • Recipe Index
  • Video Recipes
  • DIY & How-To’s
    • Homemade
    • Gardening
    • Kitchen Basics
  • About the Author
  • Navigation Menu: Social Icons

You are here: Home / Indian Recipes / Diwali Recipes / Badusha Balushahi Recipe

Badusha Balushahi Recipe

March 5, 2014 By Sangeetha Priya 22 Comments

BADUSHA BADHUSHA BALUSHAHI RECIPE WITH STEP BY STEP PICTURES

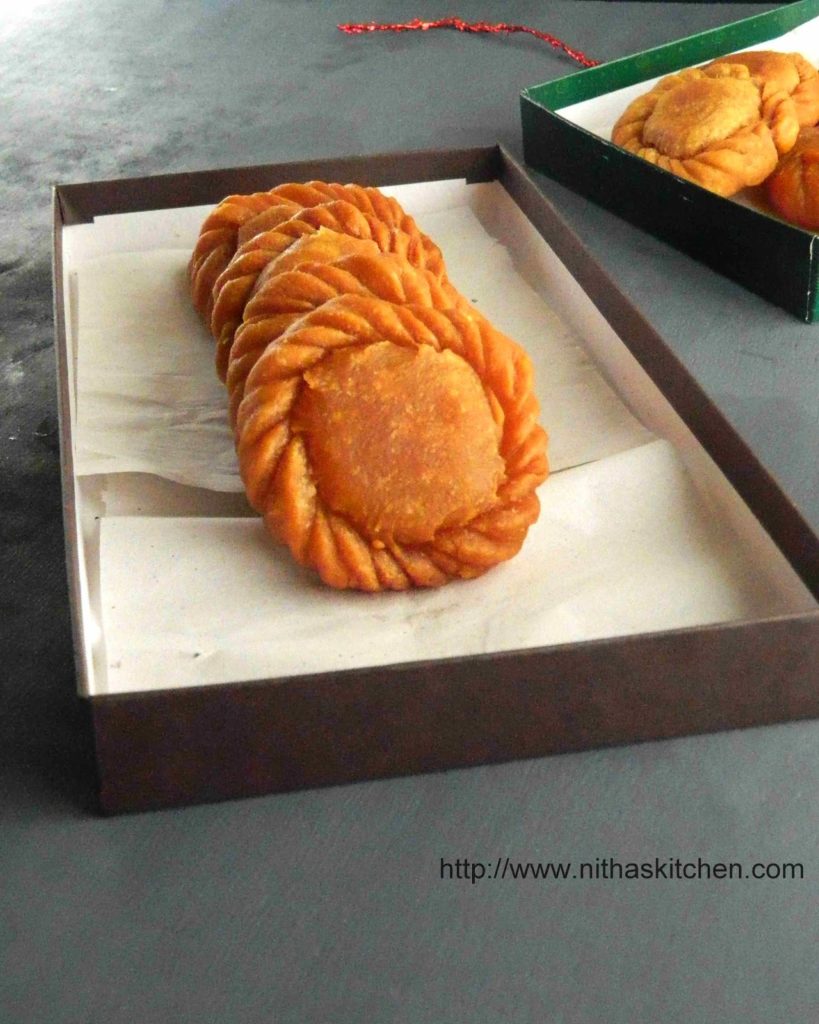
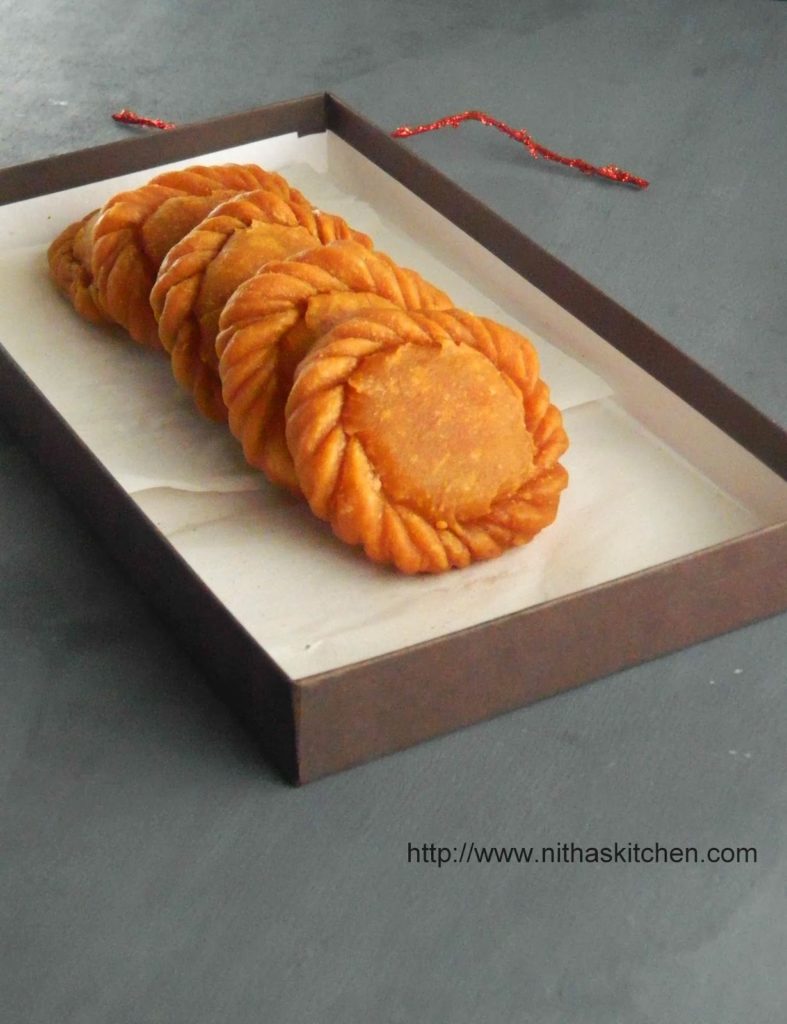
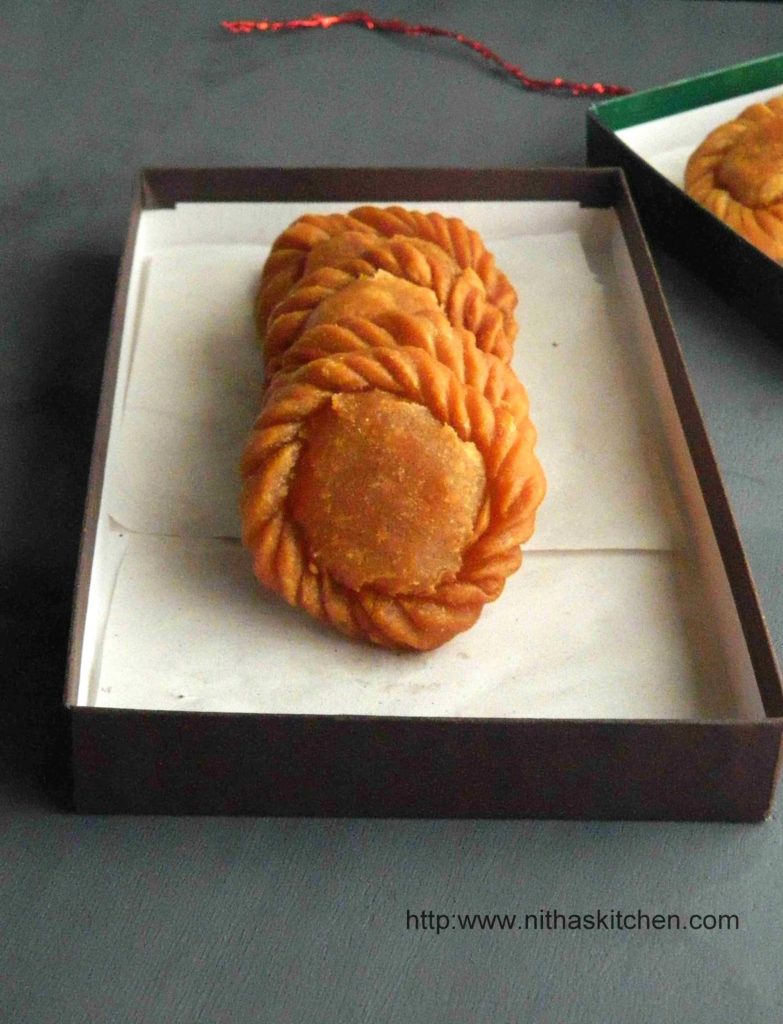
We our family loves Badusha Badhusha Balushahi much to its soft melt in mouth texture, Appa (dad) buy often from the shop during my childhood days.  During my first pregnancy (few years back after coming to US) I tried it at home for the first time. That time I just made round/plain version  , i was quiet satisfied that time for my sweet craving :-). Recently when a friend asked it particularly for her baby thotil function, I made it again but now I spent some time and made shaped badhusha …This is my first attempt in making shapes, so I update more information when I make it again…

Recipe Source :- Rak’s Kitchen

Ingredients for Badusha Badhusha Balushahi Recipe

Maida – 1 and 1/2 Cup
Butter – 1/4 Cup
Oil  – 1.5 Tbsp
Curd  – 2 Tbsp (1 Tbsp thick yogurt or 2tbsp watery yogurt)
Sugar  – 1tsp
Cooking Soda/Sodium bi carbonate  – 1/4tsp (If using double acting soda then reduce a bit, 1 gram approx)
Water – 1/4 cup (approx, I used only 2 Tbsp of water)
Oil  – To deep fry
For the Syrup
Sugar – 3/4 cup
Water – 3/4 Cup+2 Tbsp
Lemon Juice – 1tsp (Optional but it prevents sugar crystallization)
Elachi/Cardamom Powder – 1tsp

Saffron – A pinch (Optional)

Method for Badusha Badhusha Balushahi Recipe

How to make Sugar Syrup

  • Add sugar + water to a pan and boil till half or one string consistency.
  • The half string consistency gets the syrup inside the badusha and makes it very soft (I love this version).
  • The one string gives bit crisp/flaky inner layer and you can feel the sweet only on top of it (like most of store buy version).
  • Choose the string consistency, also you can make the syrup earlier and before dipping the fried stuff just warm it.
  • The syrup should not dissolve when you pour over little water placed bowl or you can check between your forefinger and thumb by swiping the syrup from back of the ladle you use for stirring.
  • Add saffron, elachi/cardamom if desired and squeeze the lemon juice (for one string syrup) lastly.
 How to make Badusha Badhusha Balushahi
  • Mix flour, sugar, baking soda in a separate bowl.
  • Melt butter in microwave or stove top(Pic 1) and add yogurt, oil(Pic 2).
  • Give a nice gentle mix using whisk then add the flour mixture(Pic 3).
  • Now sprinkle water and start kneading, initially it looks like Pic 4.
  • So keep on kneading to soft and smooth dough (Pic 5).
  • The final kneaded dough should be without any crack, it is the right consistency (Pic 5).
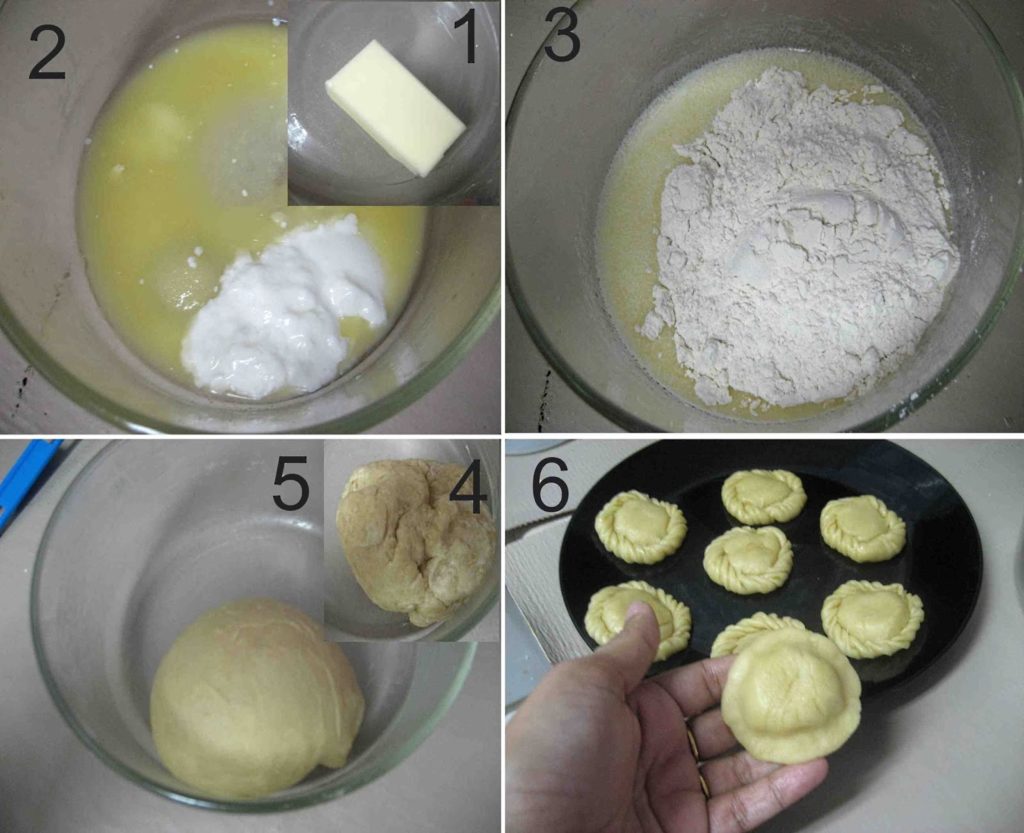
  • Cover and rest it for 15 minutes at least and divide the dough in to 10-12 lemon size balls.
  • You can make plain rounds by pressing gently in the center with your palms.
  • If going for shaped edges, make a stretch/thin layer all over sides as shown in Picture 6 above.
  • Now start pulling and bend that thin layer using thumb and next finger towards inner to form rim, also hold the round dough in other hand (Pic 7).
  • This is my first attempt, it comes by practice.
  • Keep the rolled badhusa in one plate, try to fry the rolled dough in another 20 minutes of time, till then cover it properly.
  • If you keep the rolled badusha’s in room temperature for long time, the butter starts to oozes out from it.
  • You can prepare the sugar syrup simultaneously while frying if you have not done earlier.
  • Now add oil in wide pan/kadai and when it is hot, test by adding a pinch of dough, it should pop immediately after adding it.
  • It is the right temperature, now add 2-3 at a time(Pic 8) and switch off the flame.
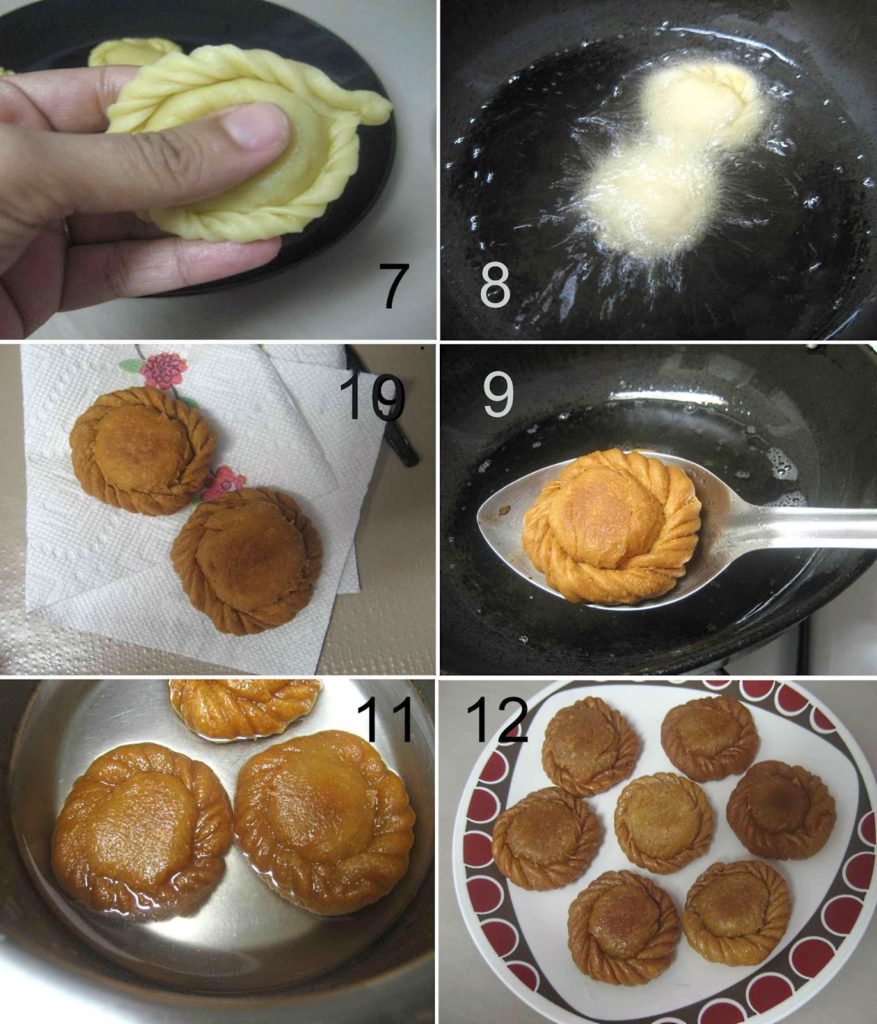
  • When all the bubbles set, again ON the flame and cook in low-medium flame till it turns light golden brown (Pic 9).
  • Drain the excess oil using kitchen towel (Pic 10)and dip in already prepared sugar syrup for 2-3 minutes (Pic 11).
  • Make sure either syrup or fried badhusa’s should be warm enough to absorb the syrup.
  • Flip both sides and when other batch is ready to dip in, remove and arrange the soaked badhusa’s in a plate (Pic 12).
  • Store it in air tight container for almost a week, when they turn non sticky.
Recent click while making…
BADUSHA BADHUSHA BALUSHAHI RECIPE WITH STEP BY STEP PICTURES
Variation
  1. You can fry in ghee as well.

Post You May Like:

Peanut Chikki Kadala Mittai Groundnut Brittle
Stuffed Capsicum Veg Bowl Bell Pepper Bowl
Eggless Banana Wheat Muffins Recipe

Filed Under: Diwali Recipes, Indian Sweets, Kids and Infant Corner Tagged With: Bachelors Cooking, Birthday Party Ideas, can we make easy shape store like, deepavali palaharam recipe, Dessert, Diwali, Festive Specials, how to make balushahi, how to make sugar syrup, how to make swrils shapes for badusha, how to make tasty homemade badusha, Indian donuts, Indian Recipes, Indian Sweet, Indian Sweets and Snacks, Kids n Infant Corner, Nitha Kitchen, perfect badhusha with clear explanation, recipe from scratch, right dough consistency for balusai batusha, step by step Badusha recipe, tikari

Archives

Previous Post: « Eggless Valentine Cookies Coated With Candy Melts
Next Post: Brown Rice Oats Bisibelebath | Kai Kari Kadhamba Sadham »

Reader Interactions

Comments

  1. Priya Suresh

    March 6, 2014 at 9:50 pm

    Badushas came out absolutely prefect, irresistible they are.

    Reply
  2. Sony P

    March 6, 2014 at 7:46 pm

    Looks delicious…… perfectly made!!

    Reply
  3. chikkus Kitchen

    March 6, 2014 at 7:40 pm

    Perfectly made badusha dear ..very tempting 🙂

    Reply
  4. sushma Mallya

    March 6, 2014 at 5:12 pm

    Perfectly made!!!

    Reply
  5. Anu Anand

    March 6, 2014 at 1:24 pm

    looks lovely

    Reply
  6. Shama Nagarajan

    March 6, 2014 at 12:25 pm

    perfect dear…neat click

    Reply
  7. Sona S

    March 6, 2014 at 9:32 am

    Beautifully made, looks really delicious…

    Reply
  8. Babitha costa

    March 6, 2014 at 9:06 am

    i love badhusha more,feel to grab and eat it

    Reply
  9. Vibha Sp

    March 6, 2014 at 8:43 am

    nice presentation n recipe too , they luks yummy,,,

    Reply
  10. Manjula Bharath

    March 6, 2014 at 5:45 am

    wow so perfectly made delicious badhusha 🙂 looks fantastic , I wud love to grab some 🙂

    Reply
  11. Meena Kumar

    March 6, 2014 at 2:30 am

    This has been in my to do list since long, u have explained it so well and the folds look so even and perfect.I have to try this.

    Reply
  12. Sailaja Damodaran

    March 5, 2014 at 4:56 pm

    Nicely made!
    http://www.sailajakitchen.org

    Reply
  13. Radha Natarajan

    March 5, 2014 at 4:05 pm

    lovely clicks and great post with good explanation…well done

    Reply
  14. divya

    March 5, 2014 at 2:48 pm

    this looks absolutely amazing… would love to grab it!

    Reply
  15. sangeethapriya

    March 5, 2014 at 12:19 pm

    Thanks for your comments :-)sure da Preet I will make a video in future 🙂

    Reply
  16. Magees kitchen

    March 5, 2014 at 9:01 am

    U made it perfectly…and it sounds delicious…

    Reply
  17. Preeti Tamilarasan

    March 5, 2014 at 5:39 am

    it looks absolutely perfect da why dont u post a video too??

    Reply
  18. Navaneetham Krishnan

    March 5, 2014 at 5:17 am

    I like how you designed the dough. Nice and perfect after being soaked in th syrup.

    Reply
  19. Raks anand

    March 5, 2014 at 4:44 am

    Superb 🙂 Thanks for the link love

    Reply
  20. Kitchen Rhythms

    March 5, 2014 at 3:03 am

    i never knew how badushas are made.thanks for the recipe.

    Reply
  21. Veena Theagarajan

    March 5, 2014 at 3:00 am

    so tasty and tempting.. This is in my to do list for longtime

    Reply

Trackbacks

  1. Air Fryer Karasev Video Recipe - Nitha Kitchen says:
    November 4, 2021 at 10:24 am

    […] soon)Besan Burfi (will add video tutorial in a day)🪔 Bournvita Burfi🪔 Yellow Burfi🪔 Badhusa🪔 Instant Mix Gulab Jamun🪔 Boondi Ladoo 🪔 Boondi Mixture🪔 Kara Sev in Air Fryer🪔 […]

    Reply

Leave a Reply Cancel reply

Your email address will not be published. Required fields are marked *

Recipe Rating


Primary Sidebar

Categories

Follow us :-)

Nitha's Kitchen

Random Posts

Vegan Mango Overnight Oats

Chocolate Whoopie Pies From Scratch Recipe

Crispy Bhakarwadi Recipe | Savory Bakarwadi From Scratch

Arisi Thengai Paal Payasam | Coconut Milk Kheer | Traditional South Indian Recipe

Eggless Linzer Cookies with Strawberry Jam Filling

chocolate burfi, bournvita burfi, boost burfi, bournvita barfi, bournvita barfee, boost barfi, boost barfee, chocolate barfi, chocolate barfee, gram flour chocolate burfi, besan chocolate barfi, besan bournvita barfi, besan bournvita burfi, gram flour chocolate barfi, gram flour chocolate barfee, chick pea flour chocolate burfi, chana dal flour chocolate burfi, chana dal flour chocolate fudge, gluten free chocolate fudge, gluten free fudge, bournvita barfi video recipe, bournvita barfi recipe, bournvita burfi recipe

Bournvita Burfi Video Recipe

Eggless Black Forest Cake with Hot Chocolate Sponge

nithakitchen

Sangeetha Priya
Happy Deepavali 🎇 🪔🎉😊 . Here is a glim Happy Deepavali 🎇 🪔🎉😊 . Here is a glimpse of Diwali preparation from my side. Another big day is coming soon for us will update more in the next post
...
..
.
🪔 Adhirasam

🪔 Bournvita Burfi 

🪔 Thenkuzhal

🪔 Thattu Vadai (Thattai)

🪔 Coconut Bun/ Thengaai Bun

https://www.nithaskitchen.com/category/indian-recipes/diwali or use search for particular recipe https://www.nithaskitchen.com

#nithakitchen #diwalisweets #diwalisnacks #deepavali #sharingwithlove  #diwalitreat #palaharam #festivaloflights #diwali #birthdayspread #homemade #thenkuzhal #adhirasam #athirasam #diwali2022 #deepavalipalaharam #deepavali2022 #murukku #nithakitchenrecipes #minibakeryathome #walkwithindia  #chocolateburfi  @walkwithindia @walkwithchennai #deepavalisnacks #tamilyshares #deepavali2022🎉 #thattai #thattuvadai #thengaibun #coconutbun #burfi
இனிய பொங்கல் நல்வா இனிய பொங்கல் நல்வாழ்த்துக்கள்!💐🌞🌺

Happy Pongal Sankranti🎑 

Thinai Ven Pongal Millet Kara Pongal , had a filling breakfast with Kathirikkai Goshtu, Tiffin Sambar and Coconut Chutney. Recipe from archives got a makeover with video tutorial recently ☺️
As always #linkinbio 👇

@nithakitchen

https://www.nithaskitchen.com/2015/02/millet-ven-pongal.html
...
..
.

#nithakitchen #nithakitchenrecipes #norice #healthylifestyle #healthyliving #healthyeating #pongalopongal #khichdi #milletkhichdi #nithakitchenblog #instantpotpongal #instantpotrecipes #instantpotcooking #pip # #venpongal #milletpongal #kharapongal #kharapongalrecipe #videorecipe #pongal #pongali #millets #millet #foxtailmillet #makarsankranti #makarsankranthi #sankranthi #harvestfestival #ulavarthirunaal
Recently we celebrated Diwali cum our family's fir Recently we celebrated Diwali cum our family's first teen birthday with her favorite 13 snacks as listed below. All are homemade and tried few new snacks this year
...
..
.
🪔 Almond Burfi

🪔 Bournvita Burfi 

🪔 Gulab Jamun

🪔 Jhangri

🪔 Kaju Katli

🪔 Karupatti Mysore Pak

🪔 Khaja

🪔 Moth Namkeen (mixture with sev)

🪔 Nattu Sakkarai Adhirasam

🪔 Pasiparuppu Murukku 

🪔 Peanut Burfi 

🪔 Thenkuzhal

🪔 Thattu Vadai (Thattai)

 
https://www.nithaskitchen.com/category/indian-recipes/diwali or use search for particular recipe https://www.nithaskitchen.com

#nithakitchen #firstteeninthehouse #teenbirthday #diwalisweets #diwalisnacks #deepavali #sharingwithlove  #diwalitreat #palaharam #festivaloflights #diwali #birthdayspread #homemade #thenkuzhal #adhirasam #athirasam #diwali2022 #deepavalipalaharam #deepavali2022 #murukku #nithakitchenrecipes #minibakeryathome #walkwithindia  #chocolateburfi  @walkwithindia @walkwithchennai #deepavalisnacks #thattai #thattuvadai #burfi #namkeen
A part of yesterday's preparation before my covid A part of yesterday's preparation before my covid vaccine...
Stocked up for two-three days and today I had my first dose...also made regular sambar
, Rasam and poriyal which are not in the frame.
From breakfast to lunch to dinner including snacks all homemade ☺️ and you can find all the recipes except wrap filling in the blog.

Follow @nithakitchen

🍛 Adhirasam
🍛 Homemade Fig Bars
🍛 Ponnanganni Paruppu Podi
🍛 Ellu Podi
🍛 Soft Idlis
🍛 Avocado Chapati Dough
🍛 Chana Masala
🍛 Mixed Veg and black beans wrap filling
🍛 Little modified filling with peanuts for Vaandu
...
..
.
#nithakitchen #walkwithindia #walkwithchennai #foodbossindia #foodblogger #homemakerlife #adhirasam  #bbcgoodfood #ndtvfood #onthetable #vegmeals #instafood #foodieofchennai #atlantafoodblogger #nammabengaluru #karnatakadiaries #fullmeals  #indianfood #southindianfood #huffposttaste  #indianinusa  #bengalurudiaries
#mealprep #mealprepideas #eathealthy #homemade #homemadefood #idli #idlipodi #chanamasala
Follow on Instagram

Trending Now

  • Black Bean Salsa Salad | Mixed Vegetable Sprouts Salad
  • Pachai Mochai Poriyal Avara Kottai Poriyal
  • Homemade Mung Bean Sprouts Video Tutorial
    How to grow Mung Bean Sprouts Video Tutorial
  • Ragi Banana Chocolate Muffins
    Ragi Banana Chocolate Muffins
  • Hot Milk Sponge Cake Recipe with Eggless Option | Step by step tutorial to make plain Vanilla sponge cake
    Hot Milk Cake Recipe with Eggless Option

Archives

Vegetarian Curry/ Lentil Recipes

Thattai Paruppu Pudalangai Kuzambu | Red Chori Dal with Snake Gourd

Pachai Mochai Kulambu | Mochai Kottai Pongal Puli kuzhambu Recipe

See More;

Latest Pins!

Millet Recipes

Ragi Banana Chocolate Muffins

Ragi Banana Chocolate Muffins

Ragi Banana chocolate muffins is an yummy and healthy breakfast muffins loaded with millet flour (ragi/finger millet), wheat flour and banana. Also ...

Read More

For More Posts -->

Appetizer and Snacks

Cornflakes Mixture | Maize Poha Mixture with step by step Pictures

https://www.nithaskitchen.com/2018/11/eggless-crescent-dough.html

Homemade Eggless Crescent Dough Recipes

See More;

Footer

my foodgawker gallery

Copyright© 2023 Nitha Kitchen All Rights Reserved