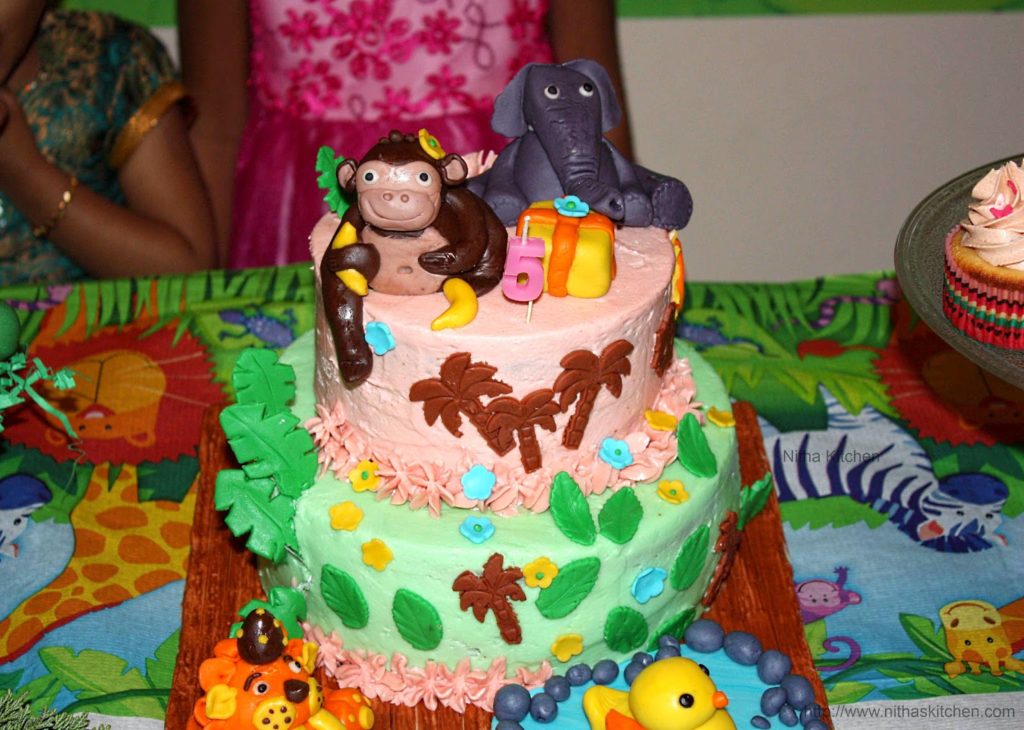
No words to describe how I felt when doctor put my daughter on my chest!!! It happened 5 years back still I remember that emotional scene. It’s the most incredible moment of my life. For both my kids birthday, till now I make the dishes single handed and even the cake. You may remember few such posts princess cake and cake pops!!! She has been asking me for a while to make jungle theme cake for her birthday, so its almost 20 days plan and within that time I purchased everything including decoration stuffs for her birthday. Last year because of Halloween and Diwali I made her birthday simple. This time I worked hard for 5 days and made the event successful. Here I wish to mention that I am a self-taught baker!!!
So today’s post is all about the cake I made and I believe that this long post is going to be useful for so many like me who wants to make birthday cake/tier cakes/fondant of their own.The Strawberry cake (top layer) used here is for October month Baking partners challenge, I couldn’t find time to post this detailed recipe on time, thanks Swathi for accepting my late post and I am also thankful to my dear friend Divya Ashok of DD’s Bake Shop who suggested this strawberry cake. She is a professional baker and very kind enough to clear my doubts whenever i ask.
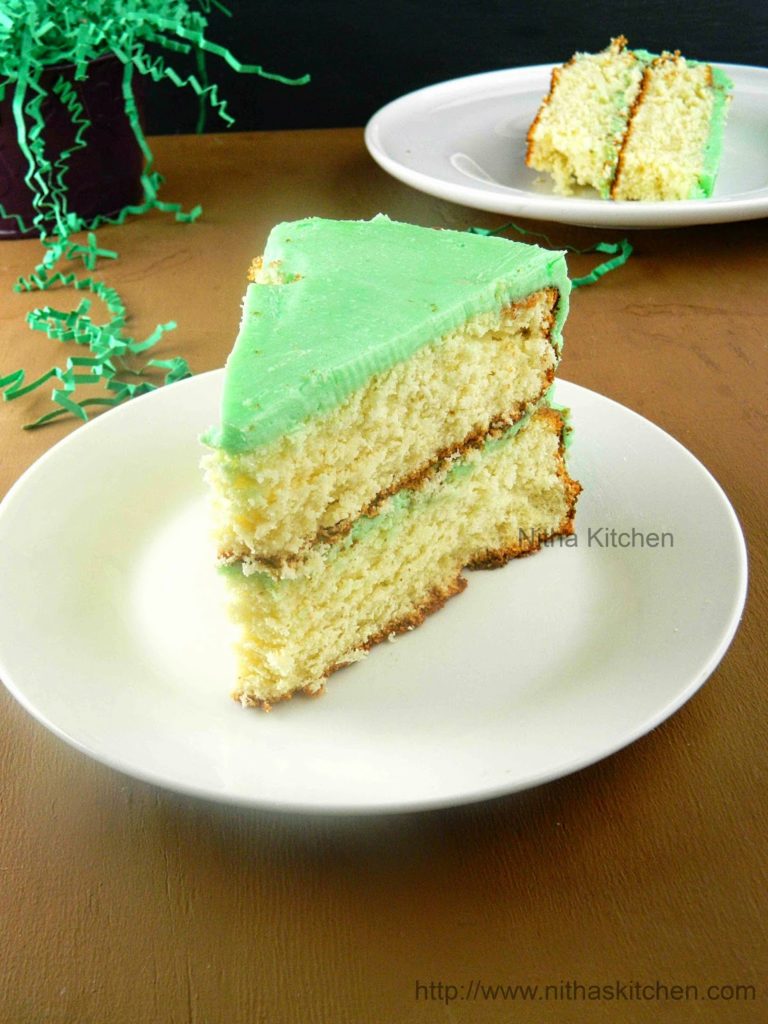
I clicked step by step pictures for strawberry cake since that recipe goes for baking partners challenge and couldn’t find time to click the inner view luckily I got 2 slices of vanilla cake and clicked them 2 days later. I surely update strawberry cake pictures when i bake for next special occasion.
Before stepping in,
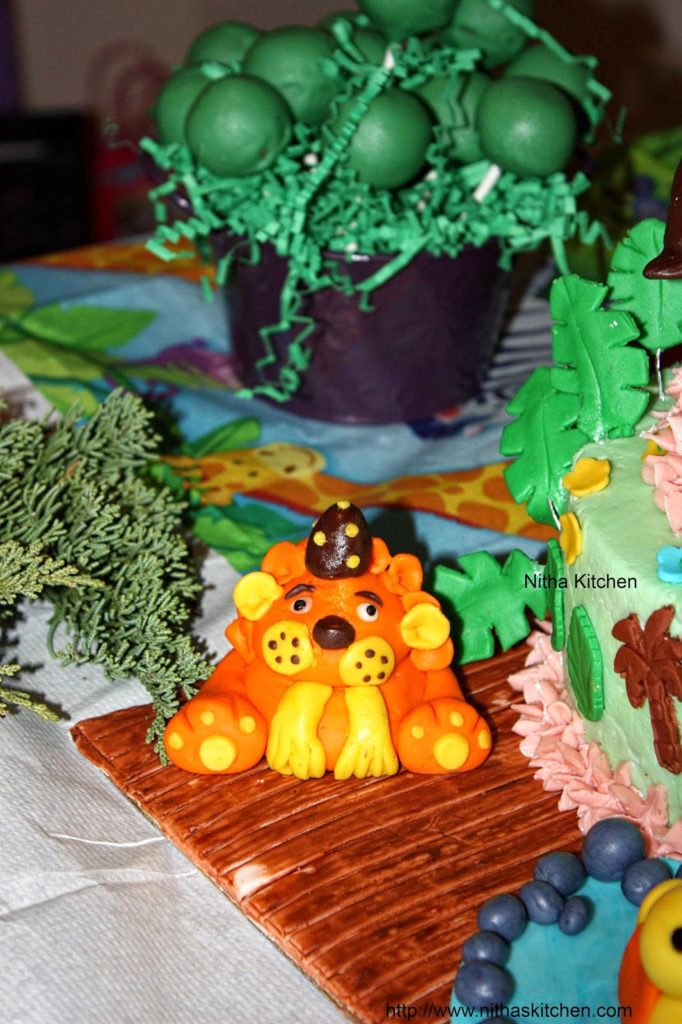
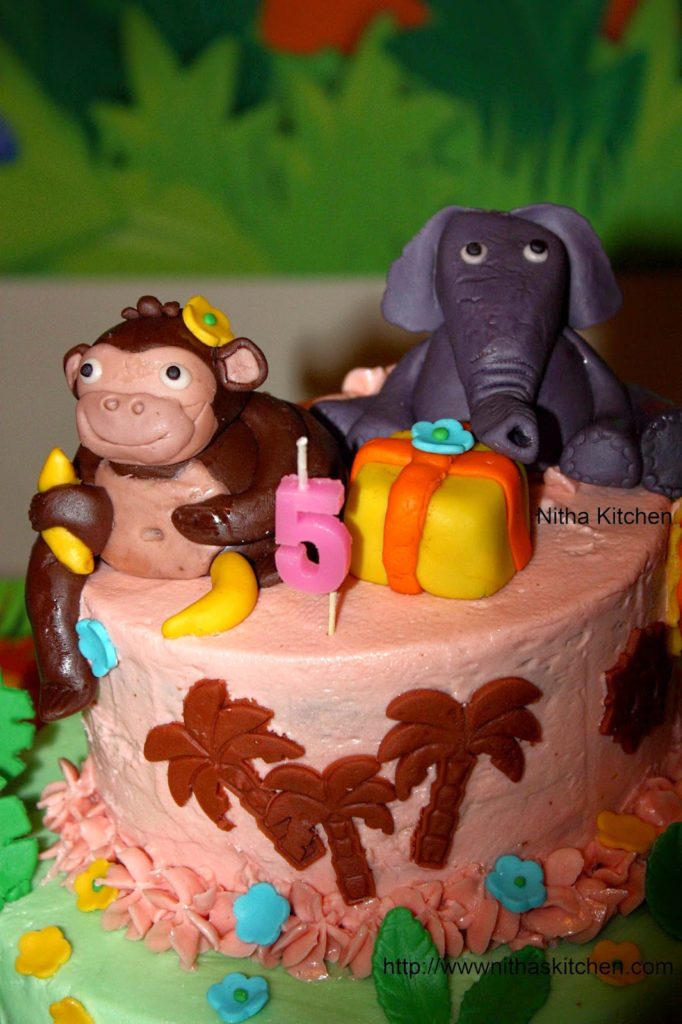
For Jungle theme Animal Fondant Toppers tutorial check HERE
Swiss Meringue Butter Cream Recipe Check HERE
Wooden Pattern Homemade Cake Board Check HERE
Homemade Cake Pops Shown at the back of Lion in above picture check HERE
Vanilla Cake – 8 inch 2 Layers (The bottow green layer cake)
Recipe Source :- Veena
Ingredients
*Cake Flour – 3 Cups
Sugar – 2 and 1/2 cups/325 grams
Butter – 1 and 1/4 cup
Milk – 1 Cup
Egg Yolks – 5 Large
Egg Whites – 7 Large + 1/4tsp tartar
Vanilla – 2 tsp
Baking Powder – 3tsp
Salt – 1/2tsp
*If you cant find cake flour, substitute with all purpose flour (APF) and corn starch. Standard substitution will be 1 cup cake flour = 1 cup of APF – 2 tablespoon of APF + 2 tablespoon of corn starch.
Method
- Grease two 8 inch cake pans and keep it ready.
- Swift flour, baking powder and salt and keep aside in a bowl.
- In a mixing bowl cream room temperature butter and sugar until light and fluffy.
- Add egg yolks one at a time and after each addition mix it well.
- Add the vanilla extract right now.
- Now add flour and liquid in 3 batches
- In another clean bowl whip egg whites to soft peaks.
- Fold the egg whites in 2 batches in to the cake batter.
- Pour the batter equally in both greased cake pans
- Bake in preheated oven at 350° F for 22-30 minutes or until cake tester inserted at center of the cake comes out clean.
Strawberry Cake – 6 Inch 3 Layers (Top pink cake)
Recipe adapted from America’s Test Kitchen
Ingredients
1 and 1/2 Cup + 3 Tbsp – APF/Cake Flour
Baking Powder – 3 tsp
Salt – 3/4 tsp
Butter – 9 Tbsp
Large Eggs – 3 Large
Strawberry Puree – 1/2 Cup
Milk – 3 Tbsp (optional, if your strawberry puree is bit watery then no need the milk)
Vanilla Extract – 1n1/2 tsp (Replace with strawberry essence)
Optional Food Color
For the Strawberry puree
1 and 1/2 lbs of very ripe fresh Strawberries (frozen strawberries without sugar)
2 tsp of Sugar
Directions
- Wash and hull fresh ripe strawberries. Cut it in to small pieces and transfer it to a bowl (Step wise Pic 1 below).
- Add a tablespoon of sugar and give a quick mix. Cover it and allow it to sit for 2-3 hours/ overnight in the refrigerator. Strawberries will become tender and juicy (Pic 2).
- Simmer the tender strawberries in a pan with ¼ cup of water(pic 3) for 20-25 mins in low flame(Taking care not to burn any).
- Mash it well with a spatula and allow it to cool (Pic 4).

- Transfer the contents to the blender with ¼ cup of water and puree the cooked strawberries (Pic 5).
- Filter the puree to remove any chunky pieces. (Taking care not to add any strawberry chunks, which would result in a mushy cake- We don’t need it).
- Again bring the filtered puree to the stove and slow cook it in low flame for another 15 mins(Pic 6).
- Reduce the puree to 1/4 cup. (If you have a little more puree that’s fine. You can use that as a filling later)
- Strawberry concentrated puree is ready.

For the Cake
- Preheat oven to 350°F. Grease (butter/shortening) and dust (flour) three 6” pans.
- You can divide the recipe or batter and bake according to your pan count.
- Take required butter, cut them in to pieces and allow them to sit at room temperature.
- Break open the eggs in a bowl and keep it ready.
Wet Ingredients
- In a small bowl, take ¼ cup of cooked strawberry puree and add ¼ cup of milk and whisk it.
- Add vanilla extract & strawberry extract (optional).
- Whisk in eggs, one at a time and keep the mixture ready.
Dry Ingredients

- In a large mixing bowl, sift cake flour.
- Add baking powder,salt and sugar, mix it slowly in a stand mixer with paddle attachment or with a hand held mixer.
- Toss in softened butter and continue mixing till you get ‘bread crumbs’ like texture.
- Slowly add the wet ingredients like egg (one by one), strawberry puree (Pic 1), vanilla extract and the cake batter is ready.
- Pour the batter equally in to three prepared pans (Pic 4). The mixture will not be runny and it will be difficult to spread.
- This is going to be the color of the cake once baked and its not going to turn pink. So if you want the cake to look pink(Pic 3), add few drops of beet juice or red food dye (Pic 2).
- Don’t use spoon to spread it, instead drop the pans on the counter multiple times to level the batter. Bake it at 350°F for 25-30 mins or until a skewer inserted comes out clean (Pic 5).
- Once done, remove the pans from the oven and let it sit in the counter for 10 mins.
How to Cool and Store the Cake
- (Tip: Press the bulges of the cake with a wet clean white cloth as soon as you remove from the oven. Taking care all the time not to burn your hands. You may not need to trim a lot of cake, while stacking also it gives clean edges.)
- Cover it with plastic wrap and transfer it to the freezer for a night. (Make sure your cake is completely wrapped and is not exposed, else your cake might turn dry).

Decorating Part
Remove the cake from the freezer 4 hours before you start decorating and place it at room temperature.
Basic Cake Decoration
- Keep your things ready.
- You may need a turn-table, cake board, a spatula, cakes, frosting and a small spoon.
- I don’t have cake turn table and i just go with ordinary plate.
- Here i used Swiss Meringue Butter cream frosting to fill and frost over the cake, but with 2 different colors.
How to assemble the cake
Leveling
- Trim the edges and level the cake (Step wise Pic 6 above).
- Take a cake board. Add a spoon of frosting (green SMBC) in the center and spread it. Top it with a 8″ cake layer.
- Trimmed edge facing down.
- Then fill cream on top of it. Spread evenly with a spatula (Pic 1 below).
- Stack another layer on top with trimmed side facing down.
Filling & Frosting
- Add ½ cup of frosting on top and spread it evenly on the sides. Just make sure the cake is totally covered with frosting. This is called crumb coat. (We are just locking up the crumbs of cake with the frosting). Let it sit in the refrigerator for 1 hour.
- Remove the cake from the refrigerator and add generous amount of frosting on top and sides. Spread the frosting.
- For thin layer you can just go with single coating its your choice but for professional look go for crumb coat and then another coat of frosting.
- Level the cake with spatula and trim the excess, since green frosted cake is going to be the bottom one i inserted 3 straws (Pic 2) to stack the 6 inch cake later.
- You can use wooden dowel too.
- Keep it aside and continue with pink frosting (Pic 3), just repeat the above process to decorate the strawberry cake and picture 4 is the the almost finished one.
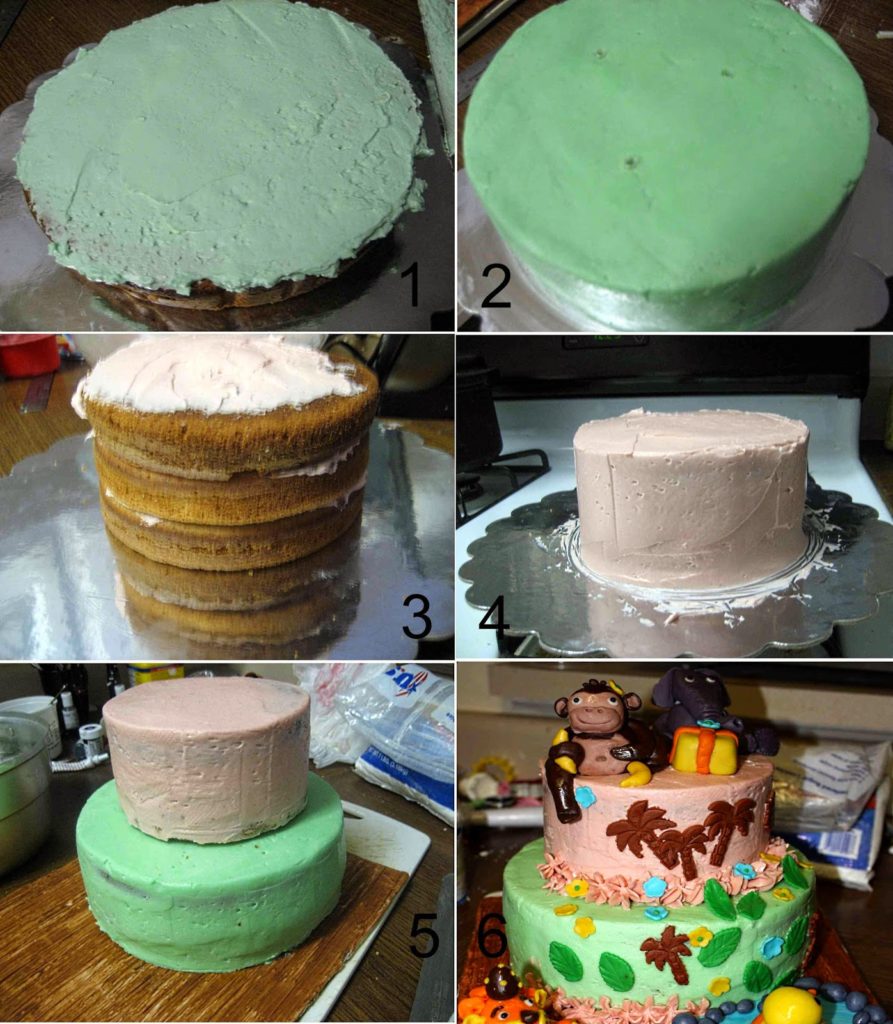
- Level it with sharp edges and once done top it over the green layered cake, make sure to place the cake in the center covering those 3 straws (Pic 5).
How to Stack the cakes
- Now using wooden dowel or 2 more straws insert from pink cake till the bottom of green one.
- Apply some frosting and cover the hole caused by dowel insert.
- You can transfer the cake over pre made cake board right now (Pic 5).
- So the cake is ready and you can make fondant borders or some decoration to hide the gap in between each cake (Pic 6).
- Here you can use grass tool tip for that.
- Now top the cake with fondant figures made before (Pic 6) and the decoration is to your creativity.
- Now the Cake is ready 🙂

Hey, have you ever deal with party venues in Houston? Well, I am thinking to book this venue for my husband birthday party. Actually someone told me that they provide good services including food and decoration.
Lovely cake,many items for the party,I wish u and ur family had a great time
Beautiful cake, you made awesome cake, and also lot dishes for the party. yumm.
Awrsome treat for ur kid.It gives me ideas to celebrate my kids b'day……..
Wow !Awesome,Thanks for sharing such detailed post with lots of pictures & belated birthday wishes .