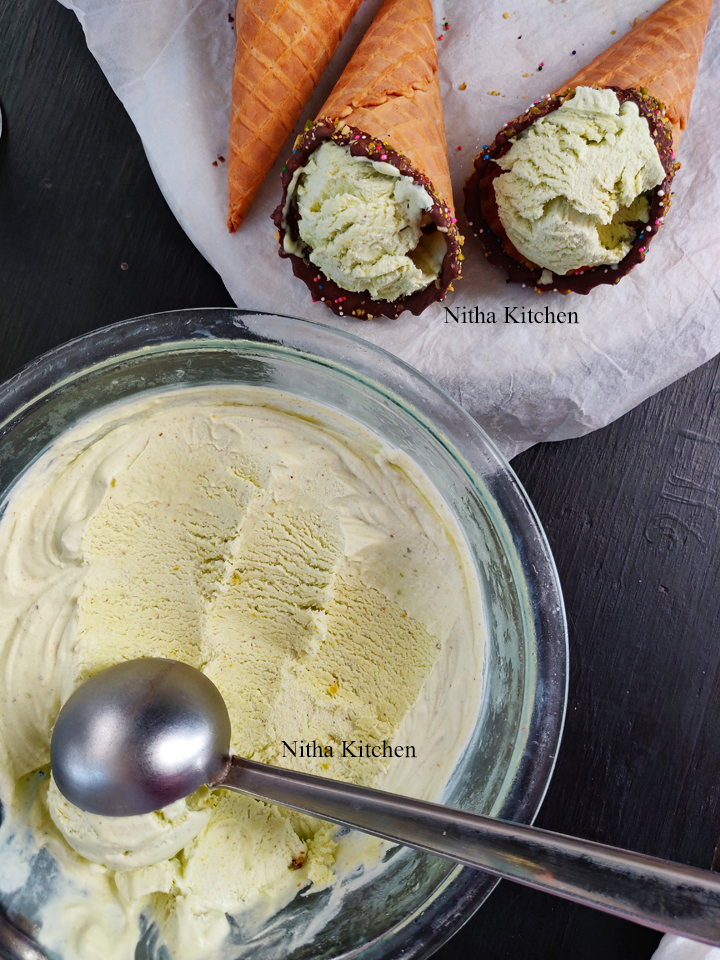
No Churn Eggless Pistachio Ice Cream , there were so many requests for the eggless pistachios ice cream since I posted Custard based Pistachios Ice Cream in blog, which was one main layer in the popular Cassata Ice cream Recipe. Even though I have Ice Cream maker
I did this ice cream in hand blender which is so quick and convenient to whip it with few ingredients compared to professional ice creams making technique which in turn needs to prepare custard in advance, chill it , also freeze the ice cream bowl before churning.
What is Ice Cream?
Ice cream is a frozen food typically eaten as a snack or dessert. It may be made from dairy milk or cream and is flavored with a sweetener, such as sugar or fresh fruits puree, and any spice, such as cocoa or vanilla or cardamom powder. It can also be made by whisking a flavored cream base and liquid nitrogen together. They are mixed, whipped or churned using ice cream maker to soft, creamy texture using special temperature while preparing it.
Homemade vs Store Bought
Homemade is all about the flavor, you can include your favorite flavors in homemade for example Mango, Kiwi etc these kind off ice creams are not available in general stores. Also they are great without artificial ingredients, fake thickeners, or weird stabilizers to keep it fresh for several days. They are amazingly flavorful and actually fresh tasting compared to store bought.
However homemade ice cream often melts very quickly. The thing is Ice creams that contain lots of air and fat tends to melt slowly. But homemade ice cream usually contains much less air than the stuff we buy in the store.
How to make Ice Cream like Professional?
Ice creams made using ice cream maker professionally has custard. I too have several custard based ice creams which are better than store bought and no churn ice creams. Custard is basically the egg yolks get cooked with milk and sugar once it gets thickened , the rest of ingredients are added and churn to form an amazing textured ice cream. Yup egg yolks will give your ice cream fantastic texture and body. They will emulsify your mix and they will also reduce the growth of ice crystals and air bubbles.
What is No Churn Ice Cream?
No churn Ice cream is a homemade ice cream without using a ice cream maker machine. For that in general simply whip the cream until soft peaks form. Add sweetened condensed milk , vanilla extract, fruits puree kind of flavor mix ins. And continue whipping until stiff peaks forms. In this recipe I used an electric mixer, whipped the cream along with condensed milk, pistachios and Pistachio flavor until cream reaches stiff peaks.
Later pour into a resealable container, cover the surface with plastic wrap, then seal. Freeze for at least 6 hours, or until firm. Keep stored in the freezer after each use.

When to Use Thickener?
If using fresh cream or dairy cream of fat less than 30% then use Milk powder or Cornstarch or Custard powder or Paneer / Cottage Cheese as thickener. Cornstarch is a gluten free substance and is the most common thickening agent used in the industry. When cornstarch is cooked in water or milk, the starch granules absorbs it, swell, and rupture, forming a translucent thickened mixture, I used this thickener in my Gulkand Kulfi please do refer it when you are using so… Also I have no cream Mango Kulfi using regular milk and paneer do check it HERE.
Do you think buying an Ice Cream Maker?
If you are in to making homemade ice cream on a regular basis then it is worth the investment to buy an ice cream maker because it makes the process faster and turns out top notch ice cream.
Heavy Cream Vs Whipping Cream
The difference between Heavy Cream and Whipping Cream is based on the fat content. Heavy cream has slightly more fat i.e. at least 36% compared with whipping cream which has at least 30% fat. Both whip well and taste delicious, but heavy cream will hold its shape longer, while the other produces a lighter and softer texture.
Recipe Variations
Fat and sugar are two essential components of ice cream. In this recipe I skipped sugar since condensed milk balance the sweetness. I used dates puree in Eggless No Churn Mango Ice Cream recently by avoiding the processed sugar completely. You can directly add pistachio flour to this recipe and the milk I mentioned is not necessary in that case. That’s a short cut method which ease the process and it doesn’t need soaking and grinding the raw pistachios as well.
Eggless Pistachio Ice Cream Ingredients
For Ice Cream
*3/4cup unshelled pistachio gives 1 cup flour
Heavy Cream – 1 Cup
No Shell Raw Pistachios – 1/3 Cup Plus
Milk – 1/3 Cup To Soak Pistachios OR
Pistachios Flour – 1/2 Cup
Sweetened Condensed Milk – 1/2 Cup
Pistachios Flavor – 1/2tsp
To Decorate
Chocolate Melting Wafers – 1/2 Cup
Flavorless Oil/ Veg Shortening – 1 Tbsp
Funfetti / Confetti Sprinkles – 1 Tbsp
Coarse Pistachio Powder
Waffle Cones
so 1/cup gives almost 1/2 cup flour

YouTube Tutorial
Homemade Pistachio Paste
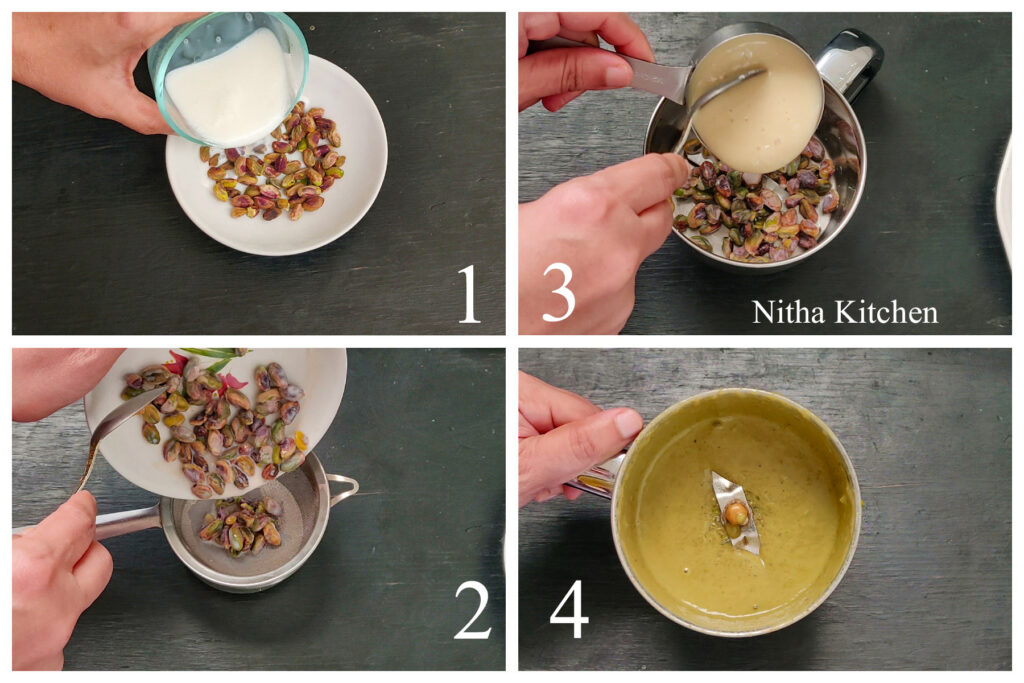
- Boil the milk and immediately soak the shells free raw pistachios in it (Pic 1).
- 20 minutes later do drain the excess milk from soaked pistachio (Pic 2).
- Add it to the food processor jar along with half of condensed milk from the ice cream recipe (pic 3).
- Grind to smooth paste (pic 4) if needed use the strained milk while grinding.

Eggless Pistachio Ice Cream Preparation
- Chill the bowl and beater for 30 minutes before whipping the cream.
- Later add heavy cream or whipping cream to the chilled bowl (pic 1).

- Start whipping in medium speed (Pic 2) until the cream gets thicken and reaches medium peaks (pic 3).
- To the whipped cream add prepared pistachio paste, remaining condensed milk (pic 4), pistachio flavor and a drop of green food color (optional).
- Scrape the sides and continue whipping until stiff peaks like shown in Pic 5.
- Do stop beating (check the video tutorial), wipe the sides (Pic 6), wrap and store in freezer for 6 hours at least or overnight.
- Using warm scoop or spatula do scoop out the ice cream (Pic 5, below) and serve chilled.
- If interested in decorating the waffle cones do check below.

How to Decorate Waffle Cones
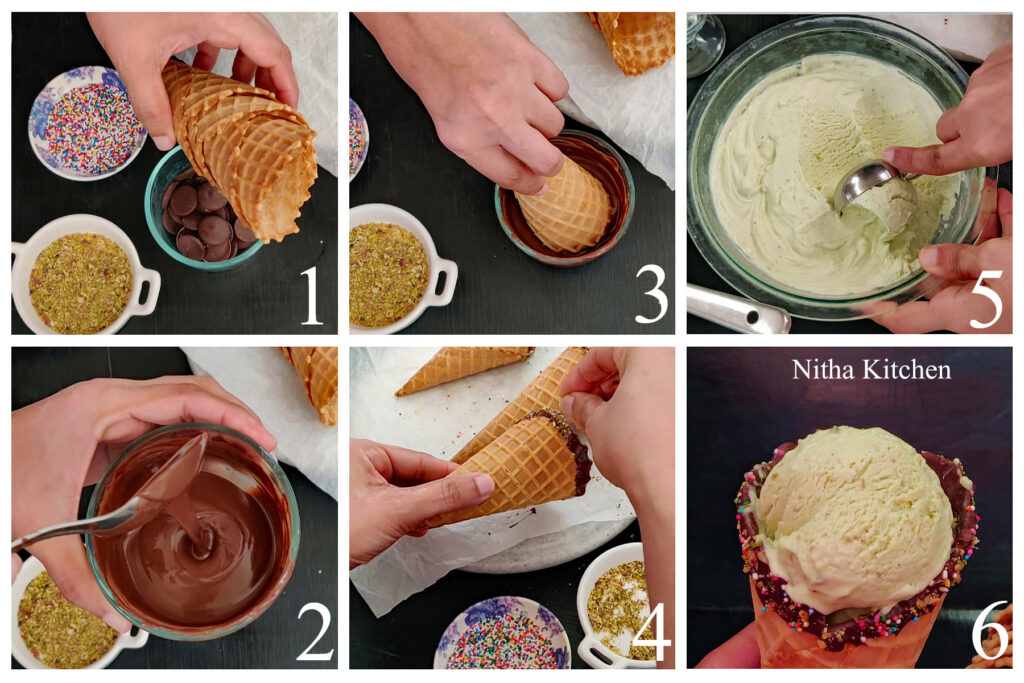
- Keep the necessary ingredients to decorate the cone(pic 1).
- Using double boiler or over hot water do place the chocolate melting wafers(check the video).
- Once its half way through or 3/4th tempered do remove form water.
- Keep stirring so that any grainy chocolates melt completely.
- Add flavorless oil or shortening to the tempered chocolate for smooth finish on cones.
- The texture should be glossy like shown in Pic 2.

- Dip each cone gently in to the chocolate and dip as much chocolate rim you want over the cones (pic 3).
- Immediately add some confetti sprinkles and coarse pistachios powder over it (pic 4).
- They both give nice look over the chocolate.
- Scoop out the prepared ice cream (Pic 5) and add to decorated cones (Pic 6).
- Enjoy…
Printable Recipe Card

- Heavy Cream – 1 Cup
- No Shell Raw Pistachio – 1/3 Cup Plus
- Milk – 1/3 Cup To Soak Pistachio OR
- Pistachio Flour – 1/2 Cup
- Sweetened Condensed Milk – 1/2 Cup
- Pistachio Flavor – 1/2tsp
- Chocolate Melting Wafers – 1/2 Cup
- Flavorless Oil/ Veg Shortening – 1 Tbsp
- Funfetti / Confetti Sprinkles – 1 Tbsp
- Coarse Pistachio Powder
- Waffle Cones
-
Chill the bowl and beater for 30 minutes before whipping the cream.
-
Later add heavy cream or whipping cream to the chilled bowl (pic 1).
-
Start whipping in medium speed (Pic 2) until the cream gets thicken and reaches medium peaks (pic 3).
-
To the whipped cream add prepared pistachios paste, remaining condensed milk (pic 4), pistachio flavor and a drop of green food color (optional).
-
Scrape the sides and continue whipping until stiff peaks like shown in Pic 5.
-
Do stop beating (check the video tutorial), wipe the sides (Pic 6), wrap and store in freezer for 6 hours at least or overnight.
-
Using warm scoop or spatula do scoop out the ice cream (Pic 5, below) and serve chilled.
-
If interested in decorating the waffle cones do check below.
-
Keep the necessary ingredients to decorate the cone(pic 1).
-
Using double boiler or over hot water do place the chocolate melting wafers(check the video).
-
Once its half way through or 3/4th tempered do remove form water.
-
Keep stirring so that any grainy chocolates melt completely.
-
Add flavorless oil or shortening to the tempered chocolate for smooth finish on cones.
-
The texture should be glossy like shown in Pic 2.
-
Dip each cone gently in to the chocolate and dip as much chocolate rim you want over the cones (pic 3).
-
Immediately add some confetti sprinkles and coarse pistachios powder over it (pic 4).
-
They both give nice look over the chocolate.
-
Scoop out the prepared ice cream (Pic 5) and add to decorated cones (Pic 6).
-
Enjoy…
Recipe Video

[…] Custard Ice Cream OR Eggless Mango Ice Cream – 2 CupsPistachio Custard Ice Cream or Eggless Pistachio Ice Cream – 2.5 Cups Strawberry Custard Ice Cream / Eggless Strawberry Version – 3 CupsCake Layer […]