Cassata Siciliana (Cassata Ice Cream) is a traditional recipe from Italy it is also called as Neapolitan or Harlequin Ice cream. It usually contains three flavors of Ice Cream arranged side by side in the same container. And with or without sponge cake layers, Candied fruits and Nuts. During my student life, after the exams or last day of school/college or alumni meet in all kind of those fun and sad farewell moments, Cassata was our first choice we friends
preferred to have. I am away from India for the past 11 years and this Homemade Cassata Ice Cream makes me to cherish those valuable memories.
I have a Neapolitan recipe with a simple shape and natural flavors like blueberry, mango and strawberry HERE. This recipe also has 3 natural flavors like Mango, Pistachios and Strawberry, Orange Sponge Cake and Cashew Nuts. With simple techniques and using household kitchen items you can take this homemade to next level.
Yup to the perfect store bought texture that is the best part here in this cassata ice cream recipe. This is our recent family favorite and while editing this post my boy is requesting me to make this yummilicious dessert again.
I came up with this idea 2 months back when I craved for Indian Cassata badly. I promised dear readers in my previous posts that I will come up with this recipe soon. But I couldn’t keep up, So sorry for that you know how tough it is to manage 2 kids who are in the summer vacation right now.

I have started teaching my 9 year old some simple recipes/kitchen basics. When she shows more interest and wants to bake a cake, with the help of me she did Oreo Ice Cream Cake recently for Father’s day and many more recipes will be added in the blog in future :-).
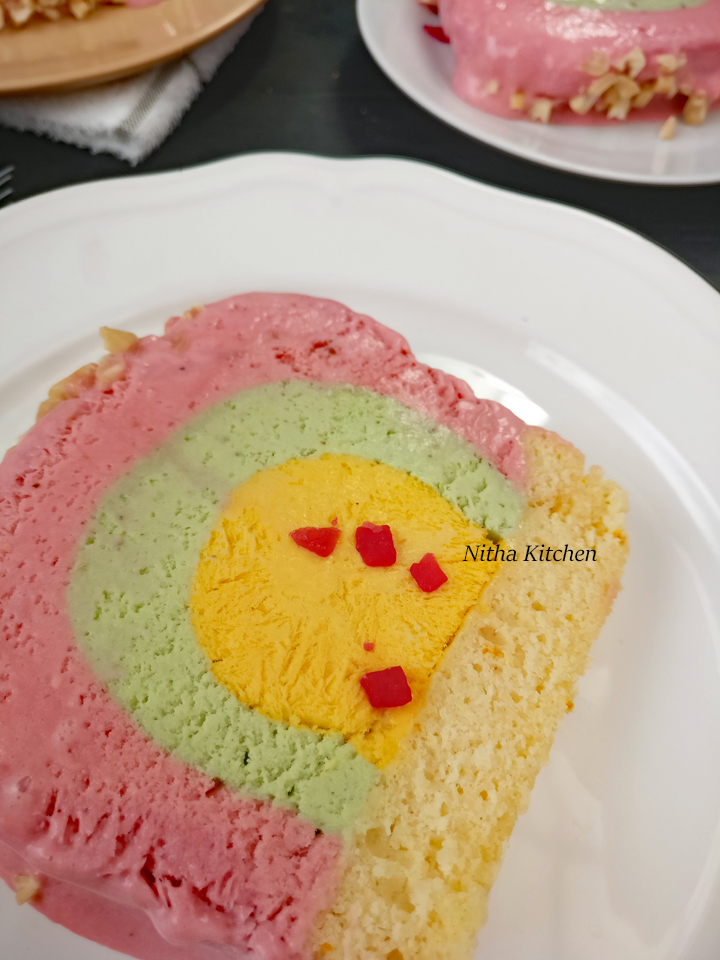
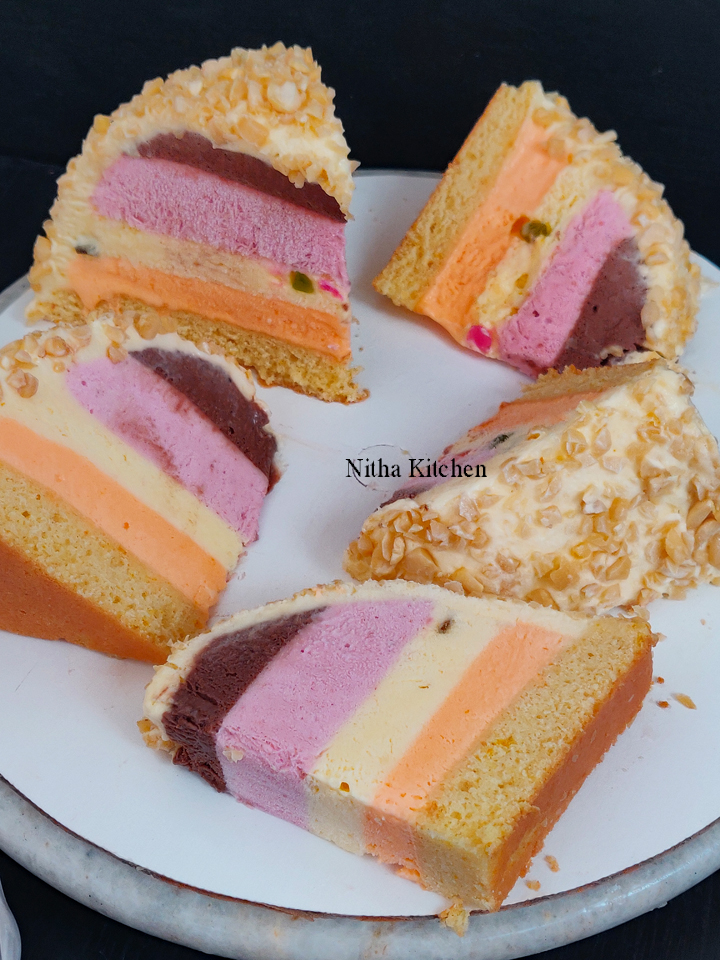
Coming to this recipe, I prepared two mango round layers and two cake base and I often make more quantity of ice creams, so she replicated what I was doing for this CASSATA recipe. she used one loaf pan and with other stuffs, she made this gorgeous homemade Cassata ice cream without shaping it (refer above picture). Yeah you heard it right I am not allowing her to use knife!
And here is the picture of her work, she played with colors , played with shapes its awesome right? the untouched ice cream has the perfect texture, have you noticed it? My version got the perfect semi circle shaped ice cream like store bought ta da !.
Highlights of Cassata Ice Cream
- Use homemade or store bought three flavors of ice cream.
- You can shape the cassata ice cream as shown or make it plain, HERE is the easy version.
- If any ice cream layer is gooey do firm up in the freezer as required before adding the next layer over it.
- Like my daughter played with flavors, use chocolate cake layer (base) instead of vanilla and enjoy it.
- These are the few important things to note before start making.
How to make Layers For Cassata Ice Cream
- Measure the loaf pan (Pic 1) you are going to use for making cassata ice cream.
- Cut two cardboard (Pic 2) a little less than the length and height of the Loaf pan which standby as divider and holds the shape while adding ice cream layers (Pic 4).
- Cover the cardboard with aluminum foil (Pic 3).
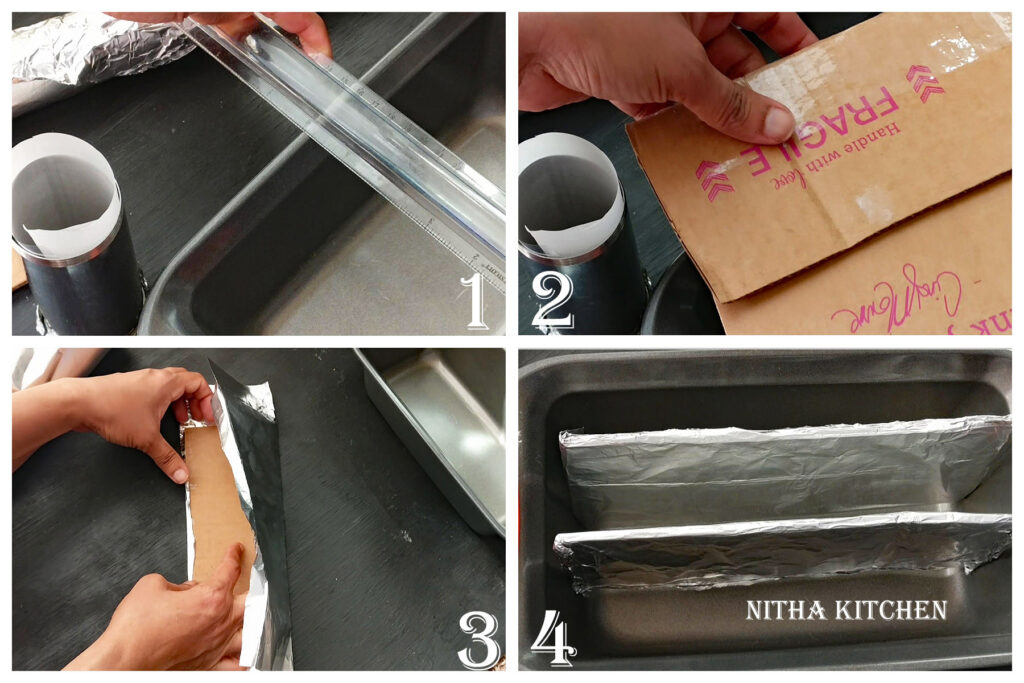
- Wrap the bottom of the cylindrical container you use to get inner circle ice cream pattern with foil if it has holes (Pic 1).
- You can place small round parchment at the bottom of the cylindrical container for easy removal.
- Wrap the inner cylindrical container with parchment paper (Pic 2).
- Staple the top of the parchment over the cylindrical surface to with stand the height of the ice cream very well (Pic 4).

- Fill the cylindrical chakli dough holder or Puttu maker with first layer of ice cream, this round shape is the first and foremost step to get cylindrical ice cream layers (Pic 3).
- I used Mango Ice cream with Tutti Frutti in between.
- Chill cylindrical mold filled with ice cream for 6 hours or over night in freezer , the one is the picture 4 is frozen ice cream..

For this recipe you need either Homemade or Store bought three Ice Cream flavors and few regular house holds items.
Cassata Ice Cream Ingredients
Mango Custard Ice Cream OR Eggless Mango Ice Cream – 2 Cups
Pistachio Custard Ice Cream or Eggless Pistachio Ice Cream – 2.5 Cups
Strawberry Custard Ice Cream / Eggless Strawberry Version – 3 Cups
Cake Layer (detail follows) or Bread Slices
Bread Pan – 9″ X 5″ with 3.25″ height
Chopped Cashews – 1/2 Cup
Optional Tutti Frutti – As Needed
One cylindrical shaped container like Chakli press or Puttu maker
Two card boards of 9 inch length and 3.25 height to fit in the bread pan and wrapped well with foil.
Parchment paper as needed
Cassata Ice Cream Preparation
- Cover the loaf pan or the pan you use to make cassata with parchment paper (Pic 1).

- Meanwhile prepare the card boards, cake layer for cassata base or bread and get ready with it.
- Place the cake layer inside the parchment placed bread pan (pic 2).
- Fill the gaps gently like shown in Pic 3, I made 10X10 inch cake and cut into half, used 3/4th to fill the bread loaf pan.
- The prepared card boards are placed (Pic 4) and ready to fill it with first circle layer.
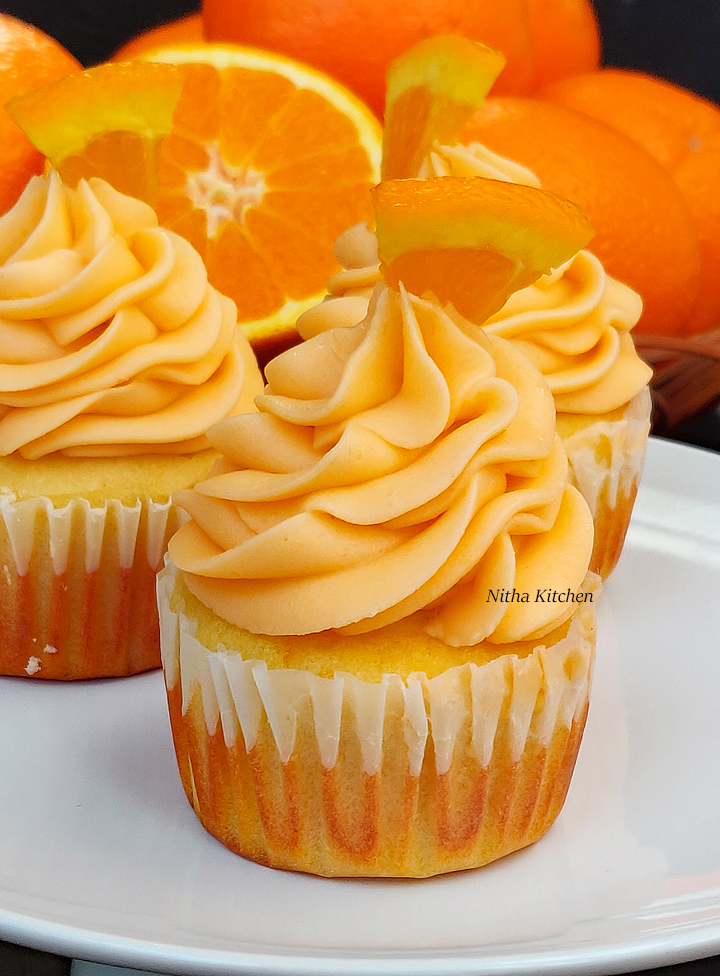
- Egg based Vanilla Sponge or Hot Milk Sponge or Eggless Vanilla Sponge Cake and for more tea cakes click HERE.
- Actually I used fresh orange flavored cake as the base,
will postthe video recipe link HERE (refer picture below)later, so stay tuned.
- Place the boards as shown in video/ Picture 4 by allowing space in the center to fit the first mango ice cream layer.
- Unwrap the mango layer from the mold (Pic 5) and once added to the pan (Pic 6) chill it for 1 hour or until layer is firm (Pic 7).

- Adjust the card board to add the next layer (pic 7 & 8) also make sure you have enough room for the third layer that is the space outside the board (Pic 8).
- Add little gooey and not completely melted Pistachios Ice Cream layer (Pic 9) like shown in Pic 10 and allow it to chill for 6 hours or until it is firm (Pic 11).
- Here comes the molding/shaping part where you can shape the ice cream layer using knife or cake leveler.
- For that gently remove the cardboard, (Pic 1 1 & 12).
- Since the ice cream layers are frozen can easily mold, fill any gaps left by cardboard (Pic 12) and trim the excess (Pic 13).
- Trim the sharp edges on both sides first then level the top and make it even all over by filling any gaps and if needed trim the excess on sides as well.
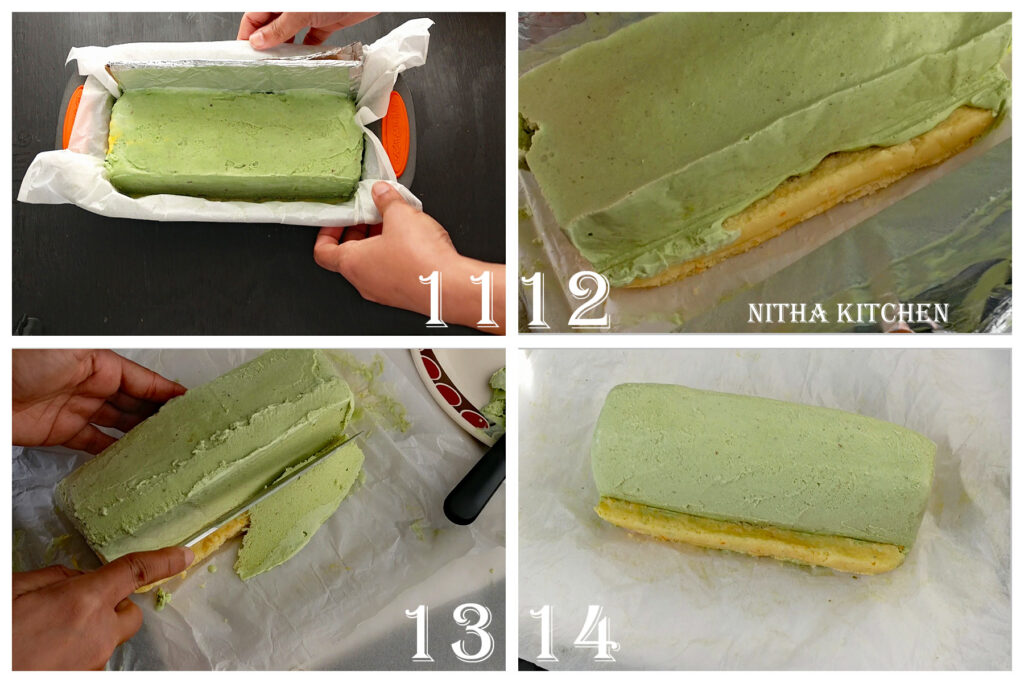
- Do refer the video how I shaped by keeping the inner mango layer in mind.
- Shape it quickly as shown in the video tutorial otherwise ice cream layers melt.
- If it happens do freeze for a while and continue.
- Once done, let the ice cream sets for 6 hours or until firm in the freezer.
- Picture 14, is the finished molded ice cream before adding the next and last layer of ice cream.
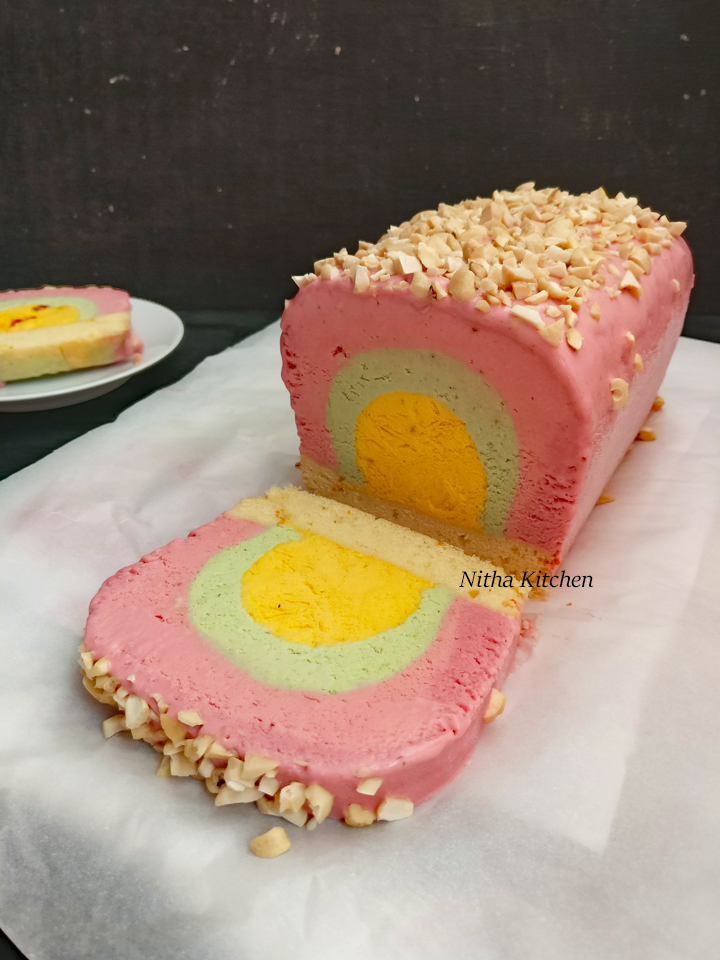
- Later add the final Strawberry layer (Pic 15), I have added little chopped cashews in the ice cream as well (optional).
- Its optional to use the cardboard while adding the final layer of ice cream, it depends on how much space you have between second layer and the bread pan and how much ice cream you have in hand.
- Since the bread pan I used is wide on the top, I used cardboard (Pic 15) to save ice cream and some time while shaping it.

- Allow to chill in freezer until it becomes firm (pic 16).
- Now do gently remove the cardboard (Pic 17), shape the final layer by trimming the sharp sides and level the top as in the video tutorial and in Pic 18.
- Add cashew nuts on top of cassata ice cream, when satisfied with shaping the ice cream (Pic 19).
- Again chill until it firms up.
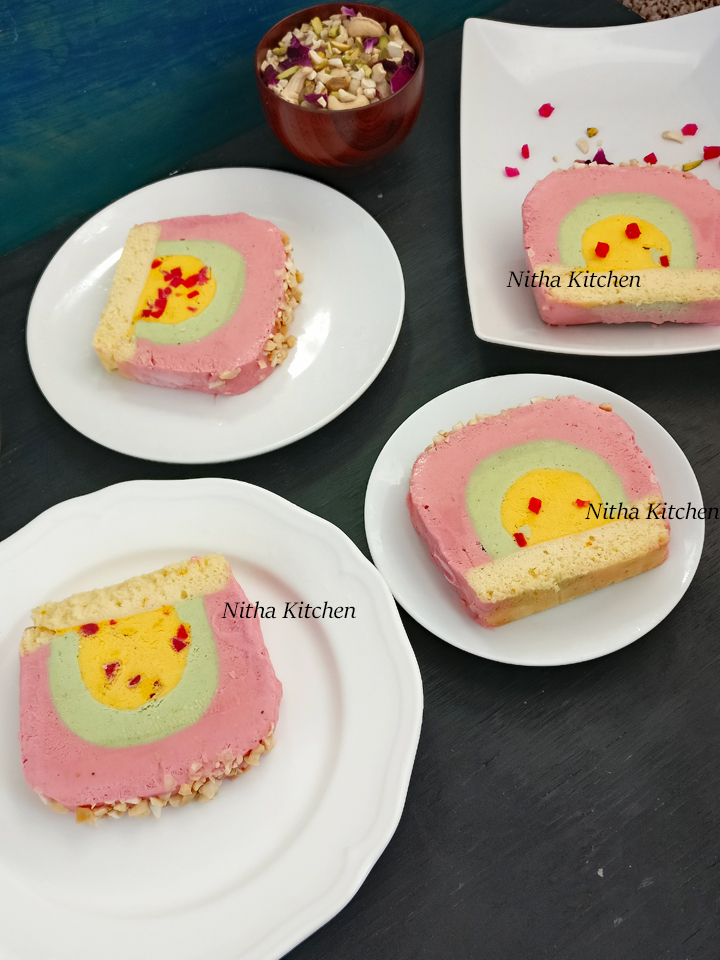
- Slice when its immediately out from the freezer (Pic 20), ta da homemade perfect cassata is ready to enjoy.
- Serve chilled 🙂
If you really like this recipe do give a thumbs up, subscribe my social medias and share it among friends. Please give proper credit when you use this idea in your blog or YouTube or in any social medias. I will be coming up with more interesting recipes like this in near future 🙂

Cassata Ice Cream Recipe Card

Learn to make Cassata Ice Cream From Scratch
- Mango Custard Ice Cream / Eggless Version – 2 Cups
- Pistachio Custard Ice Cream – 2.5 Cups
- Strawberry Custard Ice Cream / Eggless Version – 3 Cups
- Cake Layer (detail followor Bread Slices
- Chopped Cashews – 1/2 Cup
- Optional Tutti Frutti – As Needed
-
Fill the cylindrical chakli dough holder or Puttu maker with first layer of ice cream, this round shape is the first and foremost step to get cylindrical ice cream layers.
-
Chill cylindrical mold filled with ice cream for 6 hours or over night in freezer.
-
Meanwhile prepare the card boards, cake layer for cassata base or bread and get ready with it.
-
Egg based Vanilla Sponge or Hot Milk Sponge or Eggless Vanilla Sponge Cake and for more tea cakes click HERE.
-
Actually I used fresh orange flavored cake as the base, will post the link HERE later so stay tuned.
-
Place the boards as shown in video by allowing space in the center to fit the first mango ice cream layer.
-
Unwrap the mango layer from the mold and once added to the pan chill it for 1 hour or until layer is firm.
-
Adjust the card board to add the next layer also make sure you have enough room for the next layer that is the space outside the board.
-
Add little gooey and not completely melted Pistachios Ice Cream layer and allow it to chill for 6 hours or until it is firm.
-
Here comes the molding/shaping part where you can shape the ice cream layer using knife or cake leveler.
-
Do as shown in the video tutorial and make it fast otherwise ice cream melts.
-
If it happens do freeze for a while and continue.
-
Trim the sharp edges on both sides and level the top and make it even all over by filling any gaps and if needed trim the excess.
-
Once done, let the ice cream sets for 6 hours or until firm in the freezer.
-
Later add the final Strawberry layer, I have added little chopped cashews in the ice cream as well (optional).
-
Its optional to use the cardboard while adding the final layer of ice cream that has to stay close to the bread pan.
-
Since the bread pan is wide on the top, if you use it you can save ice cream and some time while shaping it.
-
Allow to chill in freezer until it becomes firm.
-
Now do shape the final layer by trimming the sharp sides and level the top as in the video tutorial.
-
Add cashews when satisfied with shaping the ice cream.
-
Again chill until it firms up.
-
Slice when its immediately out from the freezer, ta da homemade perfect cassata is ready to dig in.
-
Serve chilled 🙂
Recipe Video
- Cut two cardboards of the length and height of the Loaf pan which standby as divider and holds the shape while adding ice cream layers.
- Cover the cardboards with aluminum foil.
- Wrap the bottom of the cylindrical container you use to get semi circle pattern with foil if it has holes.
- You can place small round parchment at the bottom of the cylindrical container for easy removal.
Staple the top of the parchment over the cylindrical surface to with stand the height of the ice cream very well. - Use homemade or store bought three flavors of ice cream.
- If any layer is gooey do firm up as required before adding.
- Cover the loaf pan with parchment, these are few important things to do before starting.
Related Recipe Links


Amazing recipe!