
Wishing you all a very happy Pongal/Sankranti /Lohri!!! The Indian harvest festival/pongal is to thank god for the harvest they made. Rice is the major cultivation happens in Tamilnadu and right now it’s harvest time there. Today’s recipe is mainly related with
rice, you heard it right, Yes it’s Kai Murukku/Chakli with two versions. One with rice powder based and the other is rice batter based. When I went to India in 2010, My Mom arranged Kai murukku experts to come home and make snacks for us as a return snack to US. I got a chance to view the kai murukku making method unfortunately I couldn’t recorded and neither did practice. I came to know from those ladies that they use a specific rice to make this suthu murukku for thier business, that is IR-20 variety. This is my first attempt at making this spiral/twist murukku and I tried both versions at a time. I need more practice to get perfect shapes though taste wise these recipes never fails you, I assure that. I have given step wise pictures of making it but you can watch some you tube videos. Recently I attempted second time do check the video and more pictures…
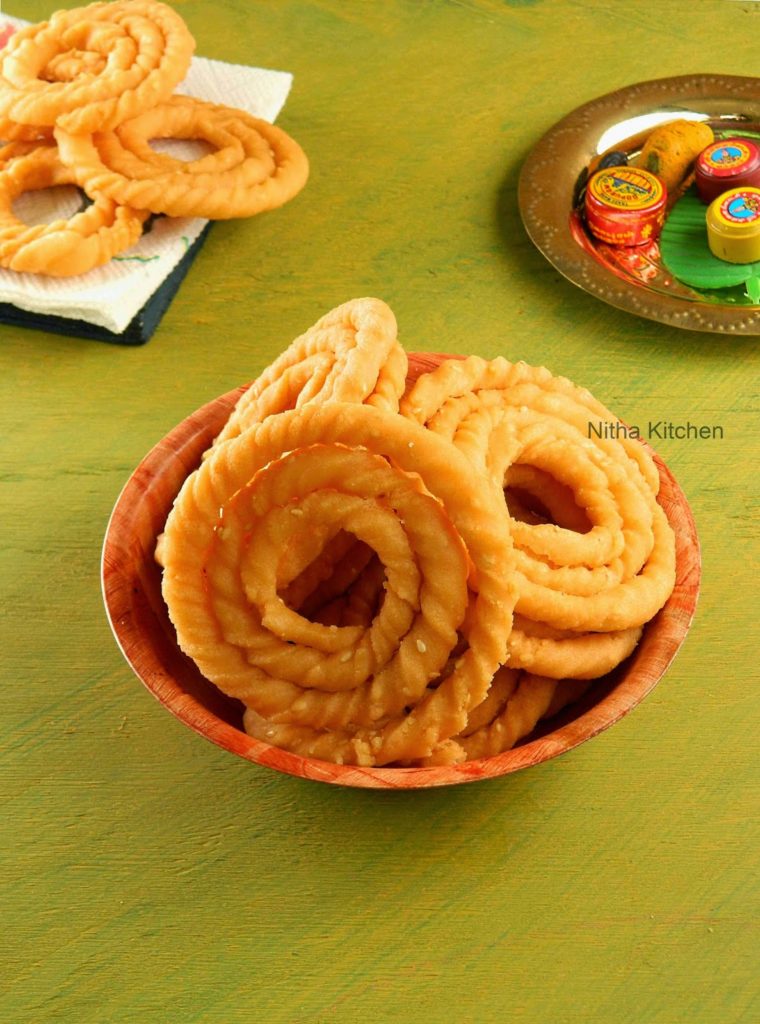
Yields :- 25 Murukkus Approx
Raw Rice Flour Kai Murukku Version I
Ingredients
Raw Rice – 2 Cups
Urad Flour or Pottukadalai Flour – 5 Tbsp (You can dry roast 1/2 cup urad dal and make fine powder)
Butter – 4 Tbsp (Softened)
Sesame Seeds – 1 Tbsp
Salt and Water – As needed to make dough
Oil – To Deep Fry
Kai Murukku Batter Preparation
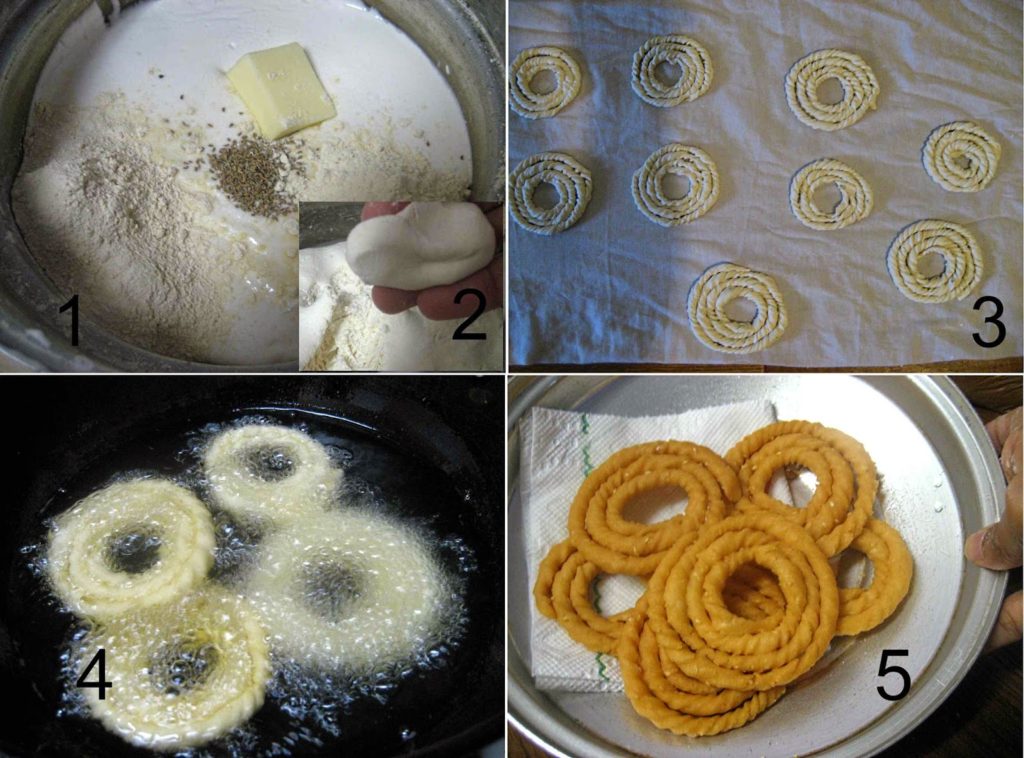
- Soak rice for 2 hours, drain and spread over cloth for 20-30 minutes (Pic 1).
- Powder the rice in batches and sieve it (Pic 2), make sure it has some moisture while grinding.
- Again powder the coarse rice filtered during this process.
- Finally you get 4 and 1/4 Cups to 4 and 1/2 cups of Rice flour.
- Mix the remaining ingredients to rice flour (pic 3) except water and oil.
- Now sprinkle little by little water and make soft non sticky dough (Pic 4).
- Cover the dough till you use.

How to Shape & Fry Kai Murukku
- Spread the same cloth used for draining the rice(the cloth should have mild wetness) and make designs as shown in above video and pictures.
- Grease your hands with oil and take a lemon size ball in your hand (Pic 5).
- Place a lid/round cookie cutter over the cloth and around it spiral the dough without breaking (Pic 6, Version I).
- It comes by practice if you are not satisfied with the output you can try again.
- Shape at least 15 and then heat oil to deep fry it (Pic 7, Version I ).
- When oil is well heated/hot, using flat dosa spatula or chapathi turner or using your hands gently take the shaped murukku one at a time and drop it carefully to the oil pan.
- It should be cooked in medium flame so add 3-4 one by one (Stepwise Pic 4 below).
- Just wait and add the next one ie after the first added murukku pops up a bit.
- Allow to cook well (Pic 4), flip over half way thru.
- Meanwhile you can make shapes with the rest of the dough.
- Once the oil bubbles suppress and murukku turn golden brown remove/drain the excess oil (Pic 5, above) and add the next batch to the hot oil.
When compared to rice flour version the ground batter version murukku dough turns out super soft like fresh homemade butter consistency and very easy to shape kai murrukku for beginners like me.
Idli Rice Batter Kai Murukku
Yields :- 1lb to 1.25lb of kai murukku
Idli Rice/IR-20 – 1 and 1/2 Cups
Homemade or Store Bought Urad Flour or Pottukadalai Flour – 1/2 Cup (you may not need all)
Butter – 3 Tbsp
Ajwain/Omam – 1tsp (Replace with Cumin Seeds)
Sesame Seeds- 2tsp (Optional)
Salt – As Needed
Oil – To Deep fry
Wet Batter Kai Murukku Dough Preparation
- Soak rice for at least 3 hours.
- Meanwhile dry roast the urad dhal till golden brown and allow to cool completely.
- Grind the fried dal and sieve it to get fine powder.
- Grind the rice in grinder with less water and to very smooth consistency, for batter consistency check here.
- Now add omam, sesame seeds, butter, salt, urad dhal powder to rice batter (Pic 1 below).
- Reserve few urad flour and if needed add more at last.
- The quantity of urad flour depends on how thick the rice batter is, so after adding 1/4 Cup add urad dal flour in tbsps.
- Attain the perfect consistency as shown in picture 2 (above) and when you make shapes it should hold, if it breaks it needs more moisture ie sprinkle water and knead again.
- Hereafter making of kai murukku is same as mentioned in “How to shape & Fry Kai Murukku” sub heading.
Notes
- Once the murukkus cooled well store it air tight container, this murukku take time to cool completely so make sure you leave it in room temperature for a while otherwise they turn soggy.
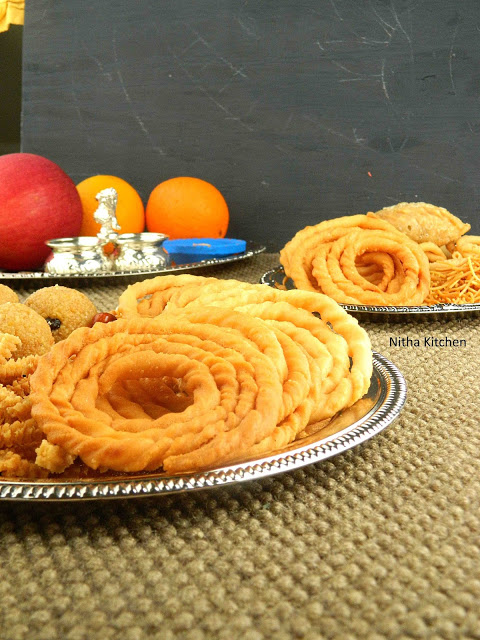
I have made all the snacks displayed here for this Tamil new year, for more snacks and sweets do check the link provided HERE.

Recipe Card

- Raw Rice – 2 Cups
- Urad Flour or Pottukadalai Flour – 5 Tbsp You can dry roast 1/2 cup urad dal and make fine powder
- Butter – 4 Tbsp Softened
- Sesame Seeds – 1 Tbsp
- Salt and Water – As needed to make the murukku dough
- Oil – To Deep Fry
- Idli Rice/IR-20 – 1 and 1/2 Cups
- Homemade or Store Bought Urad Flour or Pottukadalai Flour – 1/2 Cup you may not need all
- Butter – 3 Tbsp
- Ajwain/Omam – 1tsp Replace with Cumin Seeds
- Sesame Seeds- 2tsp Optional
- Salt – As Needed
- Oil – To Deep fry
-
Soak rice for 2 hours, drain and spread over cloth for 20-30 minutes (Pic 1).
-
Powder the rice in batches and sieve it (Pic 2), make sure it has some moisture while grinding.
-
Again powder the coarse rice filtered during this process.
-
Finally you get 4 and 1/4 Cups to 4n1/2 cups of Rice flour.
-
Mix the remaining ingredients to rice flour (pic 3) except water and oil.
-
Now sprinkle little by little water and make soft non sticky dough (Pic 4).
-
Cover the dough till you use.
-
Soak rice for at least 3 hours.
-
Meanwhile dry roast the urad dhal till golden brown and allow to cool completely.
-
Grind the fried dal and sieve it to get fine powder.
-
Grind the rice in grinder with less water and to very smooth consistency, for batter consistency check here.
-
Now add omam, sesame seeds, butter, salt, urad dhal powder to rice batter (Pic 1 below).
-
Reserve few urad flour and if needed add more at last.
-
The quantity of urad flour depends on how thick the rice batter is, so after adding 1/4 Cup add urad dal flour in tbsps.
-
Attain the perfect consistency as shown in picture 2 (above) and when u make shapes it should hold, if it breaks it needs more moisture ie sprinkle water and knead again.
-
Hereafter making of kai murukku is same as mentioned in version 1 for both version I and version II.
-
Spread the same cloth used for draining the rice(the cloth should have mild wetness) and make designs as shown in above video AND pictures.
-
Grease your hands with oil and take a lemon size ball in your hand (Pic 5).
-
Place the lid/round cookie cutter over the cloth and around it spiral the dough without breaking (Pic 6, Version I).
-
It comes by practice if you are not satisfied with the output you can try again.
-
Shape at least 15 and then heat oil to deep fry it (Pic 7, Version I ).
-
When oil is well heated/hot, using flat dosa spatula or chapathi turner or using your hands gently take the shaped murukku one at a time and drop it carefully to the oil pan.
-
It should be cooked in medium flame so add 3-4 one by one (Stepwise Pic 4 below).
-
Just wait and add the next one ie after the first added murukku pops up a bit.
-
Allow to cook well (Pic 4), flip over half way thru.
-
Meanwhile you can make shapes with the rest of the dough.
-
Once the oil bubbles suppress and murukkus turn golden brown remove/drain the excess oil (Pic 5, above) and add the next batch to the hot oil.
Excellent i followed your recipe and got it perfected at my third attempt…. no one in my family believed that i did the same….. thank u for your efforts…this is the first time iam visiting ur blog….
Kai murukku looks perfect
Looks super crispy, beautifully presented! Kai murukku looks very tempting!
really trying to make it but fear of twisting it.nice post sissy.will try sometime
Eppadi Sangee ippadi la, chance a illa…murukku semmaiya erukku…perfect o perfect kai murukku, loving it…beautiful captures too…Kalakitinga 🙂
Beautifully made, crispy and yummy snack.
look so nice.. lovely murukku photos and shape.
beautifully done..really difficult to do this perfectly…