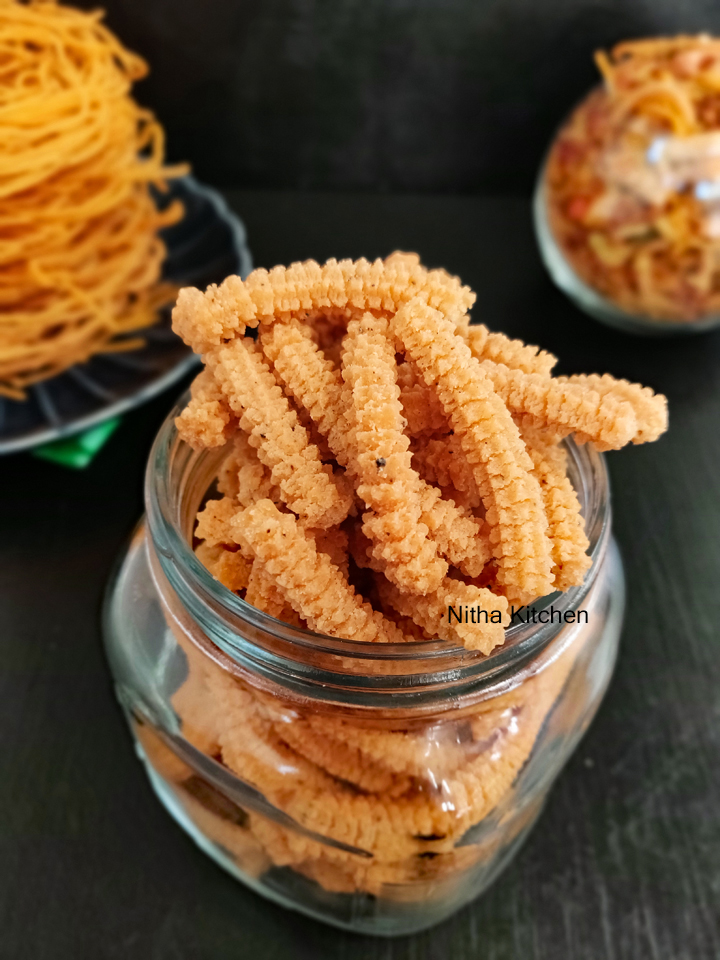
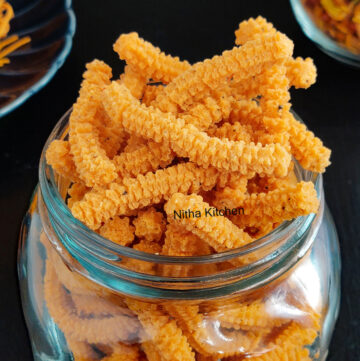
Diwali is incomplete without friends get together and potluck right? We have potlucks on coming weekend and friends are still sharing sweets/savories and even biryani with us. So I am not late in posting this milagu karasev, an authentic savory snack which I never miss to buy
from temples here. I got this recipe from my Chennai neighbor aunty/mammi. Last year I tried by borrowing neighbor’s murukku achu here is US and this time I got my own press. Yup my brother sent the murukku press during recent neighbors trip to chennai. So hereafter I stop buying this snack out. This Kaara sev/pepper pakoda/pakora tastes great and can be prepared in jiffy. The below quantity, you can keep it as a snack for 5 days or share it with 3 families. On the day of diwali I prepared Rasmalai since H is not fond of sweets, I specially made this snack for him :). Now off to the recipe…
What is Karasev?
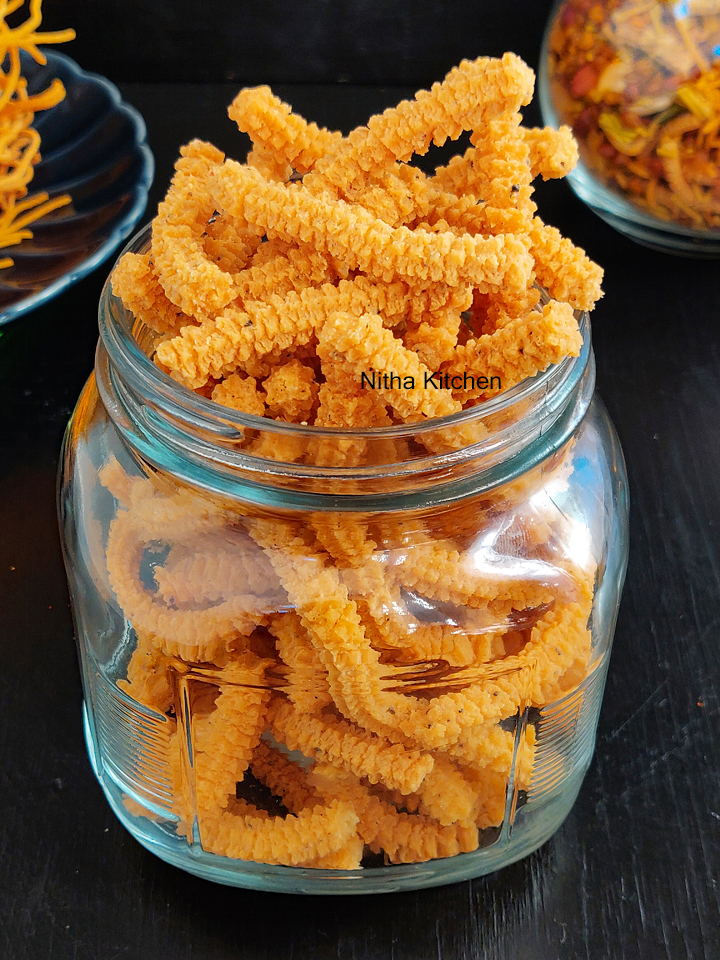
Karasev is basically a crispy snack made using gluten free flours ie Gram flour and rice flour combo. This karasev is flavored with peppercorns, garlic etc. The one flavored with pepper is called Milagu ( In Tamil) Karasev.
Can this be Air Fried?
There is a small change in the recipe between the deep fried and air fryer version. So stick with this recipe to get perfect crispy kara sev by watching the attached video tutorial at the end of this post. Do check the air fried version HERE.
Star Ingredients
- Besan / Gram Flour
- Rice Flour
- Peppercorns
- Butter or Oil
Key Points
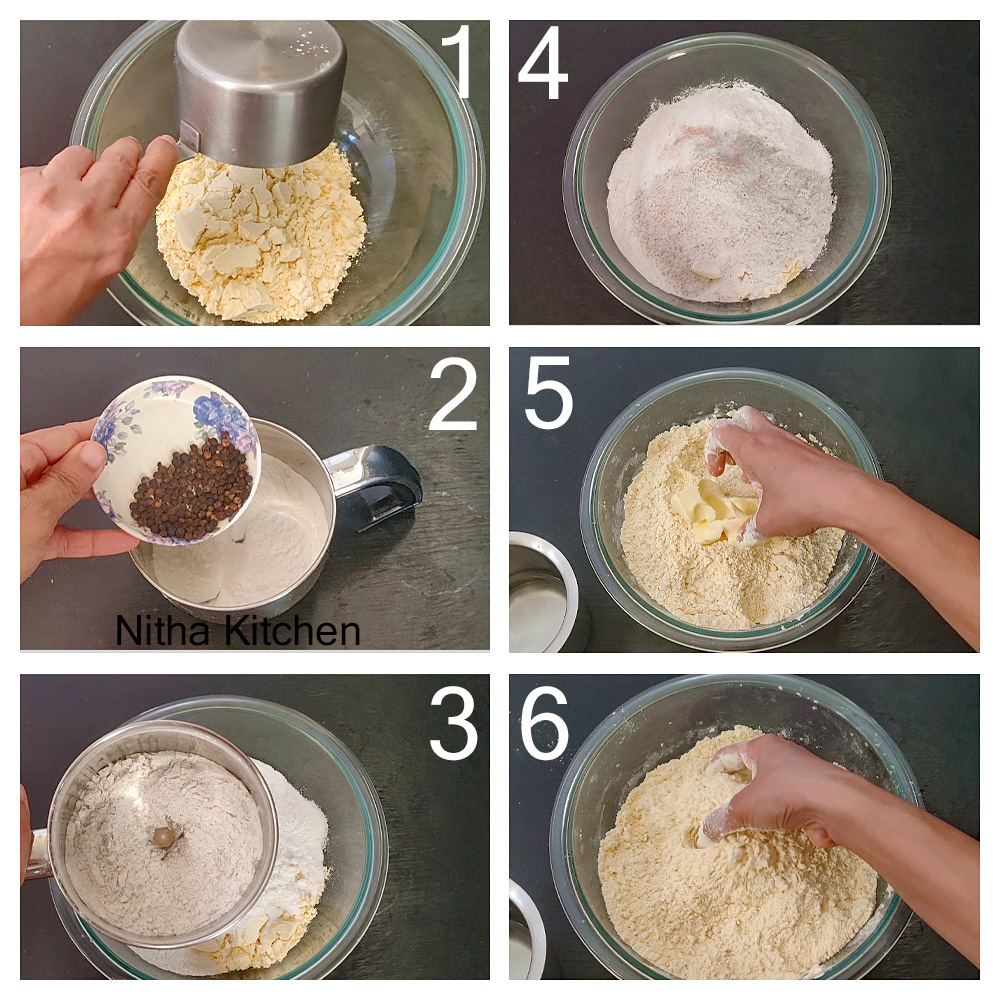
- Sift gram flour.
- Rub butter with flour mixture.
- Do make a stiff dough.
- Check whether oil is hot enough to deep fry.
- Release excess pressure from murukku press before squeezing in hot oil.
- Cook in medium to high flame.
- Do flip often to get even golden color snack.
- Once oil supresses take it out immediately.
Difference in butter and oil
For this recipe if you add oil it gives a very crispy tea time snack. The reason for adding butter instead of oil is because the crispiness should not hurt the mouth while biting. Also flavor and tastewise butter gives nice aroma to the snack.
Why deep fried karasev drinks oil?
The reason is making too moist dough by adding more water. If you make like soft chapati dough it drinks too much oil. If the dough is too tight/stiff then its hard to press/shape using murukku achu. So take these points in account before preparing. Also more besan and more fat drinks oil while deep frying so do stick with the quantity provided in the recipe card.
How to make right consistency dough?
To get right consistency dough, add right portion of water. If you want the amount I am giving a approximate quantity here. Add 2:1 Flour : Water, half quantity of water to one portion of flours you use. For example if rice flour + gram flour in total is 1 cup then 1/2 water is approximate. Do add water in batches and when its a stiff and slight crack based dough do stop adding water.
Variations to this Karasev Recipe
To make this as a vegan snack do replace butter with oil. Instead of pepper you can add red chili powder as well. Do stick with rest of the ingredients.
Milagu Karasev Ingredients
Gram/Besan flour – 2 and 1/2 Cups (for 1 cup use 3/4 cup rice flour)
Instant Rice Flour – 2 Cups
Unsalted Butter – 5 Tbsp (4 Tbsp works for this recipe as well)
Coarsely Crushed Pepper – 1.25 Tbsp
Salt – 2tsp
Water And Oil – As Required
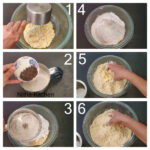
How to Sift Flour
- Sieve gram flour before start making karasev.
- Gram flour looks lumpy and if you sift then its easy to work with.
- Take siever with tiny holes and a parchment paper.
- Add lumpy flour to siever (Pic 1) and sift gently using two hands (Pic 2).
- The unfiltered coarse flour remain on the siever (Pic 3) can be used to make dosa.
- Look at the fine sifted flour in Picture 4.

- Measure required quantity of flour using measuring cup (Pic 5, above).
How to make Karasev Dough
- Grab necessary ingredients to make karasev (Pic 6, above).
- In a mixing bowl add sifted gram flour (Pic 1) and rice flour.
- Add required salt, here I used mix of pink salt and regular salt (Pic 4).
- Add a portion of rice flour and peppercorns to mixie/food processor (Pic 2) and grind pepper to coarse.
- But for kids sake I always grind it to slight fine powder (Pic 3), also you can replace it with store bought pepper powder.
- Add ground pepper with rice flour in to the mixing bowl (Pic 4).
- Mix all dry ingredients well, later mash butter with flour mixture (Pic 5).
- Do rub for a while and incorporate fat in to dry mixture compeltely.
- Once done the mixture looks crumbly (pic 6).
- You can add optional sesame seeds now.
- Now sprinkle water or do add required water in batches(Pic 7).
- Knead to stiff dough , while kneading when you see traces of dry flour do stop adding water(Pic 8).
- If needed sprinkle few drops of water at this time while kneading.
- Too moist dough gives soggy karasev.
- So if dough is gooey adjust with gram flour and rice flour of right proportion.
- Make it the right consistency stiff dough like shown in Picture 9.
- Grease murukku press with oil for smooth handling and assemble it.
- Use big plain round or flower shaped hole as shown below (Picture 10).
- I have made this karasev recently using 3 shapes do refer video tutorial.

- Insert karasev dough in to the murukku press (Pic 11) and release excess pressure (Pic 12).
How to Fry Karasev
- Heat oil in wok/kadai and when its hot do check by adding a piece of dough (Pic 1).
- If it pops out immediately then its hot enough to deep fry.
- Now gently squeeze the first batch of dough from murukku press in circular motion (Pic 2).
- Dont put excess pressure over oil, its the reason for murukku spluttering.
- Also while squeezing don’t overcrowd the pan.
- When halve cooked as shown below (Picture 3), start breaking randomly in to small pieces using the ladle.
- While frying flip it continuosly for even golden brown.
- You can fry without breaking which takes little longer to turn golden brown.
- Fry in medium to high flame, too high flame will change the outer color very soon.

- Wait for oil to suppress and turn golden brown like shown in Picture 4.
- Now take it out using two ladles like shown in Picture 5.
- Drain excess dripping oil over the pan (Picture 6).
- Later drain oil completely by placing over paper towel.
- Let it cool at room temperature.
- Once done store it in an air tight container.
- Crispy karasev stays fresh for a month when handled properly.
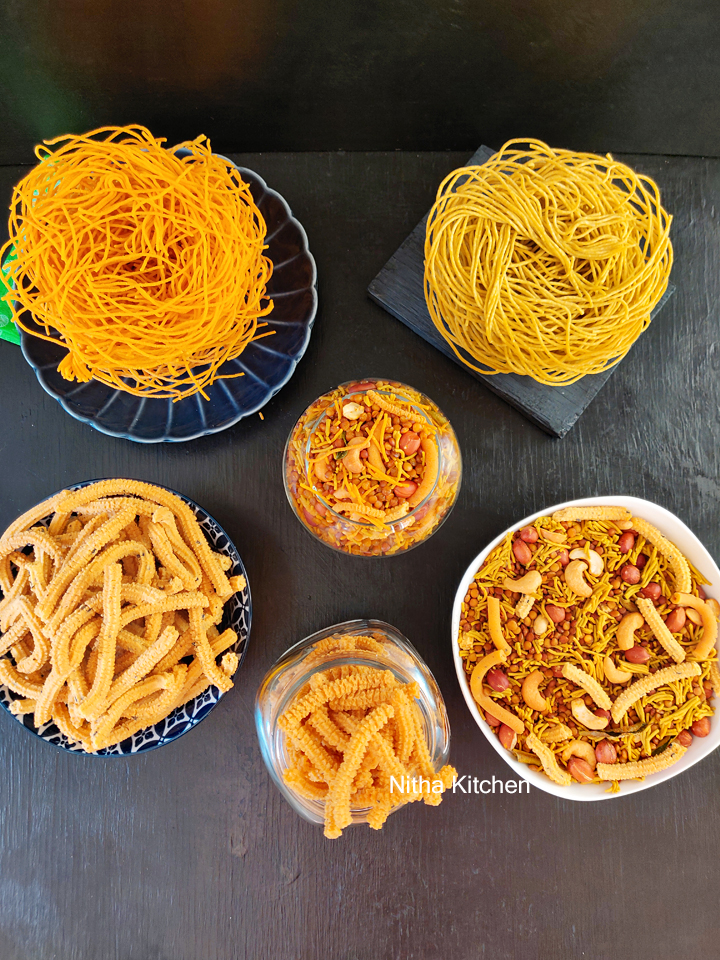
On the frame
- Spicy Omapodi/Plain Sev (starting from left corner)
- Air Fried Pepper Karasev
- Milagu Karasev (this recipe)
- 100% Air Fried Dal Moth Namkeen (recipe soon)
- Mint Bhujia / Pudina Sev
- Dal Moth Namkeen
Milagu Karasev Recipe Card
- Gram/Besan flour – 2 and 1/2 Cups for 1 cup use 3/4 cup rice flour
- Instant Rice Flour – 2 Cups
- Unsalted Butter – 5 Tbsp 4 Tbsp works for this recipe as well
- Coarsely Crushed Pepper – 1.25 Tbsp
- Salt – 2tsp
- Water And Oil – As Required
-
Sieve gram flour before start making karasev.
-
Gram flour looks lumpy and if you sift then its easy to work with.
-
Take siever with tiny holes and a parchment paper.

-
Add lumpy flour to siever (Pic 1) and sift gently using two hands (Pic 2).
-
The unfiltered coarse flour remain on the siever (Pic 3) can be used to make dosa.
-
Look at the fine sifted flour in Picture 4.
-
Measure required quantity of flour using measuring cup (Pic 5, above).
-
Grab necessary ingredients to make karasev (Pic 6, above).
-
In a mixing bowl add sifted gram flour (Pic 1) and rice flour.
-
Add required salt, here I used mix of pink salt and regular salt (Pic 4).
-
Add a portion of rice flour and peppercorns to mixie/food processor (Pic 2) and grind pepper to coarse.
-
But for kids sake I always grind it to slight fine powder (Pic 3), also you can replace it with store bought pepper powder.
-
Add ground pepper with rice flour in to the mixing bowl (Pic 4).
-
Mix all dry ingredients well, later mash butter with flour mixture (Pic 5).
-
Do rub for a while and incorporate fat in to dry mixture compeltely.
-
Once done the mixture looks crumbly (pic 6).
-
You can add optional sesame seeds now.
-
Now sprinkle water or do add required water in batches(Pic 7).
-
Knead to stiff dough , while kneading when you see traces of dry flour do stop adding water(Pic 8).
-
If needed sprinkle few drops of water at this time while kneading.

-
Too moist dough gives soggy karasev.
-
So if dough is gooey adjust with gram flour and rice flour of right proportion.
-
Make it the right consistency stiff dough like shown in Picture 9.
-
Grease murukku press with oil for smooth handling and assemble it.
-
Use big plain round or flower shaped hole as shown below (Picture 10).
-
I have made this karasev recently using 3 shapes do refer video tutorial.
-
Insert karasev dough in to the murukku press (Pic 11) and release excess pressure (Pic 12).
-
Heat oil in wok/kadai and when its hot do check by adding a piece of dough (Pic 1).
-
If it pops out immediately then its hot enough to deep fry.
-
Now gently squeeze the first batch of dough from murukku press in circular motion (Pic 2).
-
Dont put excess pressure over oil, its the reason for murukku spluttering.

-
Also while squeezing don’t overcrowd the pan.
-
When halve cooked as shown below (Picture 3), start breaking randomly in to small pieces using the ladle.
-
While frying flip it continuosly for even golden brown.
-
You can fry without breaking which takes little longer to turn golden brown.
-
Fry in medium to high flame, too high flame will change the outer color very soon.
-
Wait for oil to suppress and turn golden brown like shown in Picture 4.
-
Now take it out using two ladles like shown in Picture 5.
-
Drain excess dripping oil over the pan (Picture 6).
-
Later drain oil completely by placing over paper towel.
-
Let it cool at room temperature.
-
Once done store it in an air tight container.
-
Crispy karasev stays fresh for a month when handled properly.
Love this crispy crunchy snack.. Also love the last picture..
Oh my..it looks absolutely yummy.
Lovely yummy preparation…
nice clicks..
Belated diwali wishes to you and your family. Crunchy kaara sev looks prefect and feel like munching some.
Tempting traditional Sev…. Neatly presented…
http://recipe-excavator.blogspot.com
Very nicely made…looks tempting
I love the Happy Diwali decoration.. nice recipe!