
Boondi Mixture : As Pongal is approaching thought of sharing some traditional snacks from South India…I bought the special mixture/boondi ladle during my last trip to India and almost after 8 months just started making boondi in it. My H and nowadays my daughter both love this typical mixture so my mom make in bulk and parcel me whenever we go. I am bit tensed to prepare alone and somehow succeeded with my first attempt 🙂 and here after will make it again and again for tea time snack. Also she loves to have this with yogurt rice like boondi raita. I also shared few tips my mom and chithi told when I interacted them through phone calls…Old post updated with new pictures and complete video tutorial, and in the video I have tripled the ingredients mentioned below…

Main Ingredients
Gram Flour/Kadala Maavu/Besan Flour – 2 Cups
Rice Flour – 3 Tbsp
Water – 1 and 1/4 Cup (Plus 1-2 Tbsp if needed)
Red Chili Powder – 2tsp (Plus more if needed)
Baking Soda – 1/8tsp (Pinch)
Salt and Oil – As Needed
Fry Separately and add it to the boondi at last
Raw Peanuts – 1/4 Cup
Roasted Gram/Split Dalia/Pottu Kadalai – 1/4 Cup
Aval/Rice flakes – 1/4 Cup
Garlic – Few Cloves
Curry Leaves – Wash and Drained Few
Other Fried Ingredients
Sev/Omapodi
Milagu Kaara Sev
Thattai
Ola/Ottu/Ribbon Pakoda
Thenkuzhal Murukku/Quinoa Murukku/Pottu kadalai Murukku
Method
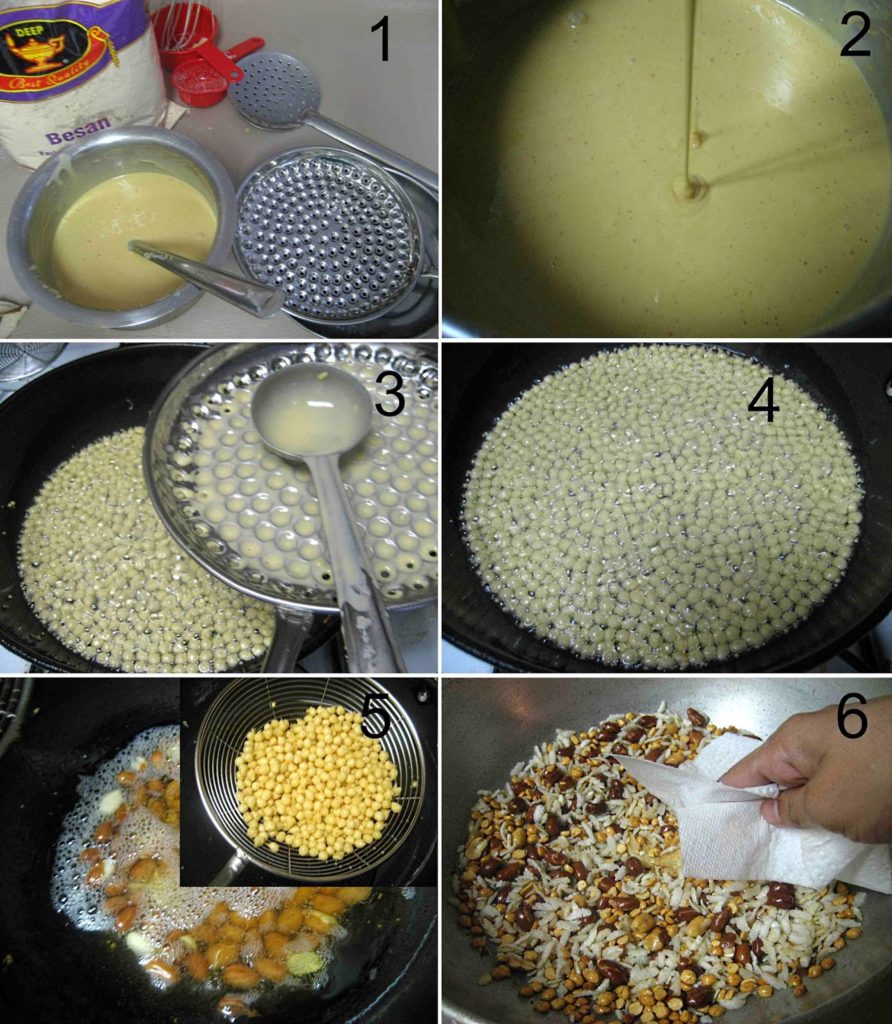
- Picture 1 below shows the ladle I used to make this boondhi .
- Mix 1 and ¼ cups of water to the flour, add salt and red chili powder, leave it aside for 5 mins (by this time it may have few lumps, nothing to worry).
- Meanwhile heat enough oil in the pan/kadai.
- Later mix the batter well with soda and make lump free and check the consistency as shown in picture 2.
- When you drop a spoonful of batter, it forms a mark and then slowly disappears/merges with remaining batter.
- Also the oil should be very hot and check it by adding a drop of batter, it should pop up immediately.
- Try to keep the hole/boondi ladle as high as possible over hot oil and add the batter, just tap the batter with the spatula you use.
- It should flow when you tap it, check tips section for more useful information.
- Don’t over load the pan, for this Kaara boondi, the boondi should cook well, turn crisp and wait for the color to change light brown.
- Drain the excess oil using paper towel.
- Before starting the next batch wipe the front and back with damp cloth and repeat the above process till done with all gram flour batter.
How to fry other ingredients
- Add ground peanuts in the same hot oil, but keep in low flame and when it cooked well it cracks/breaks in to two, so that’s the indication to remove from the oil.
- Now add pottukadalai/roasted gram and cook till it turns light golden brown.
- For Aval/Rice Flakes, heat the oil to high and add it in low quantity as they doubles in size when cooked, immediately you can remove from oil.
- Add the garlic with skin and cook in low flame as cloves are big in size and allow to turn crisp n golden brown.
- Finally add dried curry leaves (without any drops of water) and cook till it turns crisp.
- Rub all these ingredients with paper towel and remove the excess oil, as these ingredients drink more oil.
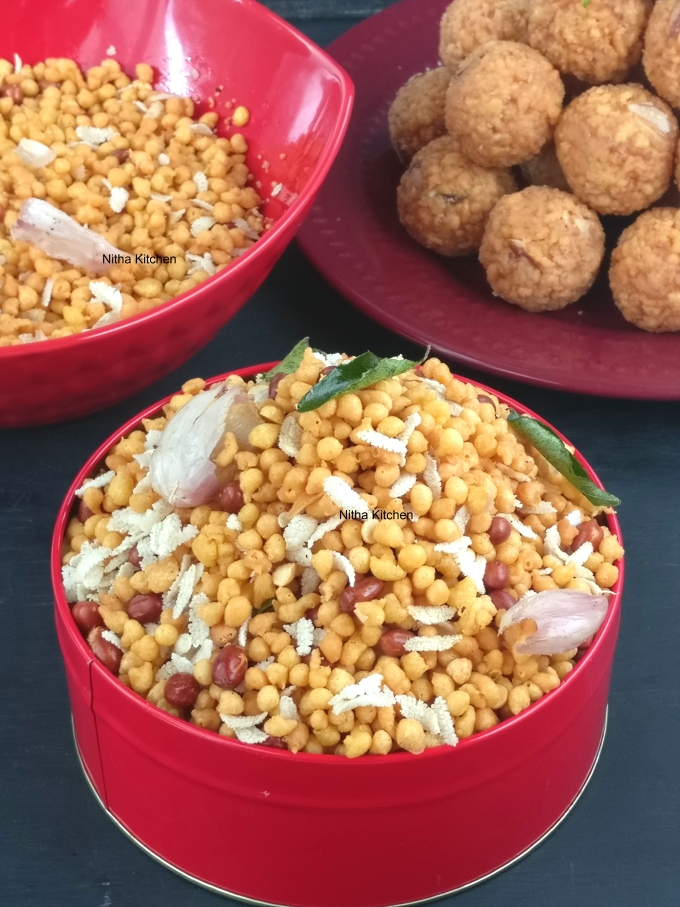
- If you haveany other fried items like thattai,sev/omapodi,muruku break n mix all these along with already fried boondi and other stuffs.
- Now if needed you can sprinkle more red chili powder and salt.
- Just serve with cup of cofee or tea as snack 🙂
Tips to make perfect round boondis and reason for flat, tail boondis
- The batter should neither be too runny nor too thick.
- If it is too runny then it drinks more oil, if it is too thick then you get some flat boondis, so for the last batch of gram flour batter sprinkle few drops of water and proceed.
- Hold the ladle as high as possible, also the oil should be very hot.
- Clean the ladle each time and you should see the round hole without any dried batter sticked to it.
- The tail is due to keeping the ladle close to oil and not wiping the ladle properly.
- My mom never add rice flour or baking soda but i am not sure with the flour i am getting here is same like that so for crispiness i added a bit.
Complete Video Tutorial
Recipe Card
- Gram Flour/Kadala Maavu/Besan Flour - 2 Cups
- Rice Flour - 3 Tbsp
- Water - 1 and 1/4 Cup Plus 1-2 Tbsp if needed
- Red Chili Powder - 2tsp Plus more if needed
- Baking Soda - 1/8tsp Pinch
- Salt and Oil - As Needed
- Raw Peanuts - 1/4 Cup
- Roasted Gram/Split Dalia/Pottu Kadalai - 1/4 Cup
- Aval/Rice flakes - 1/4 Cup
- Garlic - Few Cloves
- Curry Leaves - Wash and Drained Few
- Sev/Omapodi
- Milagu Kaara Sev
- Thattai
- Ola/Ottu/Ribbon Pakoda
- Thenkuzhal Murukku/Quinoa Murukku/Pottu kadalai Murukku
-
Picture 1 below shows the ladle I used to make this boondhi .
-
Mix 1 n ¼ cups of water to the flour, add salt and red chili powder, leave it aside for 5 mins (by this time it may have few lumps, nothing to worry).
-
Meanwhile heat enough oil in the pan/kadai.
-
Later mix the batter well with soda and make lump free and check the consistency as shown in picture 2.
-
When you drop a spoonful of batter, it forms a mark and then slowly disappears/merges with remaining batter.
-
Also the oil should be very hot and check it by adding a drop of batter, it should pop up immediately.
-
Try to keep the hole/boondi ladle as high as possible over hot oil and add the batter, just tap the batter with the spatula you use.
-
It should flow when you tap it, check tips section for more useful information.
-
Don’t over load the pan, for this Kaara boondi, the boondi should cook well, turn crisp and wait for the color to change light brown.
-
Drain the excess oil using paper towel.
-
Before starting the next batch wipe the front and back with damp cloth and repeat the above process till done with all gram flour batter.
-
How to fry other ingredients
-
Add ground peanuts in the same hot oil, but keep in low flame and when it cooked well it cracks/breaks in to two, so that’s the indication.
-
Now add pottukadalai/roasted gram and cook till it turns light golden brown.
-
For Aval/Rice Flakes, heat the oil to high and add it in low quantity as they doubles in size when cooked, immediately you can remove from oil.
-
Add the garlic with skin and cook in low flame as cloves are big in size and allow to turn crisp n golden brown.
-
Finally add dried curry leaves (without any drops of water) and cook till it turns crisp.
-
Rub all these ingredients with paper towel and remove the excess oil, as these ingredients drink more oil.
-
If you haveany other fried items like thattai,sev/omapodi,muruku break n mix all these along with already fried boondi and other stuffs.
-
Now if needed you can sprinkle more red chili powder and salt.
-
Just serve with cup of cofee or tea as snack 🙂
- The batter should neither too runny nor too thick.
- If it is too runny then it drinks more oil, if it is too thick then you get some flat boondis, so for the last batch of gram flour batter sprinkle few drops of water and proceed.
- Hold the ladle as high as possible, also the oil should be very hot.
- Clean the ladle each time and you should see the round hole without any dried batter sticked to it.
- The tail is due to keeping the ladle close to oil and not wiping the ladle properly.
- My mom never add rice flour or baking soda but i am not sure with the flour i am getting here is same like that so for crispiness i added a bit.
PWInstitute is a top rated piping design institute in Vadodara. We are a team of professionals to help you related to your subject and job. To know more about piping design course in India.
I see something like that first time. It looks so cool. I wanto to have something like that!
Looks perfect boondhi..love. The cute bucket.
Looks absolutely delicious, yummy crispy snack.
I love coming to ur space u have all apt utensils to make the dish.Love the boondi ladle.Mixture looks yummm.
super crispy boondy recipy..thanks alot.
Lovely pictures,looks yum
super crispy mixture… love it to have with rasam rice..
very delicious crunchy munchy kaara boondhi, love your clicks..
wow..this luks jsut like store brought ones..and mow i know…how boondhi is made !! thanks for sharing the image of the laddle..
Latest on Quick Picks – Fat free Apple Banana Paniyarams
Looks so delicious…
perfectly made. As such resembles that are store bought. You are really talented to make this one perfect.
Wow super sangeetha . tempting me
my all time fav…
Colorful background akka.my fav snack to munch on everyday
This is one of my favorite snack da.. Looks fabulous and colorful. Love the presentation.. 🙂